Toyota RAV4 (XA40) 2013-2018 Owners Manual: Inside rear view mirror
The rear view mirror’s position can be adjusted to enable sufficient confirmation of the rear view.
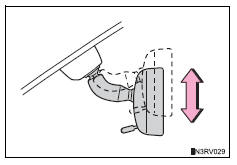
Adjusting the height of rear view mirror
The height of the rear view mirror can be adjusted to suit your driving posture.
Adjust the height of the rear view
mirror by moving it up and down.
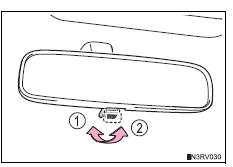
Anti-glare function
- Manual anti-glare inside rear view mirror
Reflected light from the headlights of vehicles behind can be reduced by operating the lever.
- Normal position
- Anti-glare position
- Auto anti-glare inside rear view mirror
Responding to the level of brightness of the headlights of vehicles behind, the reflected light is automatically reduced.
Changing automatic anti-glare function mode
On/off
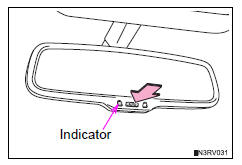
When the automatic anti-glare function is in on mode, the indicator illuminates.
Vehicles without a smart key system: the function will set to on mode each time the engine switch is turned to the “on” position.
Pressing the button turns the function to off mode. (The indicator also turns off.) Vehicles with a smart key system: the function will set to on mode each time the engine switch is turned to ignition on mode.
Pressing the button turns the function to off mode. (The indicator also turns off.)
To prevent sensor error (vehicles with an auto anti-glare inside rear view mirror)
To ensure that the sensors operate properly, do not touch or cover them.
Caution
Do not adjust the position of the mirror while driving.
Doing so may lead to mishandling of the vehicle and cause an accident, resulting in death or serious injury.
 Steering wheel
Adjustment procedure
The steering wheel can be adjusted to a comfortable position.
Hold the steering wheel and
press the lever down.
Adjust to the ideal position by
moving the steering w ...

Other materials:
Check mode procedure
Panel diagnosis (indicator check)
Turn the ignition switch to lock.
Turn the ignition switch on while simultaneously
pressing the a/c control auto switch and the rec/
frs switch.
Check that all indicators and the display area are
turned on and off 4 times in succession at 1 second ...
How to proceed with troubleshooting
Hint:
Use the following procedures to troubleshoot the occupant
classification system.
*: Use the intelligent tester.
Vehicle brought to workshop
Passenger airbag on/off indicator check
Dtc check (present and past dtc)*
Check for dtcs (see page rs-249 ).
Result ...
Transmitter id
Description
The tire pressure warning valve and transmitter that is installed in the
tires and wheels measures the air
pressure of the tires. The measured values are transmitted to the tire pressure
warning receiver on the
body as radio waves and then sent to the tire pressure warning ecu ...
