Toyota RAV4 (XA40) 2013-2018 Owners Manual: Listening to an ipod
Connecting an ipod enables you to enjoy music from the vehicle speakers.
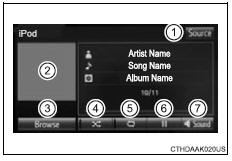
Select ÔÇťipodÔÇŁ on the audio source selection screen.
When the ipod connected to the system includes ipod video, the system can only output the sound by selecting the browse screen.
Connecting an ipod
Audio control screen
Pressing the ÔÇťaudioÔÇŁ button displays the audio control screen from any screens of the selected source.
- Audio source selection screen appears
- Displays cover art
- Selecting the play mode
- Shuffle play
- Repeat play
- Pause
Select  to resume playback
- Setting the sound
Selecting a play mode
- Select ÔÇťbrowseÔÇŁ on the screen.
- Select the desired play mode by selecting the ÔÇťplaylistsÔÇŁ, ÔÇťartistsÔÇŁ, ÔÇťalbumsÔÇŁ, ÔÇťsongsÔÇŁ, ÔÇťpodcastsÔÇŁ, ÔÇťaudio booksÔÇŁ, ÔÇťgenresÔÇŁ, ÔÇťcomposersÔÇŁ or ÔÇťvideosÔÇŁ tab. Then select a song to begin using the selected play mode.
Shuffle play
Select  to change on/off.
Repeat play
Select  to change on/off.
About ipod
 ÔÇťMade for ipodÔÇŁ and ÔÇťmade for
iphoneÔÇŁ mean that an electronic accessory has been designed to connect specifically to ipod or iphone, respectively, and has been certified by the developer to meet apple performance standards.- Apple is not responsible for the operation of this device or its compliance with safety and regulatory standards. Please note that the use of this accessory with ipod or iphone may affect wireless performance.
- Iphone, ipod, ipod classic, ipod nano, and ipod touch are trademarks of apple inc., Registered in the u.S. And other countries. Lightning is a trademark of apple inc.
Ipod cover art
- Depending on the ipod and songs in the ipod, ipod cover art may be displayed.
- This function can be changed to on/off.
- It may take time to display ipod cover art, and the ipod may not be operated while the cover art display is in process.
- Only ipod cover art that is saved in jpeg format can be displayed.
Ipod functions
- When an ipod is connected and the audio source is changed to ipod mode, the ipod will resume play from the same point in which it was last used.
- Depending on the ipod that is connected to the system, certain functions may not be available. If a function is unavailable due to a malfunction (as opposed to a system specification), disconnecting the device and reconnecting it may resolve the problem.
- While connected to the system, the ipod cannot be operated with its own controls. It is necessary to use the controls of the vehicleÔÇÖs audio system instead.
- When the battery level of an ipod is very low, the ipod may not operate. If so, charge the ipod before use.
- Compatible models
Ipod problems
To resolve most problems encountered when using your ipod, disconnect your ipod from the vehicle ipod connection and reset it. For instructions on how to reset your ipod, refer to your ipod ownerÔÇÖs manual.
Error messages
If the following error messages appear on the screen, refer to the table and take the appropriate measures. If the problem is not rectified, take the vehicle to your toyota dealer.
| Message | Cause/correction procedures |
| ÔÇťConnection error. Please consult your ownerÔÇÖs manual for instructions on how to connect the ipod.ÔÇŁ | This indicates a problem in the ipod or its connection. |
| ÔÇťNo music files found.ÔÇŁ | This indicates that there is no music data in the ipod. |
| ÔÇťNo videos found.ÔÇŁ | This indicates that no video files are included in the ipod. |
| ÔÇťPlease check the ipod firmware version.ÔÇŁ | This indicates that the software version is not
compatible.
Please check the compatible models. |
| ÔÇťIpod authorization unsuccessful.ÔÇŁ | This indicates that the audio system failed to
Authorize the ipod.
Please check your ipod. |
Compatible models
The following ipod®, ipod nano®, ipod classic®, ipod touch® and iphone® devices can be used with this system.
Made for
- Ipod touch (5th generation)
- Ipod touch (4th generation)
- Ipod touch (3rd generation)
- Ipod touch (2nd generation)
- Ipod touch (1st generation)
- Ipod classic
- Ipod with video
- Ipod nano (7th generation)
- Ipod nano (6th generation)
- Ipod nano (5th generation)
- Ipod nano (4th generation)
- Ipod nano (3rd generation)
- Ipod nano (2nd generation)
- Ipod nano (1st generation)
- Iphone 5
- Iphone 4s
- Iphone 4
- Iphone 3gs
- Iphone 3g
- Iphone
Depending on differences between models or software versions etc., Some models might be incompatible with this system.
Caution
While driving
Do not connect an ipod or operate the controls.
Notice
To prevent damage to the ipod or its terminals
- Do not leave the ipod in the vehicle. The temperature inside the vehicle may become high.
- Do not push down on or apply unnecessary pressure to the ipod while it is connected
- Do not insert foreign objects into the port.
 Cd player operation
Insert disc or select ÔÇťcdÔÇŁ on the audio source selection screen
with a disc inserted to begin listening to a cd.
Audio control screen
Pressing the ÔÇťaudioÔÇŁ button displays the audio control ...
 Listening to a usb
memory device
Listening to a usb
memory device
Connecting a usb memory device enables you to enjoy music
from the vehicle speakers.
Touch ÔÇťusbÔÇŁ on the audio source selection screen.
Connecting a usb memory device
Audio control screen
Pr ...
Other materials:
Solenoid circuit
Description
This solenoid is turned on in accordance with signals from the skid control
ecu and controls the pressure
on the wheel cylinders to control the braking force.
The solenoid and solenoid relay are built into the abs and traction actuator.
Hint:
Dtcs c0226/21, c0236/22, c02 ...
Shift solenoid "d" control circuit
Description
Shifting from 1st to o/d is performed in combination with the on and off
operation of the shift solenoid
valves sl1 and sl2, which are controlled by the ecm. If an open or short circuit
occurs in any of the shift
solenoid valves, the ecm controls the remaining normal shift sol ...
Manual air conditioning system
Air conditioning controls
Fan speed control switch
Temperature control switch
On/off switch
Windshield defogger switch
Rear window and outside rear view mirror defoggers* switch
Airflow mode control switch
Outside/recirculated air mode switch
"A/C" switch
"MAX A/C" switch
*: If equipped
...
