Toyota RAV4 (XA40) 2013-2018 Service Manual: Rear airbag sensor
Components
On-vehicle inspection
- Check rear airbag sensor (vehicle not involved in collision)
- Perform a diagnostic system check (see page rs- 49).
- Check rear airbag sensor (vehicle involved in collision and airbag has not deployed)
- Perform a diagnostic system check (see page rs- 49).
- When the quarter panel of the vehicle or its periphery is damaged, check if there is any damage to the rear airbag sensor. If there are any defects as mentioned below, replace the rear airbag sensor with a new one:
- Cracks, dents or chips on the sensor housing.
- Cracks or other damage to the connector.
- Peeling off of the label or damage to the serial number.
Caution:
For removal and installation procedures of the rear airbag sensor, be sure to following the correct procedure.
- For removal and installation procedures of the rear airbag sensor, be sure to following the correct procedure.
- Replace the rear airbag sensor.
Caution:
- For removal and installation procedures of the rear airbag sensor, be sure to follow the correct procedure.
- If the airbags have deployed, replace the side airbag sensor on the side in which the collision occurred. Replace both if necessary.
Removal
Hint:
- Use the same procedures for the rh side and lh side.
- The procedures listed below are for the lh side.
Caution:
Be sure to read the precautionary notices concerning the srs airbag system before servicing it (see page rs-1).
- Disconnect cable from negative battery terminal
Caution:
Wait at least 90 seconds after disconnecting the cable from the negative (-) battery terminal to prevent airbag and seat belt pretensioner activation.
- Remove rear door scuff plate lh (see page ir-26)
- Remove rear door opening trim weatherstrip lh
- Remove package tray trim pocket subassembly (w/o rear no. 2 Seat)
- Remove tonneau cover assembly (w/o rear no. 2 Seat)
- Remove rear floor no. 1 Board (w/o rear no.
2 Seat)
- Remove deck board assembly (w/o rear no. 2 Seat)
- Remove no. 2 Seat hinge cover lh (w/ rear no.
2 Seat) (see page se-109)
- Remove no. 2 Seat hinge cover rh (w/ rear no.
2 Seat) (see page ir-30)
- Remove no. 2 Seat leg cover lh (w/ rear no. 2 Seat) (see page se-109)
- Remove no. 2 Seat leg cover rh (w/ rear no. 2 Seat) (see page ir-30)
- Remove rear no. 2 Seat assembly lh (w/ rear no. 2 Seat) (see page se-110)
- Remove rear no. 2 Seat assembly rh (w/ rear no. 2 Seat) (see page se-110)
- Remove rear floor no. 2 Board
- Remove rear floor no. 3 Board
- Remove rear no. 1 Floor mat support side plate (see page ir-31)
- Remove back door weatherstrip
- Remove rear floor finish plate
- Remove rear deck trim cover (w/ rear no. 2 Seat)
- Remove reclining remote control lever bezel lh (w/o rear no. 2 Seat)
- Disconnect rear no. 1 Seat outer belt assembly lh (see page sb-48)
- Disconnect rear no. 2 Seat outer belt assembly lh (w/ rear no. 2 Seat) (see page sb-48)
- Remove deck trim side panel assembly lh (w/o rear no. 2 Seat) (see page ir-32)
- Remove deck trim side panel assembly lh (w/ rear no. 2 Seat) (see page ir-32)
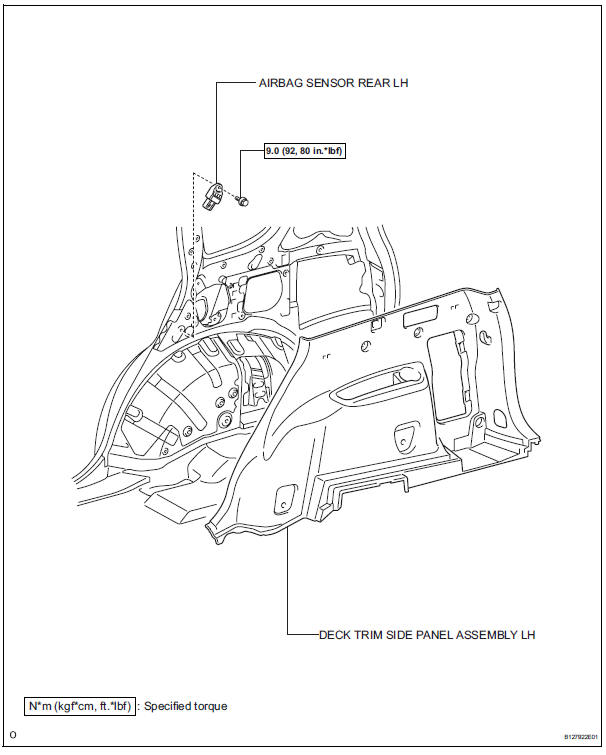
- Remove airbag sensor rear lh
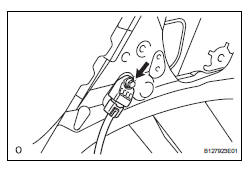
- Disconnect the connector.
- Remove the bolt and airbag sensor.
Installation
Hint:
- Use the same procedures for the rh side and lh side.
- The procedures listed below are for the lh side.
Caution:
Be sure to read the precautionary notices concerning the srs airbag system before servicing it (see page rs-1).
- Install airbag sensor rear lh
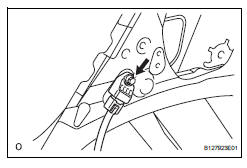
- Install the airbag sensor with the bolt.
Torque: 9.0 N*m (92 kgf*cm, 80 in.*Lbf)
Notice:
- If the airbag sensor has been dropped, or there are any cracks, dents or other defects in the case, bracket or connector, replace it with a new one.
- When installing the airbag sensor, be careful that the srs wiring does not interfere with other parts and that it is not pinched between other parts.
- Install deck trim side panel assembly lh (w/ rear no. 2 Seat) (see page ir-53)
- Install deck trim side panel assembly lh (w/ o rear no. 2 Seat) (see page ir-52)
- Connect rear no. 2 Seat outer belt assembly lh (w/ rear no. 2 Seat)
- Connect rear no. 1 Seat outer belt assembly lh (see page sb-51)
- Install reclining remote control lever bezel lh (w/o rear no. 2 Seat)
- Install rear floor finish plate (see page ir- 55)
- Install rear no. 1 Floor mat support side plate (see page ir-55)
- Install rear floor no. 3 Board
- Install rear floor no. 2 Board
- Install rear no. 2 Seat assembly lh (w/ rear no. 2 Seat) (see page se-121)
- Install rear no. 2 Seat assembly rh (w/ rear no. 2 Seat) (see page ir-55)
- Install no. 2 Seat leg cover lh (w/ rear no. 2 Seat) (see page se-123)
- Install no. 2 Seat leg cover rh (w/ rear no. 2 Seat) (see page ir-56)
- Install no. 2 Seat hinge cover lh (w/ rear no.
2 Seat) (see page se-123)
- Install no. 2 Seat hinge cover rh (w/ rear no.
2 Seat) (see page ir-56)
- Install deck board assembly (w/o rear no. 2 Seat)
- Install rear floor no. 1 Board (w/o rear no.
2 Seat)
- Install tonneau cover assembly (w/o rear no. 2 Seat)
- Remove package tray trim pocket subassembly (w/o rear no. 2 Seat)
- Install rear door opening trim weatherstrip lh
- Install rear door scuff plate lh (see page ir-57)
- Connect cable to negative battery terminal
- Check srs warning light
- Check the srs warning light (see page rs-34).
 Side airbag sensor
Components
On-vehicle inspection
Check side airbag sensor (vehicle not
involved in collision)
Perform a diagnostic system check (see page rs-
49).
Check side airbag sensor (ve ...
 Seat position sensor
Components
On-vehicle inspection
Check seat position sensor (vehicle not
involved in collision)
Perform a diagnostic system check (see page rs-
49).
Check seat position sensor ...
Other materials:
If the engine
will not start
If the engine will not start even though correct starting procedures
are being followed („_p. 197, 200), Consider each of the following
points:
The engine will not start even though the starter motor operates
normally.
One of the following may be the cause of the problem:
There may not be ...
Front power seat control system
Parts location
System diagram
Problem symptoms table
Hint:
Use the table below to help determine the cause of the
problem symptom. The potential causes of the symptoms are
listed in order of probability in the "suspected area" column
of the table. Check each symptom by check ...
Center airbag sensor assembly malfunction
Description
The center airbag sensor consists of the airbag sensor, the safing sensor,
the drive circuit, the diagnosis
circuit and the ignition control.
If the center airbag sensor receives signals from the airbag sensor, it
determines whether or not the srs
should be activated.
Dt ...
