Toyota RAV4 Service Manual: Washer motor
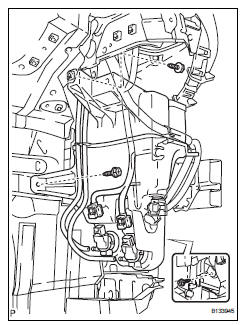
Components
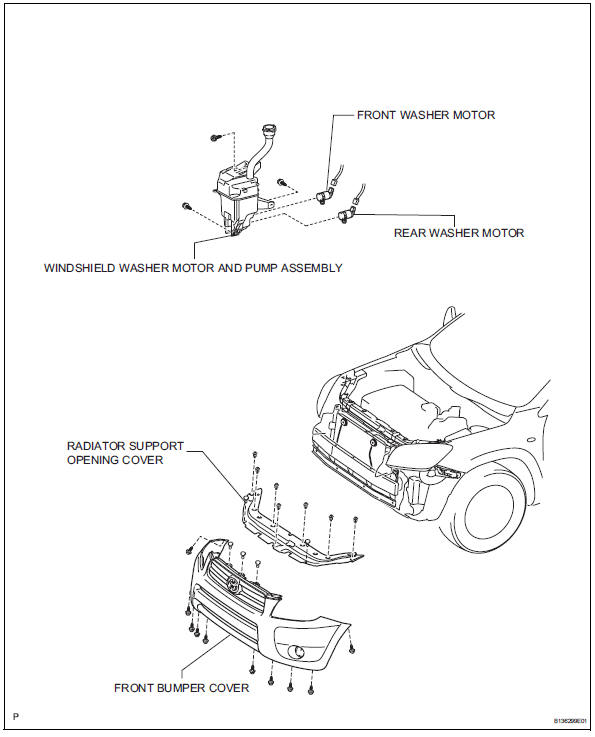
Removal
- Disconnect cable from negative battery terminal
Caution:
Wait at least 90 seconds after disconnecting the cable from the negative (-) battery terminal to prevent airbag and seat belt pretensioner activation.
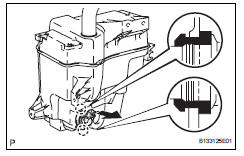
- Remove washer inlet sub-assembly
- Remove the clip.
- Pull the washer inlet of the washer jar and pump upward. Then remove it from the windshield washer jar and pump.
- Remove front fender liner lh (see page et-4)
- Remove front fender liner rh (see page et-4)
- Remove radiator support opening cover (see page et-4)
- Remove front bumper cover (see page et-5)
- Drain washer fluid
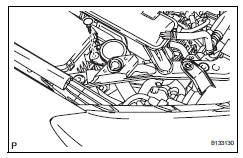
- Remove the washer hoses from the windshield washer motor and pump assembly, and drain the washer fluid into a container.
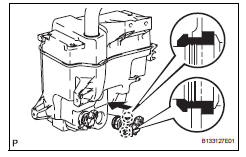
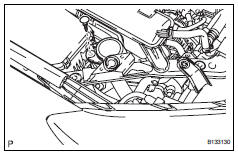
- Remove windshield washer jar assembly

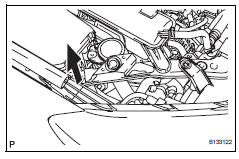
- Disconnect the connectors
- Remove the 3 bolts. Then remove the washer jar and pump.
- Remove windshield washer motor and pump assembly
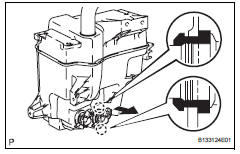
- Pull out the washer motor and pump from the packing of the washer jar.
- Remove rear washer motor and pump assembly
- Pull out the washer motor and pump from the packing of the washer jar.
Inspection
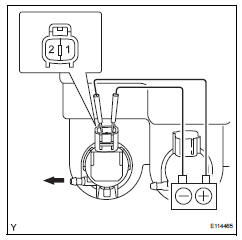
- Inspect windshield washer motor and pump assembly
Hint:
This check should be performed with the windshield washer motor and pump installed to the washer jar.
- Fill the washer jar with washer fluid.
- Connect the battery's positive (+) lead to terminal 1 of the washer motor and pump, and the negative (-) lead to terminal 2.
- Check that washer fluid flows from the washer jar.
Ok: washer fluid flows from the washer jar.
If the result is not as specified, replace the washer motor and pump assembly.
- Inspect rear washer motor and pump assembly
- Fill the washer jar with washer fluid.
- Connect the battery's positive (+) lead to terminal 1 of the washer motor and pump, and the negative (-) lead to terminal 2.
- Check that washer fluid flows from the washer jar.
Ok: washer fluid flows from the washer jar.
If the result is not as specified, replace the washer motor and pump assembly.
Installation
- Install rear washer motor and pump assembly

- Install the windshield washer motor and pump to the packing of the washer jar.
- Install windshield washer motor and pump assembly
- Install the windshield washer motor and pump to the packing of the washer jar.
- Install windshield washer jar assembly
- Install the windshield washer jar and pump with the 3 bolts.
- Connect the connectors.
- Fill up washer jar and pump assembly with washer fluid
- Connect the washer hoses to the washer motor and pump, and fill the washer jar with washer fluid.
- Install front bumper cover (see page et-11)
- Install radiator support opening cover (see page et-12)
- Install front fender liner lh (see page et- 12)
- Install front fender liner rh (see page et- 12)
- Install washer inlet sub-assembly

- Install the washer inlet of the washer jar and pump to the windshield washer jar and pump.
- Install the washer inlet of the washer jar and pump with the clip.
- Connect cable to negative battery terminal
 Wiper switch
Precaution
Precaution for vehicle with srs
Some procedures in this section may affect the
supplemental restraint system (srs). Prior to
performing the procedures, read the srs section's
...

Other materials:
How to proceed with troubleshooting (2005/11-2006/01)
Hint:
Use these procedures to troubleshoot the air conditioning
system.
*: Use the intelligent tester.
Vehicle brought to workshop
Customer problem analysis and symptom check
Inspect battery voltage
Standard voltage:
11 to 14 v
If the voltage is below 11 v, recha ...
Test mode procedure
Test mode check
Hint:
When entering the test mode, the tire pressure
warning ecu sets all the test dtcs first. After
completing the test mode for each inspection item, the
dtcs that are determined normal by the tire pressure
warning ecu will be erased.
The dtcs for other inspec ...
Ig power supply voltage malfunction
Description
The power steering ecu distinguishes the ignition switch status as on or off
through the ig power
source circuit.
Wiring diagram
Inspection procedure
Read value of intelligent tester (ig power supply)
Connect the intelligent tester (with can vim) to the
dlc3.
...
