Toyota RAV4 (XA40) 2013-2018 Service Manual: Inspection
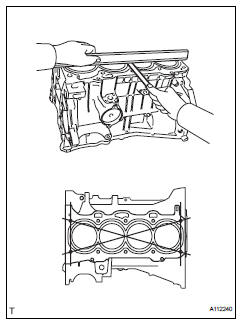
- Inspect cylinder block for warpage
- Using a precision straightedge and feeler gauge, measure the warpage of the surface that is in contact with the cylinder head gasket.
Maximum warpage: 0.05 Mm (0.0020 In.)
If the warpage is greater than the maximum, replace the cylinder block.
- Inspect piston
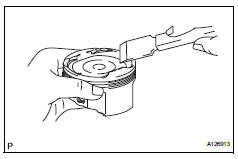
- Using a gasket scraper, remove the carbon from the piston top.
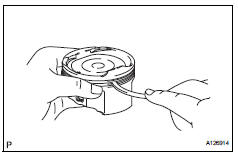
- Using a groove cleaning tool or a broken ring, clean the piston ring grooves.
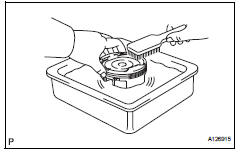
- Using a brush and solvent, thoroughly clean the piston.
Notice:
Do not use a wire brush.
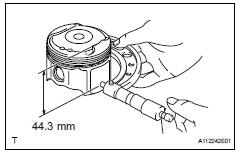
- Using a micrometer, measure the piston diameter at right angles to the piston pin hole, and at the piston 44.3 Mm (1.7587 In.) From the piston head.
Standard piston diameter: 88.477 To 88.487 Mm (3.5125 To 3.5129 In.)
If the diameter is not as specified, replace the piston.
- Inspect piston oil clearance
- Subtract the piston diameter measurement from the cylinder bore diameter measurement.
Standard oil clearance: 0.021 To 0.044 Mm (0.0008 To 0.0017 In.)
Maximum oil clearance: 0.10 Mm (0.0039 In.)
If the oil clearance is greater than the maximum, replace all the pistons. If necessary, replace the cylinder block.
- Inspect ring groove clearance
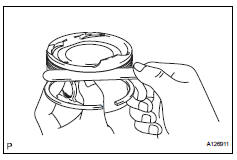
- Using a feeler gauge, measure the clearance between the new piston ring and wall of the ring groove.
Standard ring groove clearance
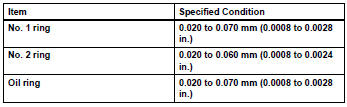
If the groove clearance is not as specified, replace the piston.
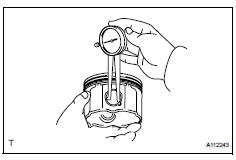
- Inspect piston ring end gap
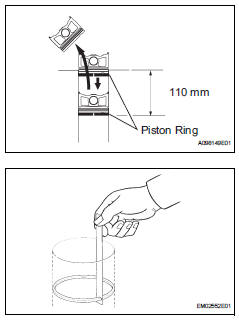
- Using a piston, push the piston ring a little beyond the bottom of the ring travel, 110 mm (4.33 In.) From the top of the cylinder block.
- Using a feeler gauge, measure the end gap.
Standard end gap
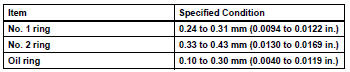
Maximum end gap


If the end gap is greater than the maximum, replace the piston ring. If the end gap is greater than the maximum, even with a new piston ring, replace the cylinder block.
- Inspect piston pin oil clearance
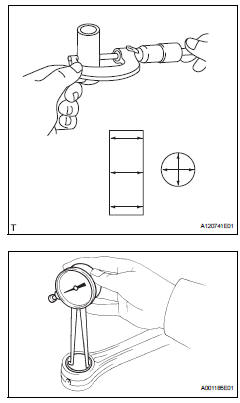
- Using a caliper gauge, measure the piston pin bore diameter.
Standard piston pin bore diameter:
22.001 To 22.010 Mm (0.8662 To 0.8665 In.)
 If the diameter is not as specified,
replace the
piston.
- Using a micrometer, measure the piston pin diameter.
Standard piston pin diameter:
21.997 To 22.006 Mm (0.8660 To 0.8664 In.)
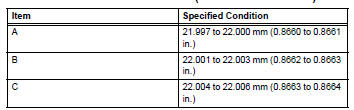
If the
diameter is not as specified, replace the piston
pin.
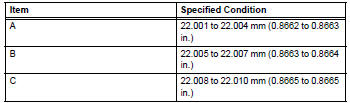
- Using a caliper gauge, measure the connecting rod small end bore diameter.
Standard connecting rod small end bore
diameter:
22.005 To 22.014 Mm (0.8663 To 0.8667 In.)
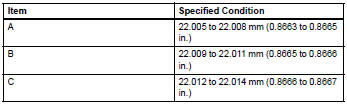
If the
diameter is not as specified, replace the
connecting rod.
- Subtract the piston pin diameter measurement from the piston pin bore diameter measurement.
Standard oil clearance: 0.001 To 0.007 Mm (0.00004 To 0.0003 In.)
Maximum oil clearance: 0.013 Mm (0.0005 In.)
If the oil clearance is greater than the maximum, replace the connecting rod. If necessary, replace the piston and piston pin as a set.
- Subtract the piston pin diameter measurement from the connecting rod small end bore diameter measurement.
Standard oil clearance: 0.005 To 0.011 Mm (0.0002 To 0.0004 In.)
Maximum oil clearance: 0.017 Mm (0.0007 In.)
If the oil clearance is greater than the maximum, replace the connecting rod. If necessary, replace the connecting rod and piston pin as a set.
- Inspect connecting rod sub-assembly
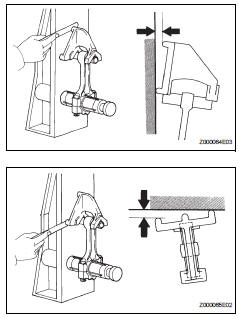
- Using a connecting rod aligner and feeler gauge, check the connecting rod alignment.
- Check for misalignment.
Maximum misalignment: 0.05 Mm (0.0020 In.) Per 100 mm (3.94 In.)
If the misalignment is greater than the maximum, replace the connecting rod.
- Check for twist.
Maximum twist: 0.15 Mm (0.0059 In.) Per 100 mm (3.94 In.)
If the twist is greater than the maximum, replace the connecting rod.
- Inspect connecting rod bolt

- Using a vernier caliper, measure the tension portion diameter of the bolt.
Standard diameter: 7.2 To 7.3 Mm (0.283 To 0.287 In.)
Maximum diameter: 7.0 Mm (0.276 In.)
If the diameter is less than the minimum, replace the connecting rod bolt.
- Inspect crankshaft
- Using a dial indicator and v-blocks, measure the circle runout as shown in the illustration.
Maximum taper and distortion: 0.003 Mm (0.0001 In.)
If the taper and distortion are greater than the maximum, replace the crankshaft.

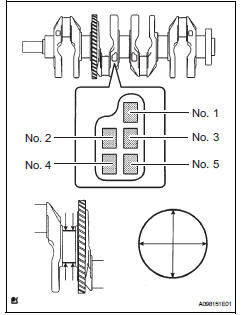
- Using a micrometer, measure the diameter of each main journal.
Standard diameter: 54.988 To 55.000 Mm (2.1830 To 2.1654 In.)
Standard diameter: 54.988 To 55.000 Mm (2.1830 To 2.1654 In.)
- Check each main journal for taper and distortion as shown in the illustration.
Maximum taper and distortion: 0.003 Mm (0.0001 In.)
If the taper and distortion are greater than the maximum, replace the crankshaft.
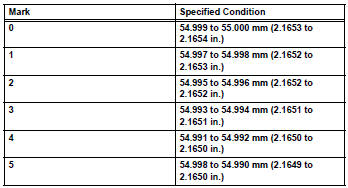
Standard diameter (reference)
- Using a micrometer, measure the diameter of each crank pin.
Standard diameter: 47.990 To 48.000 Mm (1.8894 To 1.8898 In.)
If the diameter is not as specified, check the connecting rod oil clearance.
- Inspect each crank pin for taper and distortion as shown in the illustration.
Maximum taper and distortion: 0.003 Mm (0.0001 In.)
If the taper and distortion are greater than the maximum, replace the crankshaft.
- Inspect crankshaft bearing cap set bolt
- Using a vernier caliper, measure the tension portion diameter of the bolts.
Standard diameter: 7.5 To 7.6 Mm (0.295 To 0.299 In.)
Minimum diameter: 7.5 Mm (0.295 In.)
If the diameter is less than the minimum, replace the bolt.
 Disassembly
Remove idler pulley (see page em-23)
Remove oil dipstick
Remove oil dipstick guide (see page em-57)
Remove manifold stay (see page em-57)
Remove no. 2 Manifold stay (see page em-58)
Remov ...
 Replacement
Replace timing chain cover oil seal
Hint:
There are 2 methods to replace the oil seal.
If the timing chain cover is removed from the
cylinder block:
Using a screwdriver and hammer, ...
Other materials:
Seat heaters
Turns on the front left seat
heater (high)
Turns on the front left seat
heater (low)
Turns on the front right seat
heater (high)
Turns on the front right seat
heater (low)
The indicator light comes on.
The seat heaters can be used when
Vehicles without a smart key system
T ...
Fuel information
You must only use unleaded
gasoline in your vehicle.
Select octane rating 87
(Research Octane Number
91) or higher. Use of
unleaded gasoline with an
octane rating lower than 87
may result in engine knocking.
Persistent knocking
can lead to engine damage.
At minimum, the gasoline you
use should meet ...
Fastening and releasing
the seat belt
To fasten the seat belt, push
the plate into the buckle until a click sound is heard.
To release the seat belt,
press the release button A.
â– Emergency locking retractor
(ELR)
The retractor will lock the belt during
a sudden stop or on impact. It may
also lock if you lean forward too
quickly ...
