
Toyota RAV4 (XA40) 2013-2018 Service Manual: Installation
Caution:
Be sure to read the precautionary notices concerning the srs airbag system before servicing it (see page rs-1).
- Install steering pad assembly
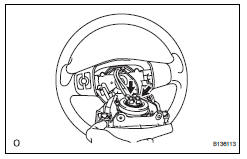
- Support the steering pad with one hand as shown in the illustration.
- Connect the 2 airbag connectors.
Notice:
When handling the airbag connector, do not damage the airbag wire harness.
- Connect the horn connector.
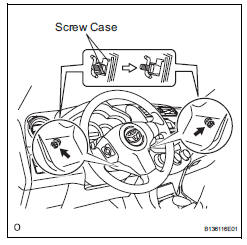
- Install the steering pad after confirming that the circumference grooves of the screws are caught on the screw case.
- Using a t30 "torx" driver, install the 2 screws.
Torque: 8.8 N*m (90 kgf*cm, 78 in.*Lbf)
- Connect cable to negative battery terminal
- Inspect steering pad assembly
- Check for cuts, cracks or discoloration on the steering pad outer surface and in the grooved portion.
- Check that the horn sounds.
- Check srs warning light
- Check the srs warning light (see page rs-34).
 Removal
Caution:
Be sure to read the precautionary notices concerning the
srs airbag system before servicing it (see page rs-1).
Disconnect cable from negative battery
terminal
Caution:
Wait at le ...
 Disposal
Hint:
When scrapping a vehicle equipped with an srs or disposing
of the steering pad, be sure to deploy the airbag first in
accordance with the procedure described below. If any
abnormality occurs ...
Other materials:
Inspection
Inspect front seat outer belt assembly
Notice:
Do not disassemble the retractor.
Before installing the outer belt, check the elr.
When the inclination of the retractor is 15Ð or
less, check that the belt can be pulled from the
retractor. When the inclination of the retractor ...
Opening/closing the back
door (vehicles with power
back door)
â– Using the wireless remote
control
Press and hold the switch.
The power back door automatically
opens/closes.
Pressing the switch while the power
back door is opening/closing stops
the operation. When the switch is
pressed and held again during the
halted operation, the back door will
perform t ...
Windshield wipers and
washer
Operating the lever can
switch between automatic
operation and manual operation,
or can use the
washer.
NOTICE
â– When the windshield is dry
Do not use the wipers, as they
may damage the windshield.
Operating the wiper lever
Operating the lever operates
the wipers or washer as follows:
Intermittent ...
