
Toyota RAV4 (XA40) 2013-2018 Service Manual: Light control switch circuit
Description
This circuit detects the state of the headlight dimmer switch.
Wiring diagram
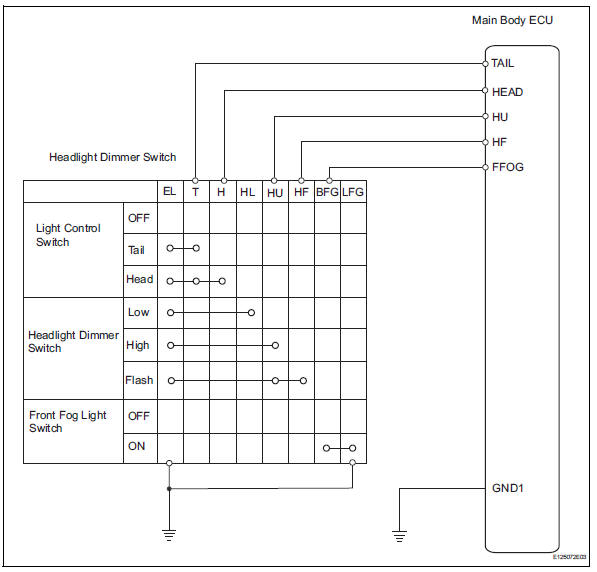
Inspection procedure
- Read value of intelligent tester (main body ecu)
- Connect the intelligent tester to the dlc3.
- Turn the ignition switch on and press the intelligent tester main switch on.
- Select the items below in the data list, and read the displays on the intelligent tester.
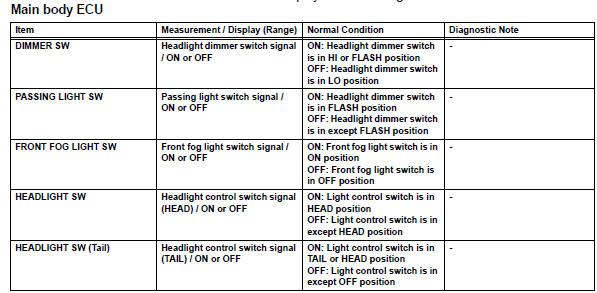
Ok: on is displayed on the intelligent tester screen.


- Inspect headlight dimmer switch
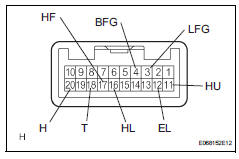
- Remove the headlight dimmer switch.
- Measure the resistance of the switch.
Standard resistance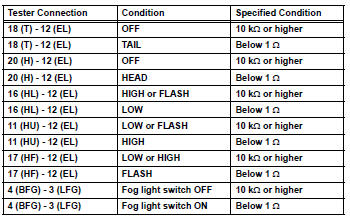


- Check wire harness (main body ecu - dimmer switch and body ground)

- Disconnect the e12 headlight dimmer switch connector.
- Disconnect the ie and ij instrument panel junction block connectors.
- Disconnect the e15 and e17 main body ecu connectors.
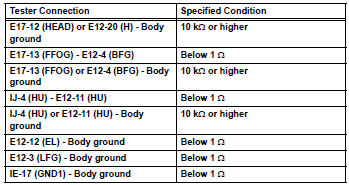
- Measure the resistance of the wire harness side connectors.
Standard resistance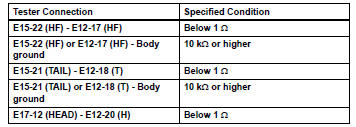


Replace instrument panel junction block (main body ecu)
 Back-up light circuit
Description
The park / neutral position switch turns on when the shift lever is moved
into the r position, causing the
back-up lights to illuminate.
Wiring diagram
Inspection procedure
I ...
 Door courtesy switch circuit
Description
The main body ecu detects the condition of the door courtesy switch.
Wiring diagram
Inspection procedure
Read value of intelligent tester (door courtesy light switch)
Conn ...
Other materials:
Connecting a bluetooth®
device
Up to 5 bluetooth® devices (phones (hfp) and audio players
(avp)) can be registered.
If more than 1 bluetooth® device has been registered, select
which device to connect to.
Press the “setup� button.
Select “bluetooth*�.
*: Bluetooth is a registered trademark of bluetooth sig ...
Open in one side of can branch line
Description
If 2 or more ecus and/or sensors do not appear on the intelligent tester's
"bus check" screen via the
can vim, one side of the can branch wire may be open. (One side of the canh
[branch wire] /canl
[branch wire] of the ecu and/or sensor is open.)
Wiring diagram
...
Occupant classification system malfunction
Description
The occupant classification system circuit consists of the center airbag
sensor and the occupant
classification system.
When the center airbag sensor receives signals from the occupant classification
ecu, it determines
whether or not the front passenger airbag, front seat side ...
