Toyota RAV4 (XA40) 2013-2018 Service Manual: Rear seat inner belt assembly
Components

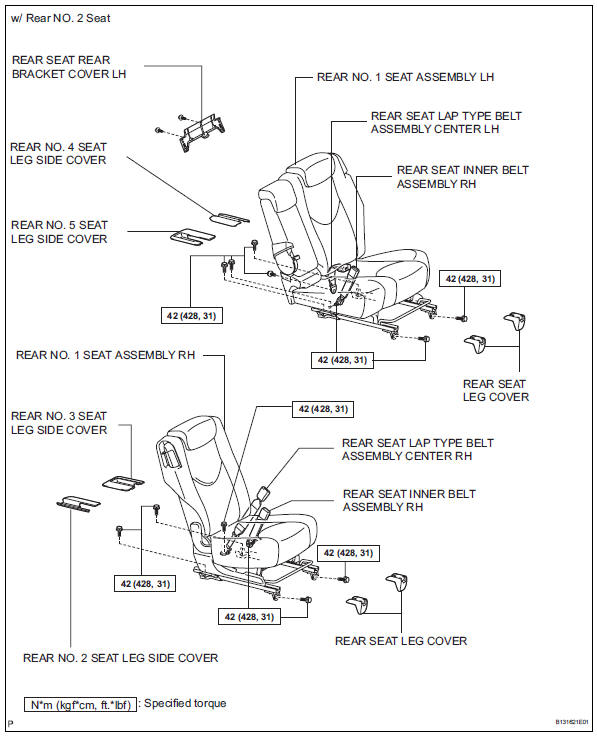
Removal
- Remove rear seat leg cover
- Remove rear no. 2 Seat leg side cover
- Remove rear no. 3 Seat leg side cover (w/ rear no. 2 Seat) (see page se-81)
- Remove rear no. 3 Seat leg side cover (w/o rear no. 2 Seat) (see page se-81)
- Remove rear no. 4 Seat leg side cover
- Remove rear no. 5 Seat leg side cover
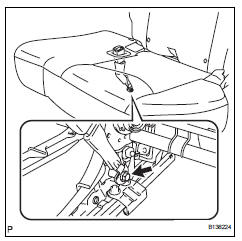
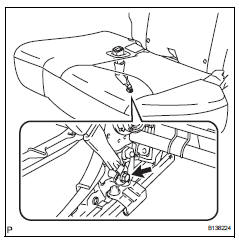
- Remove rear seat lap type belt assembly center rh (w/o rear no. 2 Seat)
- Remove the bolt and seat belt.
- Remove rear seat lap type belt assembly center rh (w/ rear no. 2 Seat)
- Remove the bolt and seat belt.
- Remove rear no. 1 Seat assembly lh (see page se-50)
- Remove rear seat rear bracket cover lh (see page se-54)
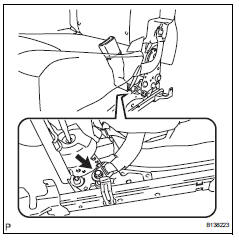
- Remove rear seat lap type belt assembly center lh
- Remove the bolt and the seat belt.
- Remove rear seat inner belt assembly rh (for 60/40 split seat type lh side)
- Remove the bolt and the seat belt.
- Remove rear no. 1 Seat assembly rh (see page se-84)
- Remove rear seat inner belt assembly rh (for 60/40 split seat type rh side)
- Remove the bolt and the seat belt.
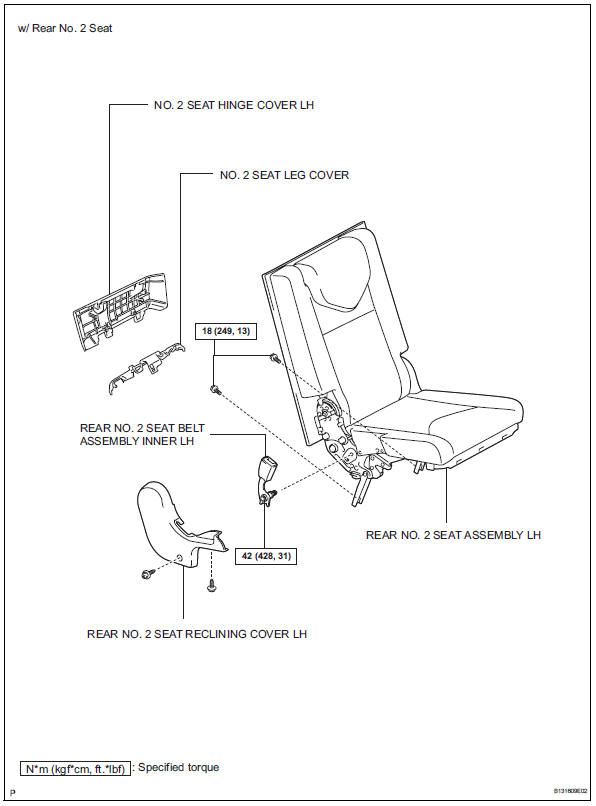
- Remove no. 2 Seat hinge cover lh (w/ rear no.
2 Seat) (see page se-109)
- Remove no. 2 Seat leg cover (w/ rear no. 2 Seat) (see page se-109)
- Remove rear no. 2 Seat assembly lh (w/ rear no. 2 Seat) (see page se-110)
- Remove rear no. 2 Seat reclining cover lh (w/ rear no. 2 Seat) (see page se-111)
- Remove rear no. 2 Seat inner belt assembly lh (w/ rear no. 2 Seat)

- Remove the bolt and seat belt.
Installation
- Install rear no. 2 Seat inner belt assembly lh (w/ rear no. 2 Seat)
- Install the seat belt with the bolt.
Torque: 42 n*m (428 kgf*cm, 31 ft.*Lbf)
- Install rear no. 2 Seat reclining cover lh (w/ rear no. 2 Seat) (see page se-121)
- Install rear no. 2 Seat assembly lh (w/ rear no. 2 Seat) (see page se-121)
- Install no. 2 Seat leg cover (w/ rear no. 2 Seat) (see page se-123)
- Install no. 2 Seat hinge cover (w/ rear no. 2 Seat) (see page se-123)
- Install rear seat inner belt assembly rh (for 60/40 split seat type rh side)
- Install the belt with the bolt.
Torque: 42 n*m (428 kgf*cm, 31 ft.*Lbf)

- Install rear no. 1 Seat assembly rh (see page se-97)
- Install rear seat inner belt assembly rh (for 60/40 split seat type lh side)
- Install the belt with the bolt.
Torque: 42 n*m (428 kgf*cm, 31 ft.*Lbf)
- Install rear seat lap type belt assembly center lh
- Install the belt with the bolt.
Torque: 42 n*m (428 kgf*cm, 31 ft.*Lbf)
- Install rear seat rear bracket cover lh (see page se-60)
- Install rear no. 1 Seat assembly lh (see page se-64)
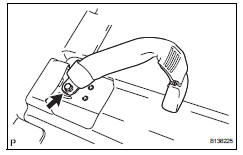
- Install rear seat lap type belt assembly center rh (w/o rear no. 2 Seat)
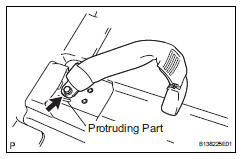
- Install the belt with the bolt.
Torque: 42 n*m (428 kgf*cm, 31 ft.*Lbf)
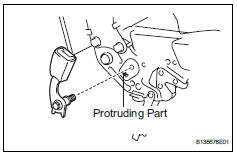
Notice:
The anchor part of the seat belt must not overlap the protruding part.
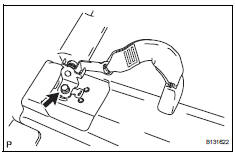
- Install rear seat lap type belt assembly center rh (w/ rear no. 2 Seat)
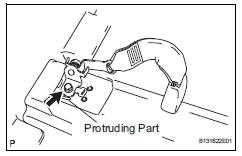
- Install the belt with the bolt.
Torque: 42 n*m (428 kgf*cm, 31 ft.*Lbf)
Notice:
The anchor part of the seat belt must not overlap the protruding part.
- Install rear no. 5 Seat leg side cover
- Install rear no. 4 Seat leg side cover
- Install rear no. 3 Seat leg side cover (w/ rear no. 2 Seat) (see page se-72)
- Install rear no. 3 Seat leg side cover (w/o rear no. 2 Seat) (see page se-72)
- Install rear no. 2 Seat leg side cover
- Install rear seat leg cover
 Disposal
Hint:
When scrapping vehicles equipped with a seat belt
pretensioner or disposing of a front seat outer belt (with seat
belt pretensioner), always first activate the seat belt
pretensioner in acco ...
 Rear seat outer belt assembly
Components
...
Other materials:
Tc and cg terminal circuit
Description
Dtc output mode is set by connecting terminals 13 (tc) and 4 (cg) of the
dlc3. The dtcs are indicated
by the blinking of the tire pressure warning light.
Wiring diagram
Hint:
When each warning light continues blinking, a ground short in the wiring of
terminal tc of the dlc3 ...
Throttle actuator control throttle body range / performance
Description
The electronic throttle control system (etcs) is composed of the throttle
actuator, throttle position (tp)
sensor, accelerator pedal position (app) sensor, and ecm. The ecm operates the
throttle actuator to
regulate the throttle valve in response to driver inputs. The tp senso ...
Sun visors and vanity
mirrors
Sun visors
Forward position:
flip down.
Side position:
flip down, unhook, and swing
to the side.
Side extender (if equipped):
place in side position then slide
backwards.
Vanity mirrors
Slide the cover to open.
The light turns on when the cover
is opened.
Notice
To ...
