Toyota RAV4 Service Manual: Removal
- Disconnect cable from negative battery terminal
Caution:
Wait at least 90 seconds after disconnecting the cable from the negative (-) battery terminal to prevent airbag and seat belt pretensioner activation.
- Remove front seat assembly lh
- Remove the front seat.
For manual seat (see page se-11) for power seat (see page se-27)
- Remove front seat assembly rh
- Remove the front seat.
For manual seat (see page se-11) for power seat (see page se-27)
- Remove rear no. 1 Seat assembly lh
- Remove the rear no. 1 Seat (see page se-45).
- Remove rear no. 1 Seat assembly rh
- Remove the rear no. 1 Seat (see page se-80).
- Remove no. 1 Console upper panel garnish (see page ip-17)
- Remove no. 2 Console upper panel garnish (see page ip-18)
- Remove upper console panel sub-assembly (see page ip-18)
- Remove switch base (see page ip-18)
- Remove console cup holder box (see page ip-18)
- Remove upper rear console panel subassembly (see page ip-19)
- Remove console rear end panel (see page ip- 19)
- Remove no. 1 Instrument panel bracket cover inner lh (see page ip-19)
- Remove no. 1 Instrument panel bracket cover inner rh (see page ip-19)
- Remove rear console box sub-assembly (see page ip-20)
- Remove front door scuff plate lh (see page ir-26)
- Remove front door scuff plate rh (see page ir-26)
- Remove cowl side trim board lh (see page ir- 26)
- Remove cowl side trim board rh (see page ir-26)
- Remove front door opening trim weatherstrip lh
- Remove front door opening trim weatherstrip rh
- Remove rear door scuff plate lh (see page ir-29)
- Remove rear door scuff plate rh (see page ir-29)
- Remove rear door opening trim weatherstrip lh
- Remove rear door opening trim weatherstrip rh
- Remove lower center pillar garnish lh (see page ir-29)
- Remove lower center pillar garnish rh (see page ir-30)
- Remove package tray trim pocket subassembly (w/o rear no. 2 Seat)
- Remove tonneau cover assembly (w/o rear no. 2 Seat)
- Remove rear floor no. 1 Board (w/o rear no.
2 Seat)
- Remove deck board assembly (w/o rear no. 2 Seat)
- Remove rear no. 2 Seat assembly lh (w/ rear no. 2 Seat)
- Remove the rear no. 2 Seat (see page se-109).
- Remove rear no. 2 Seat assembly rh (w/ rear no. 2 Seat)
- Remove the rear no. 2 Seat (see page se-109).
- Remove rear floor no. 3 Board
- Remove rear floor no. 2 Board
- Remove rear floor no. 1 Mat support side plate (see page ir-31)
- Remove back door weatherstrip
- Remove rear floor finish plate (see page ir- 31)
- Remove rear deck trim cover lh (w/ rear no.
2 Seat) (see page ir-31)
- Remove rear deck trim cover lh (w/ rear no.
2 Seat) (see page ir-31)
- Remove reclining remote control lever bezel lh (w/o rear no. 2 Seat) (see page se-45)
- Remove reclining remote control lever bezel rh (w/o rear no. 2 Seat) (see page se-80)
- Remove tether anchor bracket subassembly (w/o rear no. 2 Seat) (see page ir-32)
- Remove deck trim side panel assembly lh (w/o rear no. 2 Seat) (see page ir-32)
- Remove deck trim side panel assembly lh (w/ rear no. 2 Seat) (see page ir-32)
- Remove deck trim side panel assembly lh (w/ rear no. 2 Seat) (see page ir-32)
- Remove deck trim side panel assembly rh (w/ rear no. 2 Seat) (see page ir-34)
- Remove front floor carpet assembly
- Partially remove the floor carpet.
Hint:
It is not necessary to fully remove the floor carpet.
Partially remove it so that the lock control cable can be removed in a later step.
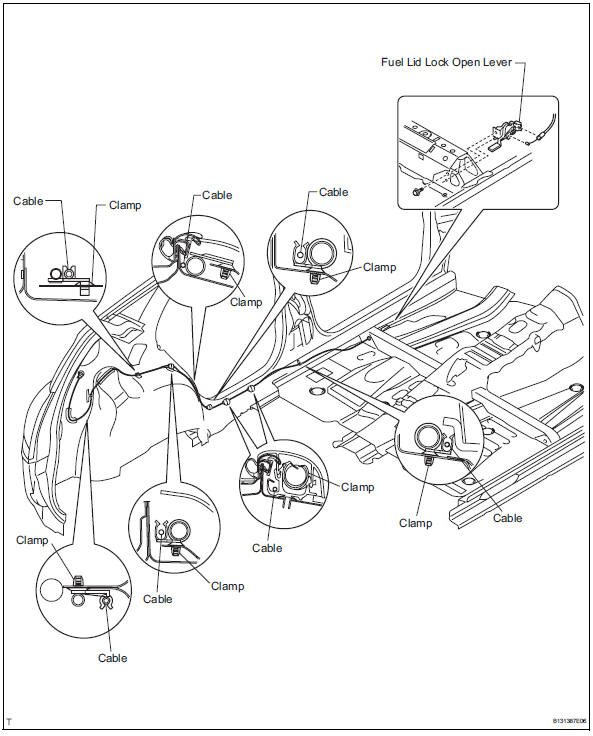
- Remove fuel lid lock control cable subassembly
- Remove the bolt and fuel lid lock open lever.
- Remove the tape and cable from the clamps as shown in the illustration.


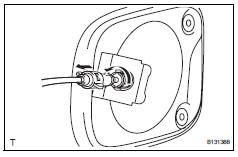
- Remove fuel lid lock control cable subassembly
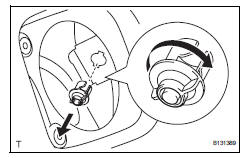
- Remove fuel filler opening lid lock retainer
- Turn the lock retainer clockwise and remove the lock retainer as shown in the illustration.

 Components
...
 Installation
Install fuel filler opening lid lock retainer
Install the lock retainer and turn it counterclockwise
as shown in the illustration.
Install fuel filler opening lid lock retainer
...
Other materials:
Precaution
If any of following conditions are met,
keep engine idling with a/c on (engine
speed at less than 2000 rpm) for at least 1
minute:
Refrigerant gas has been refilled or a/c parts have
been replaced.
A long time has elapsed since the engine was
stopped.
Notice:
If the engine s ...
Torque converter clutch solenoid circuit
Description
The shift solenoid valve dsl is turned on and off by signals from the ecm to
control the hydraulic
pressure acting on the lock-up relay valve, which then controls operation of the
lock-up clutch.
Fail-safe function:
if the ecm detects a malfunction, it turns the shift sol ...
Reassembly
Install wiring harness clamp bracket
Install the bracket with the bolt.
Install elbow tube
Install straight pin
Using a plastic hammer, install the 4 straight pins to
the rear differential carrier.
Thoroughly clean oil and water from the surface of
the rear different ...
