Toyota RAV4 (XA40) 2013-2018 Service Manual: Removal (2005/11-2006/01)
- Disconnect cable from negative battery terminal
Caution:
Wait at least 90 seconds after disconnecting the cable from the negative (-) battery terminal to prevent airbag and seat belt pretensioner activation.
- Remove roof headlining assembly
- Remove the roof headlining (see page ir-26).
- Remove sliding roof side garnish lh
- Using a screwdriver, detach the claws and remove the garnish.
Hint:
Tape the screwdriver tip before use.
- Remove sliding roof side garnish rh
Hint:
Use the same procedures described for the lh side.
- Remove sliding roof glass sub-assembly
- Using a t25 "torx" driver, remove the 4 screws and glass.
- Pull the glass upward to remove it.
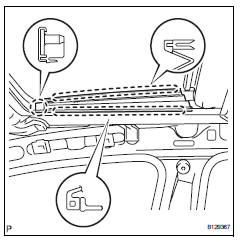
- Remove sliding roof weatherstrip
- Disconnect sliding roof drain hose
- Disconnect the 4 drain hoses.
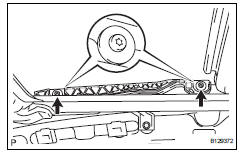
- Remove sliding roof housing assembly

- Remove the 4 bolts, 8 nuts and housing.
Notice:
Be careful not to damage the curtain shield airbag when removing the housing.

 Removal (2006/01- )
Disconnect cable from negative battery
terminal
Caution:
Wait at least 90 seconds after disconnecting the
cable from the negative (-) battery terminal to
prevent airbag and seat belt preten ...
Other materials:
Multiplex communication circuit
Description
The air conditioning amplifier communicates data with the ecm and combination
meter through the can
communication system.
Wiring diagram
Inspection procedure
Check dtc
Clear the dtc (see page ac-127).
Read the dtc (see page ac-127).
Result
Go to can ...
Removal
Disconnect cable from negative battery
terminal
Caution:
Wait at least 90 seconds after disconnecting the
cable from the negative (-) battery terminal to
prevent airbag and seat belt pretensioner activation.
Remove air cleaner cap (see page es-411)
Remove air cleaner case
...
Transmission fluid temperature sensor "A" circuit
Description
The automatic transmission fluid (atf) temperature sensor converts the atf
temperature into a
resistance value which is input into the ecm.
The ecm applies a voltage to the temperature sensor through ecm terminal tho1.
The sensor resistance changes with the atf temperature. ...
