Toyota RAV4 (XA40) 2013-2018 Service Manual: Removal (2006/01- )
- Disconnect cable from negative battery terminal
Caution:
Wait at least 90 seconds after disconnecting the cable from the negative (-) battery terminal to prevent airbag and seat belt pretensioner activation.
- Remove front door scuff plate lh
- Using a screwdriver, detach the 10 claws and remove the scuff plate.
Hint:
Tape the screwdriver tip before use.
- Remove front door scuff plate rh
Hint:
Use the same procedures described for the lh side.
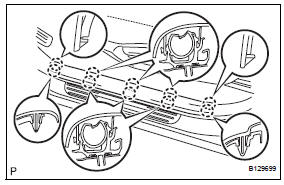
- Remove cowl side trim board lh
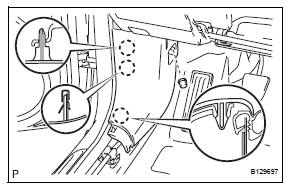
- Remove the cap nut.
- Using a screwdriver, detach the 3 claws and remove the trim board.
Hint:
Tape the screwdriver tip before use.
- Remove cowl side trim board rh
Hint:
Use the same procedures described for the lh side.
- Remove front door opening trim weatherstrip lh
- Remove front door opening trim weatherstrip rh
- Remove instrument cluster finish panel assembly (see page ip-4)
- Remove combination meter assembly (see page ip-5)
- Remove no. 2 Instrument cluster finish panel center (see page ip-5)
- Remove no. 1 Instrument cluster finish panel center (see page ip-5)
- Remove radio receiver (see page ip-5)
- Remove instrument panel register assembly center (see page ip-6)
- Remove glove compartment door assembly (see page ip-20)
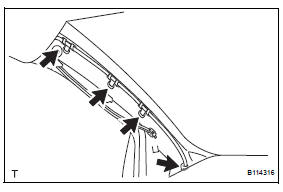
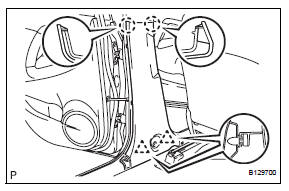
- Remove front pillar garnish lh
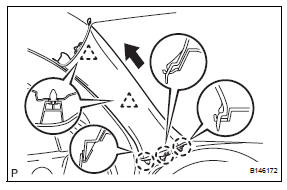
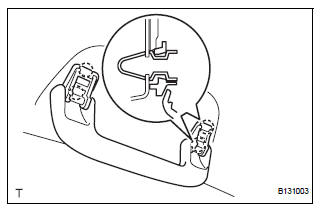
- W/o curtain shield airbag:
- Using a clip remover, detach the 2 clips.
- Pull the garnish in the direction indicated by the
arrow in the illustration to detach the 3 claws.
Then remove the garnish.
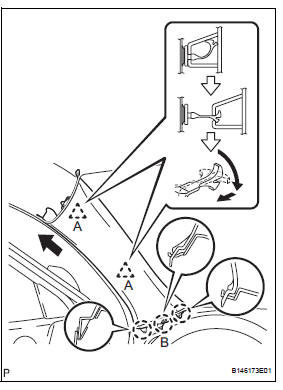
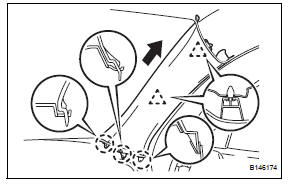
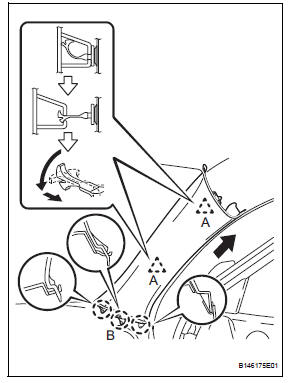
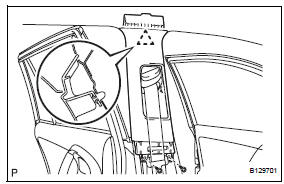
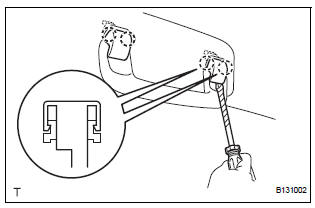
- W/ curtain shield airbag:
- Pull the pillar garnish so that the base of the 2 clips labeled a detach. Then pull until the tips of the 2 clips labeled a lock in the pillar garnish's holes.
- Using needle-nose pliers, rotate the 2 clips labeled a 90°. Then pull the pillar garnish to release the tips of the 2 clips labeled a from the pillar garnish.
- Pull the pillar garnish in the direction indicated by the arrow in the illustration to detach the 3 claws labeled b.
- Remove the 2 clips labeled a from the vehicle body.
- Using a clip remover, remove the 4 wiring harness clamps.
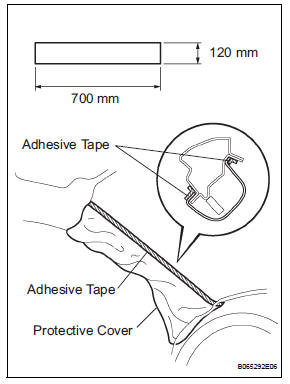
- W/ curtain shield airbag:
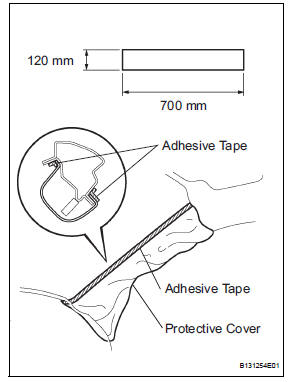
- Thoroughly cover the airbag with cloth or nylon of 700 mm (27.56 In.) X 120 mm (4.72 In.) And fix the ends of the cover with adhesive tape, as shown in the illustration.
Notice:
Cover the curtain shield airbag with a protective cover as soon as the front pillar garnish is removed.
- Remove front pillar garnish rh
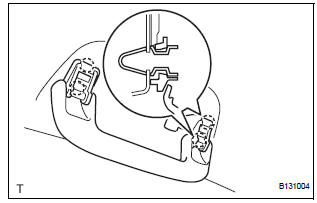
- W/o curtain shield airbag:
- Using a clip remover, detach the 2 clips.
- Pull the garnish in the direction indicated by the
arrow in the illustration to detach the 3 claws.
Then remove the garnish.
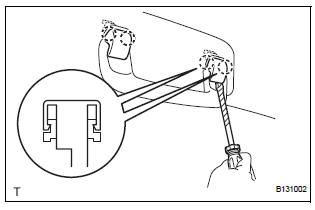
- W/ curtain shield airbag:
- Pull the pillar garnish so that the base of the 2 clips labeled a detach. Then pull until the tips of the 2 clips labeled a lock in the pillar garnish's holes.
- Using needle-nose pliers, rotate the 2 clips labeled a 90°. Then pull the pillar garnish to release the tips of the 2 clips labeled a from the pillar garnish.
- Pull the pillar garnish in the direction indicated by the arrow in the illustration to detach the 3 claws labeled b.
- Remove the 2 clips labeled a from the vehicle body.
- thoroughly cover the airbag with cloth or nylon of 700 mm (27.56 in.) x 120 mm (4.72 in.) and fix the ends of the cover with adhesive tape, as shown in the illustration.
Notice:
Cover the curtain shield airbag with a protective cover as soon as the front pillar garnish is removed.
- Remove instrument panel sub-assembly (see page ip-6)
- Remove rear door scuff plate lh
- Using a screwdriver, detach the 9 claws.
Hint: Tape the screwdriver tip before use.
- Using a clip remover, detach the 2 clips and remove the garnish.
- remove rear door scuff plate rh
Hint:
Use the same procedures described for the lh side.
- Remove rear door opening trim weatherstrip lh
- Remove rear door opening trim weatherstrip rh
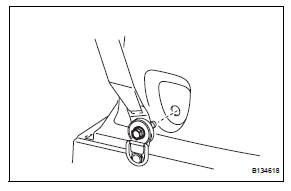
- Remove lower center pillar garnish lh
- Disconnect the front seat outer belt's floor anchor.
- Remove the anchor cover.
- Remove the bolt and disconnect the floor anchor.

- Using a screwdriver, detach the 2 claws.
Hint:
Tape the screwdriver tip before use.
- Using a clip remover, detach the 2 clips and remove the garnish.
- Remove lower center pillar garnish rh
Hint:
Use the same procedures described for the lh side.
- Remove center pillar garnish lh
- Remove the 2 screws.
- Using a clip remover, detach the clip and remove the garnish.
- Remove center pillar garnish rh
Hint:
Use the same procedures described for the lh side.
- Remove package tray trim pocket subassembly (w/o rear no. 2 Seat)
- Remove tonneau cover assembly (w/o rear no. 2 Seat)
- Remove rear floor no. 1 Board (w/o rear no.
2 Seat)
- Remove deck board assembly (w/o rear no. 2 Seat)
- Remove no. 2 Seat hinge cover lh (w/ rear no.
2 Seat) (see page se-109)
- Remove no. 2 Seat hinge cover rh (w/ rear no.
2 Seat)
Hint:
Use the same procedures described for the lh side.
- Remove no. 2 Seat leg cover lh (w/ rear no. 2 Seat) (see page se-109)
- Remove no. 2 Seat leg cover rh (w/ rear no. 2 Seat)
Hint:
Use the same procedures described for the lh side.
- Remove rear no. 2 Seat assembly lh (w/ rear no. 2 Seat) (see page se-110)
- Remove rear no. 2 Seat assembly rh (w/ rear no. 2 Seat)
Hint:
Use the same procedures described for the lh side.
- Remove rear floor no. 3 Board
- Remove rear floor no. 2 Board
- Remove rear floor no. 1 Mat support side plate
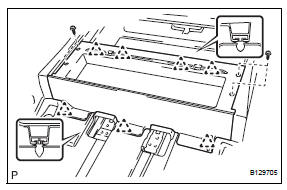
- W/o rear no. 2 Seat:
- Remove the 4 screws.
- Using a clip remover, detach the 7 clips and remove the plate.
- W/ rear no. 2 Seat:
- Using a clip remover, detach the 8 clips and remove the plate.
- Remove back door weatherstrip
- Remove rear floor finish plate
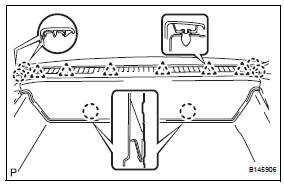
- Using a clip remover, detach the 6 clips.
- Detach the 6 claws and remove the finish plate.
- Remove rear deck trim cover lh (w/ rear no. 2 Seat)
- Remove the bolt.
- Using a screwdriver, detach the 4 claws and remove the trim cover.
Hint:
Tape the screwdriver tip before use.
- Remove rear deck trim cover rh (w/ rear no.
2 Seat)
Hint:
Use the same procedures described for the lh side.
- Remove reclining remote control lever bezel lh (w/o rear no. 2 Seat) (see page se-45)
- Remove reclining remote control lever bezel rh (w/o rear no. 2 Seat) (see page se-80)
- Remove tether anchor bracket subassembly (w/o rear no. 2 Seat)
- Remove the bolt and tether anchor bracket.
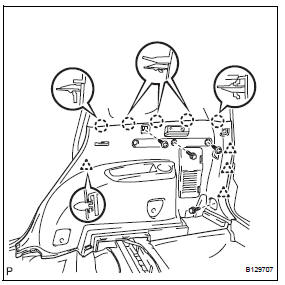
- Remove deck trim side panel assembly lh (w/o rear no. 2 Seat)
- Disconnect the rear no. 1 Seat outer belt's floor anchor.
- Remove the anchor cover.
- Remove the bolt and disconnect the floor anchor.
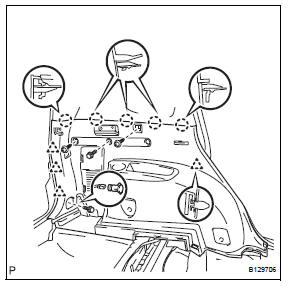
- Remove the 2 screws and 2 bolts.
- Using a screwdriver, detach the 5 claws.
Hint:
Tape the screwdriver tip before use.
- Using a clip remover, detach the 4 clips and remove the trim board.
- Disconnect the power outlet socket connector.
- Remove the belt hanger.
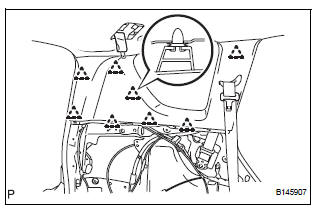
- Remove deck trim side panel assembly lh (w/ rear no. 2 Seat)
- Disconnect the rear no. 1 Seat outer belt's floor anchor.
- Remove the anchor cover.
- Remove the bolt and disconnect the floor anchor.
- Disconnect the rear no. 2 Seat outer belt's floor anchor.
- Remove the bolt and disconnect the floor anchor.
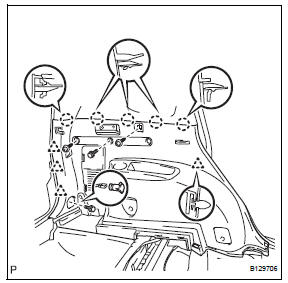
- Remove the 2 screws and 2 bolts.
- Using a screwdriver, detach the 5 claws.
Hint:
Tape the screwdriver tip before use.
- Using a clip remover, detach the 4 clips and remove the trim board.
- Disconnect the power outlet socket connector.
- Remove the belt hanger.
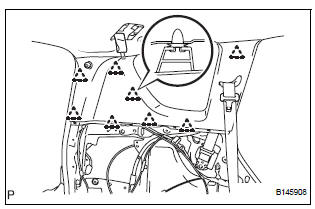
- Remove deck trim side panel assembly rh (w/o rear no. 2 Seat)

- Disconnect the rear no. 1 Seat outer belt's floor anchor.
- Remove the anchor cover.
- Remove the bolt and disconnect the floor anchor.
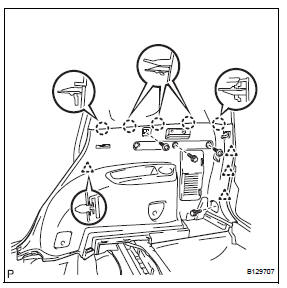
- Remove the 2 screws and 2 bolts.
- Using a screwdriver, detach the 5 claws.
Hint:
Tape the screwdriver tip before use.
- Using a clip remover, detach the 4 clips and remove the trim board.
- Remove the belt hanger.
- Remove deck trim side panel assembly rh (w/ rear no. 2 Seat)
- Disconnect the rear no. 1 Seat outer belt's floor anchor.
- Remove the anchor cover.
- Remove the bolt and disconnect the floor anchor.
- Disconnect the rear no. 2 Seat outer belt's floor anchor.
- Remove the bolt and disconnect the floor anchor.
Remove inner roof side garnish assembly lh (w/o rear no. 2 Seat)
- Using a clip remover, detach the 8 clips and remove the garnish.
- Remove inner roof side garnish assembly lh (w/ rear no. 2 Seat)

- Disconnect the rear no. 2 Seat outer belt's shoulder anchor.
- Using a screwdriver, detach the 2 claws and open the seat belt anchor cover.
Hint:
Tape the screwdriver tip before use.
- Remove the bolt and disconnect the shoulder anchor.
- Using a clip remover, detach the 8 clips and remove the garnish.
Hint:
Use the same procedures described for the lh side.
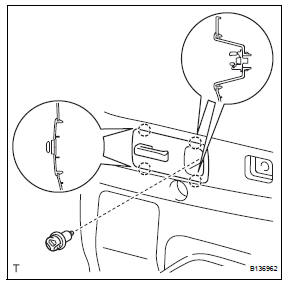
- Remove rear room partition net hook lh
- Remove the 2 screws and net hook.
- Remove rear room partition net hook rh
Hint:
Use the same procedures described for the lh side.
- Remove visor assembly lh
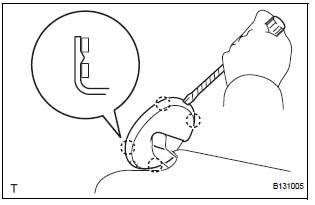
- Using a screwdriver, detach the 4 claws and remove the visor bracket cover.
Hint:
Tape the screwdriver tip before use.
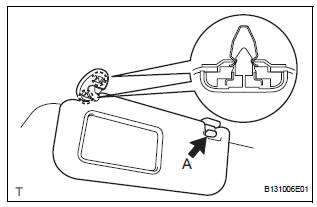
- Remove portion a from the visor holder.
- Detach the 2 claws and remove the visor.
- Remove visor assembly rh
Hint:
Use the same procedures described for the lh side.
- Remove visor holder
- Remove the visor holder by turning it counterclockwise.
- Remove vanity light assembly (see page li- 128)
- Remove map light assembly (see page li-115)
- Remove room light assembly (see page li-118)
- Remove television garnish (w/ television display) (see page av-165)
- Remove television display assembly (w/ television display) (see page av-165)
- Remove assist grip cover (for front grip)
- Using a screwdriver, detach the 4 claws and remove the 2 assist grip covers.
Hint:
Tape the screwdriver tip before use.
- Remove assist grip sub-assembly
- Detach the 4 claws and remove the assist grip.
- Remove assist grip cover (for rear grip)
- Using a screwdriver, detach the 4 claws and remove the 2 assist grip covers.
Hint:
Tape the screwdriver tip before use.
- Remove rear assist grip assembly
- Detach the 4 claws and remove the assist grip.
- Remove child restraint seat tether anchor cover (see page sb-77)
- Remove shoulder belt anchor cover rh (see page sb-64)
- Remove sun roof opening trim moulding
- Remove roof headlining assembly

- Using a screwdriver, remove the wire harness clamp.
- Disconnect the roof wire connector.
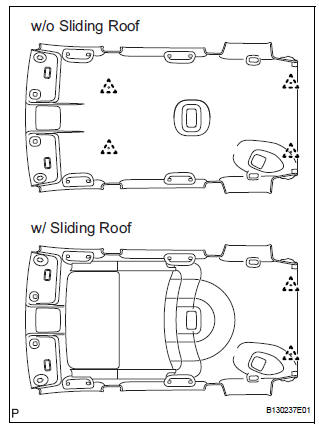
- W/o sliding roof:
- Using a clip remover, remove the 4 clips and headlining.
- W/ sliding roof:
- Disconnect the connector from the drive gear.
- Using a clip remover, remove the 2 clips and headlining.
- Remove no. 1 Roof headlining support
- Remove no. 2 Roof headlining support
- Remove no. 3 Roof headlining support
- Remove no. 4 Roof headlining support
- Remove no. 1 Roof wire
- Only when replacing the roof headlining:
- Remove the double-sided tape and roof wire.
- Remove no. 1 Roof silencer pad
- W/o sliding roof:
- Remove the 5 silencer pads.
- W/ sliding roof:
- Remove the 2 silencer pads.
- Remove no. 3 Roof silencer pad
 Removal (2005/11-2006/01)
Disconnect cable from negative battery
terminal
Caution:
Wait at least 90 seconds after disconnecting the
cable from the negative (-) battery terminal to
prevent airbag and seat belt preten ...
 Installation (2005/11-2006/01)
Install no. 1 Roof silencer pad
W/o sliding roof:
Install the 5 silencer pads.
W/ sliding roof:
Install the 2 silencer pads.
Install no. 3 Roof silencer pad
Install ...
Other materials:
Removal
Disconnect cable from negative battery
terminal
Caution:
Wait at least 90 seconds after disconnecting the
cable from the negative (-) battery terminal to
prevent airbag and seat belt pretensioner activation.
Remove radiator support opening cover
Remove front wheel rh
Remove no. 1 ...
Mil circuit
Description
The mil (malfunction indicator lamp) is used to indicate vehicle malfunction
detections by the ecm.
When the ignition switch is turned on, power is supplied to the mil circuit, and
the ecm provides the
circuit ground which illuminates the mil.
The mil operation can be checked ...
Rear occupant classification sensor lh collision detection
Description
Dtc b1787 is output when the occupant classification ecu receives a collision
detection signal sent by
the rear occupant classification sensor lh when an accident occurs.
Dtc b1787 is also output when the front seat assembly rh is subjected to a
strong impact, even if an
actua ...
