Toyota RAV4 (XA40) 2013-2018 Service Manual: Removal (2006/01- )
- Disconnect cable from negative battery terminal
Caution:
Wait at least 90 seconds after disconnecting the cable from the negative (-) battery terminal to prevent airbag and seat belt pretensioner activation.
- Remove air cleaner case sub-assembly (for 2az-fe)
- Remove the air cleaner case (see page em-98).
Hint:
Refer to the procedures from the removal of the purge vsv up until the removal of the air cleaner case.
- Remove air cleaner case (for 2gr-fe)
- Remove the air cleaner case (see page em-21).
Hint:
Refer to the procedures from the removal of the air cleaner cap sub-assembly up until the removal of the air cleaner case.
- Drain brake fluid
Notice:
Wash off brake fluid immediately if it comes in contact with any painted surface.
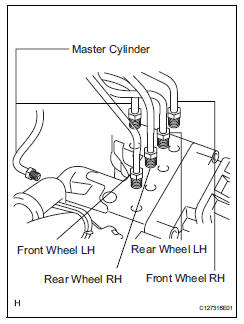
- Disconnect brake lines
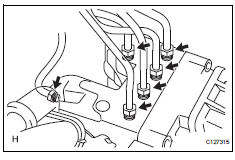
- Using sst, disconnect the 6 brake lines from the actuator.
Sst 09023-00101
- Place tags or marks to identify the installation locations of each brake line.
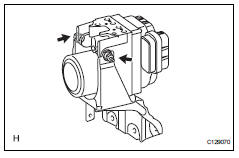
- Remove abs and traction actuator assembly with bracket
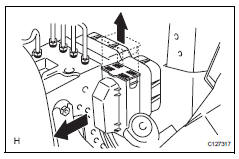
- Pull the lock lever upward and disconnect the connector.
- Disconnect the brake tube clamp from the bracket.
- Remove the 3 nuts and actuator with bracket.
Notice:
Be careful not to damage the brake tubes.
Disassembly
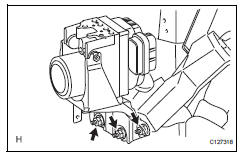
- Remove abs and traction actuator assembly
- Remove the 2 nuts and actuator from the bracket.
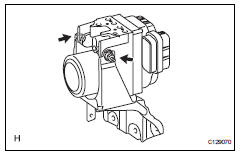
- Remove brake actuator bolt holder
- Remove the 2 bolt holders from the actuator.
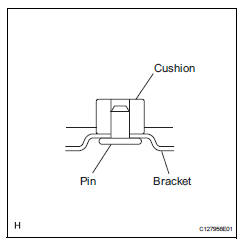
- Remove brake actuator bolt cushion
- Remove the 3 cushions from the actuator.
Reassembly
- Install brake actuator bolt cushion
- Install the 3 cushions to the actuator.
- Install brake actuator bolt holder
- Install the 2 bolt holders to the actuator.
- Install abs and traction actuator assembly
Notice:
- Do not remove the hole plug before connecting the brake tube. New actuators are filled with brake fluid.
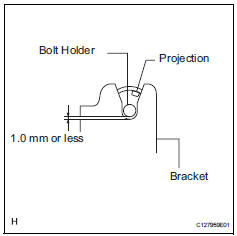
- The clearance between the bolt holder and bracket is less than 1.0 Mm (0.039 In.).
- The projection should be set as shown in the illustration.
- Install the 2 nuts to assemble the actuator and bracket.
Torque: 5.4 N*m (55 kgf*cm, 48 in.*Lbf)
 Removal (2005/11-2006/01)
Disconnect cable from negative battery
terminal
Caution:
Wait at least 90 seconds after disconnecting the
cable from the negative (-) battery terminal to
prevent airbag and seat belt prete ...
 Installation (2005/11-2006/01)
Install abs and traction actuator assembly with bracket
Notice:
Do not remove the hole plug before connecting the
brake tube. New actuators are filled with brake fluid.
Install the actuato ...
Other materials:
Tc and cg terminal circuit
Description
Dtc output mode is set by connecting terminals tc and cg of the dlc3.
The dtcs are displayed by blinking the srs warning light.
Hint:
Make sure that dtc b1281 has not been output. If dtc b1281 has been
output, refer to the multiplex
communication system.
When each warning ...
Removal
Hint:
Use the same procedures for the rh side and lh side.
The procedures listed below are for the lh side.
Remove front pillar cover sub-assembly upper lh
Using a moulding remover, detach the 3 clips and
remove the pillar cover.
...
Disassembly (2005/11-2006/01)
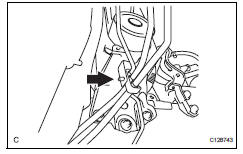
Remove front axle inboard joint boot no. 2 Clamp lh
One touch type:
Using a screwdriver, remove the inboard joint
boot clamp, as shown in the illustration.
Claw engagement type:
Using needle-nose pliers, remove the inboard
joint boot clamp, as shown in the illustra ...
