Toyota RAV4 (XA40) 2013-2018 Service Manual: Speed sensor
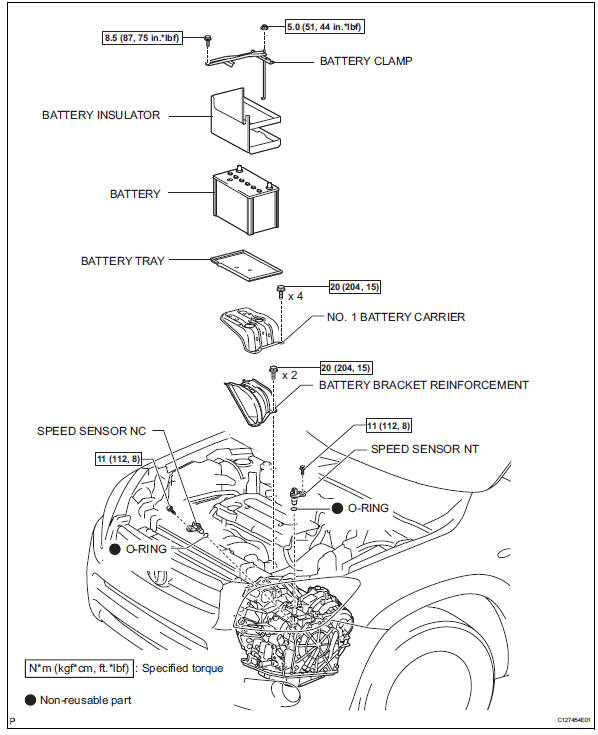
Components
Removal
- Disconnect cable from negative battery terminal
Caution:
Wait at least 90 seconds after disconnecting the cable from the negative (-) battery terminal to prevent airbag and seat belt pretensioner activation.
- Remove battery
- Loosen the nut and remove the bolt and battery clamp.
- Remove the battery.
- Remove the battery tray.
- Remove the 4 bolts and battery carrier.
- Remove the 2 bolts and battery bracket reinforcement.
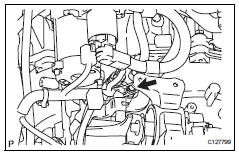
- Remove speed sensor nt
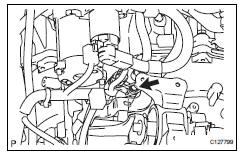
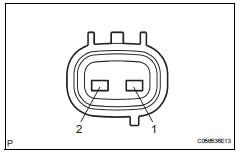
- Disconnect the sensor connector.
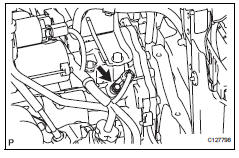
- Remove the bolt and sensor.
- Remove the o-ring from the sensor.
- Remove speed sensor nc
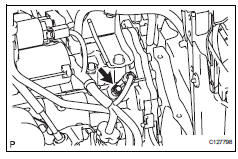
- Disconnect the sensor connector.
- Remove the bolt and sensor.
- Remove the o-ring from the sensor.
Inspection
- Inspect speed sensor nt
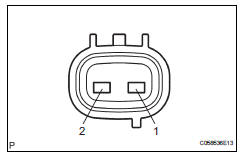
Measure the resistance of the sensor.
Standard resistance 
- Inspect speed sensor nc
Measure the resistance of the sensor.
Standard resistance 
Installation
- Install speed sensor nc
- Coat a new o-ring with atf.
- Install the o-ring to the sensor.
- Install the sensor with the bolt.
Torque: 11 n*m (112 kgf*cm, 8 ft.*Lbf)
- Connect the sensor connector.
- Install speed sensor nt
- Coat a new o-ring with atf.
- Install the o-ring to the sensor.
- Install the sensor with the bolt.
Torque: 11 n*m (112 kgf*cm, 8 ft.*Lbf)
- Connect the sensor connector.
- Install battery
- Install the battery bracket reinforcement with the 2 bolts.
Torque: 20 n*m (204 kgf*cm, 15 ft.*Lbf)
- Install the battery carrier with the 4 bolts.
Torque: 20 n*m (204 kgf*cm, 15 ft.*Lbf)
- Install the battery tray.
- Install the battery with the battery clamp.
Torque: 8.5 N*m (87 kgf*cm, 75 in.*Lbf) for bolt
5.0 N*m (51 kgf*cm, 44 in.*Lbf) for nut
- Connect cable to negative battery terminal
 Automatic transaxle fluid
On-vehicle inspection
Check transaxle fluid level
Hint:
Drive the vehicle so that the engine and transaxle are at
normal operating temperature.
Fluid temperature:
70 to 80°c (158 to 176°f ...
 Transmission wire
Components
Removal
Disconnect cable from negative battery
terminal
Caution:
Wait at least 90 seconds after disconnecting the
cable from the negative (-) battery terminal to
preven ...
Other materials:
Removal (2006/01- )
Disconnect cable from negative battery
terminal
Caution:
Wait at least 90 seconds after disconnecting the
cable from the negative (-) battery terminal to
prevent airbag and seat belt pretensioner activation.
Remove roof headlining assembly
Remove the roof headlining (see page ir ...
Skid control sensor (for 2wd)
Components
Removal
Hint:
Use the same procedures for the lh side and rh side.
The procedures listed below are for the lh side.
Disconnect cable from negative battery
terminal
Caution:
Wait at least 90 seconds after disconnecting the
cable from the negative (-) battery termin ...
Main body ecu communication stop mode
Description
Wiring diagram
Inspection procedure
Notice:
Turn the ignition switch off before measuring the resistances of the
main wire and the branch
wire.
After the ignition switch is turned off, check that the key reminder
warning system and light
reminder warning syste ...
