Toyota RAV4 (XA40) 2013-2018 Owners Manual: Tire inflation pressure
Tire inflation pressure
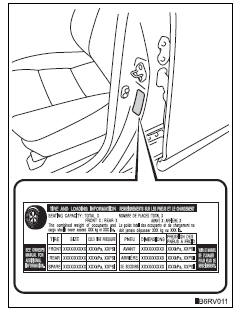
The recommended cold tire inflation pressure and tire size are displayed on the tire and loading information label.
Inspection and adjustment procedure
- Tire valve
- Tire pressure gauge
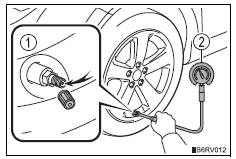
- Remove the tire valve cap.
- Press the tip of the tire pressure gauge onto the tire valve.
- Read the pressure using the gauge gradations.
- If the tire inflation pressure is not at the recommended level, adjust the pressure.
If you add too much air, press the center of the valve to deflate.
- After completing the tire inflation pressure measurement and adjustment, apply soapy water to the valve and check for leakage.
- Put the tire valve cap back on.
Tire inflation pressure check interval
You should check tire inflation pressure every two weeks, or at least once a month.
Do not forget to check the spare.
Effects of incorrect tire inflation pressure
Driving with incorrect tire inflation pressure may result in the following:
- Reduced fuel efficiency
- Reduced driving comfort and tire life
- Reduced safety
- Damage to the drive train
If a tire needs frequent inflating, have it checked by your toyota dealer.
Instructions for checking tire inflation pressure
When checking tire inflation pressure, observe the following:
- Check only when the tires are cold.
If your vehicle has been parked for at least 3 hours or has not been driven for more than 1 mile or 1.5 Km, you will get an accurate cold tire inflation pressure reading.
- Always use a tire pressure gauge.
The appearance of the tire can be misleading. In addition, tire inflation pressure that is even just a few pounds off can affect ride quality and handling.
- Do not reduce tire inflation pressure after driving. It is normal for tire inflation pressure to be higher after driving.
- Never exceed the vehicle capacity weight.
Passengers and luggage weight should be placed so that the vehicle is balanced.
Caution
Proper inflation is critical to save tire performance
Keep your tires properly inflated. Otherwise, the following conditions may occur and result in an accident causing death or serious injury:
- Excessive wear
- Uneven wear
- Poor handling
- Possibility of blowouts resulting from overheated tires
- Poor sealing of the tire bead
- Wheel deformation and/or tire separation
- A greater possibility of tire damage from road hazards
Notice
When inspecting and adjusting tire inflation pressure
Be sure to put the tire valve caps back on.
Without the valve caps, dirt or moisture could get into the valve and cause air leakage, which could result in an accident. If the caps are lost, replace them as soon as possible.
 Tires
Tires
Replace or rotate tires in accordance with maintenance schedules
and treadwear.
Checking tires
New tread
Treadwear indicator
Worn tread
The location of treadwear indicators
is shown ...
 Wheels
If a wheel is bent, cracked or heavily corroded, it should be
replaced. Otherwise, the tire may separate from the wheel or
cause a loss of handling control.
Wheel selection
When replacing wheels, ...
Other materials:
Hood
Release the lock from the
inside of the vehicle to open
the hood.
Opening the hood
1. Pull the hood lock release
lever.
The hood will pop up slightly.
2. Push the auxiliary catch lever
to the left and lift the hood.
3. Hold the hood open by inserting
the supporting rod into
the slot.
WARNING
â– ...
If your vehicle needs to be
towed
If towing is necessary, we
recommend having your
vehicle towed by your
Toyota dealer or commercial
towing service, using a
wheel-lift type truck or flatbed
truck.
Use a safety chain system
for all towing, and abide by
all state/provincial and local
laws.
Situations when it is necessary
to contact d ...
Door control transmitter module
Components
Removal
Remove transmitter housing cover
Notice:
Take extra care when handling these precision
electronic components.
Twist the screwdriver in the direction of the arrow
mark in the illustration, and open the transmitter
housing cover.
Notice:
Do not forcibly pry ...
