Toyota RAV4 (XA40) 2013-2018 Service Manual: Removal
- Discharge fuel system pressure (see page fu-9)
- Disconnect cable from negative battery terminal
Caution:
Wait at least 90 seconds after disconnecting the cable from the negative (-) battery terminal to prevent airbag and seat belt pretensioner activation.
- Remove hood sub-assembly (see page ed-4)
- Remove radiator support opening cover
- Remove battery clamp sub-assembly
- Loosen the bolt and nut, and remove the battery clamp.
- Remove battery
- Remove battery tray
- Remove front wheel
- Remove no. 1 Engine under cover
- Remove no. 2 Engine under cover
- Remove front fender apron rh
- Remove no. 1 Engine cover (see page em-22)
- Drain engine coolant (see page co-6)
- Drain automatic transaxle fluid
- Drain automatic transaxle fluid for u241e (2wd) (see page ax-146).
- Drain automatic transaxle fluid for u140f (4wd) (see page ax-147).
- Remove radiator assembly
- Remove the radiator (see page co-29).
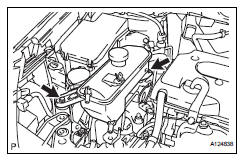
- Remove radiator reservoir
- Remove the 2 bolts and reservoir.
- Remove purge vsv (see page ec-15)
- Remove air cleaner cap (see page es-411)
- Remove air cleaner filter element subassembly
- Remove air cleaner case sub-assembly
- Remove the 3 bolts from the air cleaner case.
- Disconnect the case from the no. 1 Air cleaner inlet.
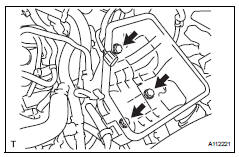
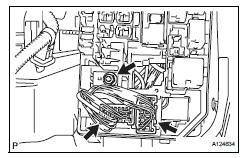
- Remove front battery carrier
- Disconnect the 2 clamps of the engine wire.
- Remove the 4 bolts and front battery carrier.
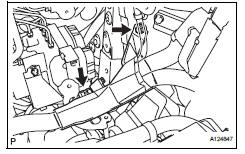
- Remove battery bracket reinforcement
- Remove the 2 bolts and battery bracket reinforcement.
- Remove battery carrier bracket
- Remove the 2 bolts, nut and battery carrier bracket.
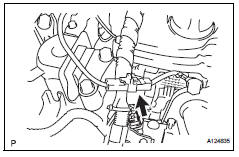
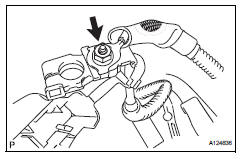
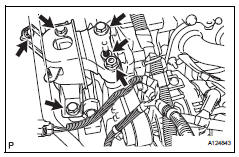
- Disconnect union to connector tube hose
- Disconnect the 2 union to connector tube hoses from the booster vacuum tube.
- Disconnect heater water inlet hose
- Disconnect the heater water inlet hose from the heater unit.
- Disconnect heater water outlet hose
- Disconnect the heater water outlet hose from the heater unit.
- Disconnect fuel tube (see page fu-10)
- Remove throttle body (see page es-412)
- Disconnect no. 2 Ventilation hose (see page fu-10)
- Remove fuel delivery pipe sub-assembly (see page fu-10)
- Remove intake manifold (see page es-419)
- Remove intake manifold insulator (see page es-420)
- Remove transaxle control cable assembly
- Remove the transaxle control cable for u241e (2wd) (see page ax-129).
- Remove the transaxle control cable for u140f (4wd) (see page ax-129).
- Remove front suspension member reinforcement rh (see page em-6)
- Remove fan and generator v belt (see page em-6)
- Remove generator assembly (see page ch-9)
- Remove cooler compressor assembly
- Remove the cooler compressor (see page ac-216).
Hint:
Disconnect the compressor together with the lowpressure and high-pressure hoses, then secure it to the vehicle side using rope.
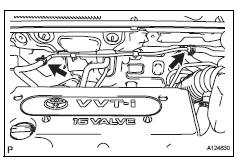
- Remove ecm (see page es-429)
- Disconnect engine wire
- Remove the engine room relay block cover.
- Remove the nut and disconnect the 2 engine wire connectors.
- Remove the bolt and engine wire cover. Then disconnect the engine wire from the engine wire cover.
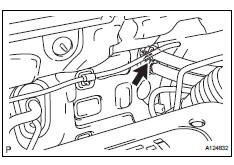
- Disconnect the ground cable connector.
- Remove the nut from the positive (+) battery terminal to disconnect the engine wire.
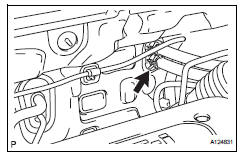
- Disconnect the ground cable from the clamp located near the starter.
- Remove the bolt and ground cable located near the starter.
- Remove front exhaust pipe assembly (see page ex-3)
- Remove front drive shaft assembly
- Remove the front drive shaft (for 2wd) (see page ds-7).
- Remove the front drive shaft (for 4wd) (see page ds-40).
- Remove propeller shaft assembly (for 4wd) (see page pr-3)
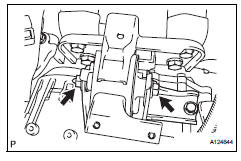
- Remove engine mounting insulator fr

- Remove the through bolt and nut.
- Remove the 2 bolts and engine mounting insulator fr.
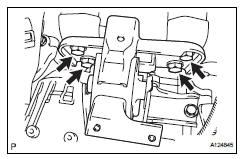
- Remove engine mounting insulator rr
- Remove the through bolt.
- Remove the 2 nuts, 2 bolts and engine mounting insulator rr.

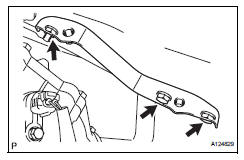
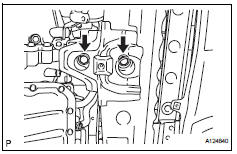
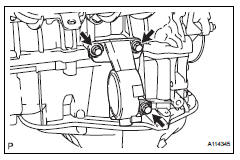
- Remove engine assembly with transaxle
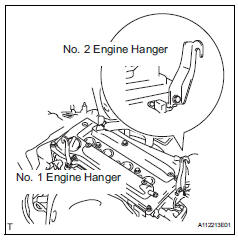
- Install the no. 1 And no. 2 Engine hangers with the bolts as shown in the illustration.
Torque: 38 n*m (387 kgf*cm, 28 ft.*Lbf)
part no. 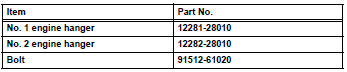

- Attach the sling device to the engine hangers and chain block.
- Carefully remove the engine with transaxle from the vehicle.
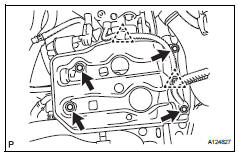
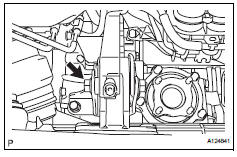
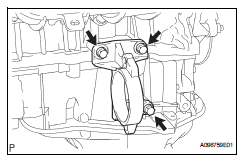
- Remove engine mounting insulator rh
- Remove the 2 nuts, 4 bolts and engine mounting insulator rh.
- Remove engine mounting insulator lh
- Remove the through bolt and nut.
- Remove the 4 bolts and engine mounting insulator lh.
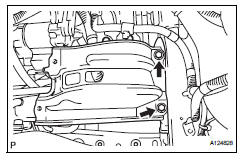
- Remove drive shaft bearing bracket (for 2wd)
- Remove the 3 bolts and bracket.
- Remove drive shaft bearing bracket (for 4wd)
- Remove the 3 bolts and bracket.
- Remove transfer assembly (for 4wd) (see page tf-59)
- Remove starter assembly (see page st-7)
- Remove automatic transaxle assembly
- Remove the automatic transaxle for u241e (2wd) (see page ax-147).
- Remove the automatic transaxle for u140f (4wd) (see page ax-148).
- Remove torque converter clutch assembly
- Remove the torque converter clutch for u241e (2wd) (see page ax-148).
- remove the torque converter clutch for u140f (4wd) (see page ax-149)
- Remove drive plate sub-assembly
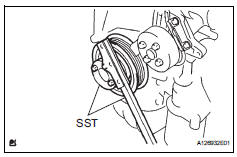
- Using sst, hold the crankshaft.
Sst 09213-54015 (91651-60855), 09330-00021
- Remove the 8 bolts, rear spacer, drive plate and front spacer.

 Components
...
 Installation
Install drive plate sub-assembly
Clean the 8 bolts and 8 bolt holes.
Apply adhesive to 2 or 3 threads of the 8 bolts.
Adhesive:
Toyota genuine adhesive 1342, three bond
1342 or equival ...
Other materials:
Detailed bluetooth®
system settings
You can confirm and change the detailed bluetooth® settings.
How to check and change detailed bluetooth® settings
Display the “bluetooth* setup” screen.
Select “system settings”.
The following screen is displayed:
Bluetooth® power on/off. You can change bluetooth®
fu ...
If the electronic key does
not operate properly (vehicles
with smart key system)
If communication between
the electronic key and vehicle
is interrupted or the electronic key cannot
be used because the battery
is depleted, the smart key
system and wireless remote
control cannot be used. In
such cases, the doors can
be opened and the engine
can be started by following
the procedur ...
If your vehicle has to
be stopped in an
emergency
Only in an emergency, such as if it becomes impossible to stop
the vehicle in the normal way, stop the vehicle using the following
procedure:
Steadily step on the brake pedal with both feet and firmly depress it.
Do not pump the brake pedal repeatedly as this will increase the effort
req ...
