Toyota RAV4 (XA40) 2013-2018 Owners Manual: Window lock switch
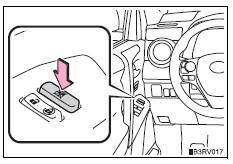
Press the switch to lock the passenger window switches.
Use this switch to prevent children from accidentally opening or closing a passenger window.
The power windows can be operated when
- Vehicles without a smart key system
The engine switch is in the ŌĆ£onŌĆØ position.
- Vehicles with a smart key system
The engine switch is in ignition on mode.
Operating the power windows after turning the engine off
- Vehicles without a smart key system
The power windows can be operated for approximately 45 seconds after the engine switch is turned to the ŌĆ£accŌĆØ or ŌĆ£lockŌĆØ position. They cannot, however, be operated once either front door is opened.
- Vehicles with a smart key system
The power windows can be operated for approximately 45 seconds after the engine switch is turned to accessory mode or turned off. They cannot, however, be operated once either front door is opened.
Jam protection function (if equipped for driverŌĆÖs window)
If an object becomes caught between the window and the window frame, window travel is stopped and the window is opened slightly.
When the power window does not close normally
If the jam protection function is operating abnormally and a window cannot be closed, perform the following operations using the power window switch on the driverŌĆÖs door.
- Vehicles without a smart key system: after stopping the vehicle, the window can be closed by holding the power window switch in the one-touch closing position while the engine switch is turned to the ŌĆ£onŌĆØ position
- Vehicles with a smart key system: after stopping the vehicle, the window can be closed by holding the power window switch in the one-touch closing position while the engine switch is turned to ignition on mode.
- If the window still cannot be closed even by carrying out the operation as explained above, initialize the function by performing the following procedure.
- Press and hold the power window switch. Continue holding the switch for 1 second or more after the window has opened completely.
- Hold the power window switch in the one-touch closing position. Continue holding the switch for 1 second or more after the window has closed completely.
If you release the switch while the window is moving, start again from the beginning.
If the window continues to close but then re-open slightly even after performing the above procedure correctly, have the vehicle inspected by your toyota dealer.
Caution
Observe the following precautions.
Failure to do so may result in death or serious injury.
Closing the windows
- The driver is responsible for all the power window operations, including the operation for the passengers. In order to prevent accidental operation, especially by a child, do not let a child operate the power windows. It is possible for children and other passengers to have body parts caught in the power window. Also, when riding with a child, it is recommended to use the window lock switch.
- Check to make sure that all passengers do not have any part of their body in a position where it could be caught when a window is being operated.
- When exiting the vehicle, turn the engine switch off, carry the key and exit the vehicle along with the child. There may be accidental operation, due to mischief, etc., That may possibly lead to an accident.
Jam protection function (if equipped for driverŌĆÖs window)
- Never use any part of your body to intentionally activate the jam protection function.
- The jam protection function may not work if something gets caught just before the window fully closes.
 Opening and closing procedures
The power windows can be opened and closed using the switches.
Operating the switch moves the windows as follows:
Closing
One-touch closing (driverŌĆÖs window
only) (if equipped)*
Opening ...
 Moon roof
Use the overhead switches to open and close the moon roof and
tilt it up and down. ...
Other materials:
Taillight relay circuit
Description
When the light control switch, located on the headlight dimmer switch, is
turned to the tail position, the
taillight relay (marking: t-lp) turns on to illuminate the front side marker
lights, rear taillights, side marker
lights and license plate light.
Wiring diagram
Ins ...
Disassembly
Fix differential carrier sub-assembly
Fix the rear differential carrier in place with the
overhaul attachment.
Remove stud bolt
Remove the 4 stud bolts from the transmission
coupling.
Remove differential drain plug
Using a 10 mm socket hexagon wrench, remove ...
Master cylinder pressure sensor malfunction
Description
The master cylinder pressure sensor is connected to the skid control ecu in
the abs and traction
actuator.
Dtc c1281/81 can be detected when the master cylinder pressure sensor sends a
master cylinder
pressure signal or test mode ends. Dtc c1281/81 is output only in test mo ...
