Toyota RAV4 (XA40) 2013-2018 Owners Manual: Basic audio operations
Basic audio operations and functions common to each mode are explained in this section.
Operating the audio system
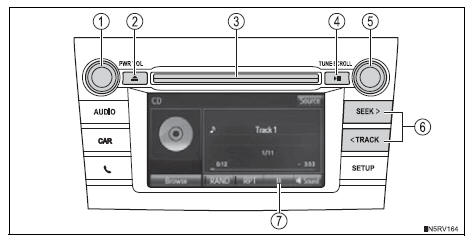
- Press this knob to turn the audio system on and off, and turn it to adjust the volume.
- Press this button to eject a disc
- Insert a disc into the disc slot
- Press to pause or resume playing music.
- Turn this knob to select radio
station bands, tracks and files.
Also the knob can be used to select items in the list display.
- Press the button to seek up or down for a radio station, or to access a desired track or file.

Select to pause music.
Select to resume playing music.
Random playback
Select  to
to
change on/off.
Repeat play
Select  to
to
change on/off.
Using cellular phones
Interference may be heard through the audio system’s speakers if a cellular phone is being used inside or close to the vehicle while the audio system is operating.
Caution
Laser product
This product is a class 1 laser product.
Do not open the cover of the player or attempt to repair the unit yourself.
Refer servicing to qualified personnel.
Laser products
- Do not take this unit apart or attempt to make any changes
yourself.
This is an intricate unit that uses a laser pickup to retrieve information from the surface of compact discs. The laser is carefully shielded so that its rays remain inside the cabinet. Therefore, never try to disassemble the player or alter any of its parts since you may be exposed to laser rays and dangerous voltages.
- This product utilizes a laser.
Use of controls or adjustments or performance of procedures other than those specified herein may result in hazardous radiation exposure.
The use of optical instruments with this product will increase eye hazard.
Notice
To prevent battery discharge
Do not leave the audio system on longer than necessary when the engine is off.
To avoid damaging the audio system
Take care not to spill drinks or other fluids on the audio system.
 Usb port/aux port
Connect an ipod, usb memory device or portable audio player
to the usb/aux port as indicated below. Select “ipod”, “usb” or
“aux” on the audio source selection screen and the device can
...
 Setup menu
You can adjust the audio system to your desired settings.
Display “setup” screen
Press the “setup” button to display the “setup” screen.
Select to adjust the settings for
operation ...
Other materials:
Freeze frame data
Description
Freeze frame data records the engine conditions (fuel
system, calculated load, engine coolant temperature,
fuel trim, engine speed, vehicle speed, etc.) When a
malfunction is detected. When troubleshooting, it can
help determine if the vehicle was running or stopped, the
engin ...
Disassembly
Caution:
Wear protective gloves. Sharp areas on the seat frame
(with adjuster) may injure your hands.
Hint:
Use the same procedures for the rh side and lh side.
The procedures listed below are for the lh side.
Remove vertical adjuster cover lh (for driver side)
Using a screw ...
Installation
Install fuel filler opening lid lock retainer
Install the lock retainer and turn it counterclockwise
as shown in the illustration.
Install fuel filler opening lid lock retainer
Install the cable and turn it clockwise as shown in
the illustration.
Install the fuel l ...
