
Toyota RAV4 (XA40) 2013-2018 Service Manual: Dtc check / clear
- Check dtc (using intelligent tester)
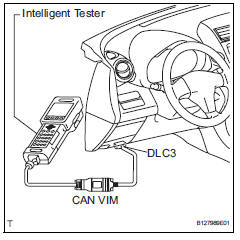
- Connect the intelligent tester (with can vim) to the dlc3.
- Turn the ignition switch on.
- Read the dtcs by following the directions on the tester screen.
Hint:
Refer to the intelligent tester operator's manual for further details.
- Check dtc (using sst check wire)
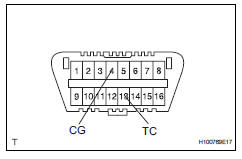
- Using sst, connect terminals 13 (tc) and 4 (cg) of the dlc3.
Sst 09843-18040
- Turn the ignition switch on.
- Read the dtc on the cruise main indicator light.
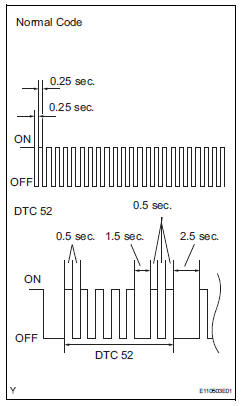
Hint:
- If the dtc is not output, inspect the diagnosis circuit.
- As an example, the blinking patterns of a normal code and code 52 are shown in the illustration.
- Clear dtc (using intelligent tester)
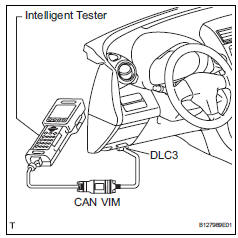
- Connect the intelligent tester (with can vim) to the dlc3.
- Turn the ignition switch on.
- Read the dtcs by following the directions on the tester screen.
Hint:
Refer to the intelligent tester operator's manual for further details.
- Clear dtc (using sst check wire)
- Read and record dtcs from the cruise main indicator light. Turn the ignition switch off.
- If dtcs are indicated, repair the relevant circuits using the dtc chart (see page cc-18).
- Clear the dtcs according to one of the following procedures.
- Disconnect the negative (-) battery cable for more than 1 minute.
- Remove the efi no. 1 And etcs fuses from the engine room relay block (located inside the engine compartment) for more than 1 minute.
- Recheck for dtcs.
 Diagnosis system
Description
The ecm controls the function of cruise control on this
vehicle. Data of the cruise control or dtc can be read
from the dlc3 of the vehicle. When trouble occurs with
cruise contro ...
 Fail-safe chart
Hint:
If the following conditions are detected while the cruise
control is in operation, the system clears the stored vehicle
speed in the ecm and cancels the cruise control operation.
Hint:
...
Other materials:
Reassembly
Hint:
Thoroughly clean all parts to be assembled.
Before installing the parts, apply fresh engine oil to all
sliding and rotating surfaces.
Replace oil seals with new ones.
Install valve stem oil seal
Using sst, push in a new oil seal.
Sst 09201-41020
Hint:
The int ...
Removal
Remove radiator grille sub-assembly
Remove the 4 bolts and 4 nuts.
Detach the 6 claws and remove the radiator grille.
Remove no. 1 Radiator grille lower
Detach the 16 claws and remove the radiator grille.
Remove no. 2 Radiator grille lower
Detac ...
Calibration
Description
After replacing components relating to the vsc or
performing "front wheel alignment adjustment",
clear and read the sensor calibration data.
Follow the chart to perform calibration.
Clear zero point calibration data (when using
intelligent tester)
...
