Toyota RAV4 (XA40) 2013-2018 Service Manual: Front power seat control system
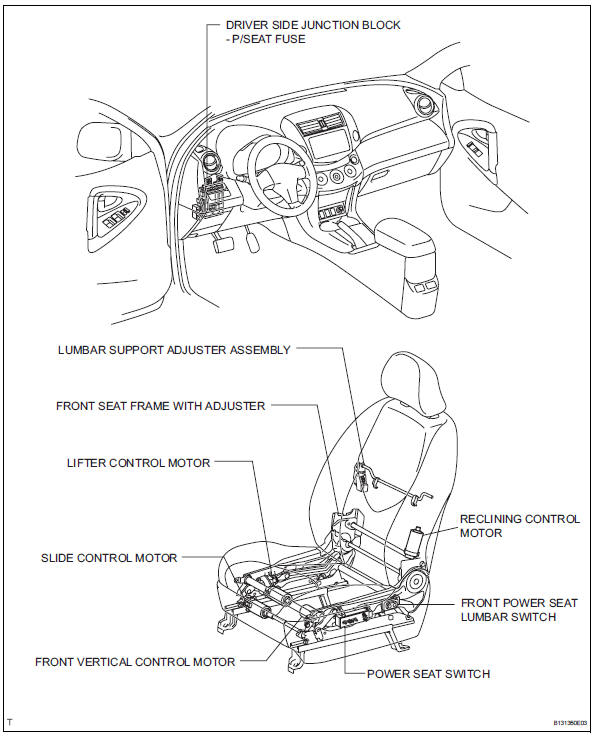
Parts location
System diagram

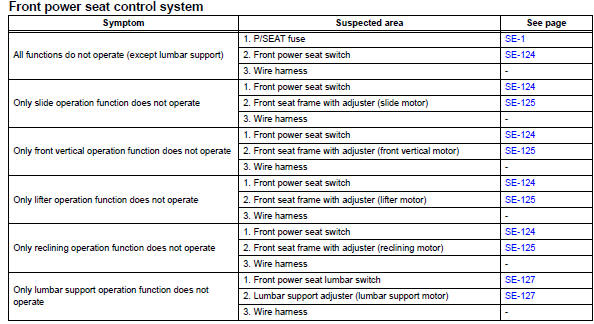
Problem symptoms table
Hint:
Use the table below to help determine the cause of the problem symptom. The potential causes of the symptoms are listed in order of probability in the "suspected area" column of the table. Check each symptom by checking the suspected areas in the order they are listed. Replace parts as necessary.
On-vehicle inspection
- Check power seat function
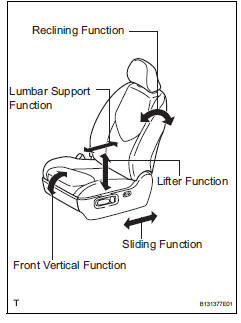
- Check the basic functions.
- Operate the power seat switches and check to make sure each seat function works:
- Sliding
- Front vertical
- Lifter
- Reclining
- Lumbar support
- Check front seat frame with adjuster (sliding, front vertical, lifter and reclining functions)
- Check the ptc operation inside the power seat motor.
Hint:
The ptc thermistor's resistance increases when the power seat switch is held down even after the power seat has been moved to the maximum in one direction. If the resistance increases beyond a specified level, current is cut to prevent a short circuit.
Notice:
- The inspection should be performed with the seat installed in the vehicle.
- Perform the 4 steps below for the full range of motion for each power seat function.
- Choose a power seat function. Operate the power seat switch and move the seat as much as possible in one direction. Keep the seat in that position for approximately 60 seconds.
- Operate the power seat switch again and continue to try to move the seat in the same direction as in the previous step. Measure the amount of time elapsed before current is automatically cut (the sound of the motor has stopped).
Standard: 4 to 90 seconds
- After current has been cut, release the power seat switch and wait for approximately 60 seconds.
- Operate the same power seat switch and move the seat in the opposite direction. Check that the motor operates.
- Check lumbar support adjuster assembly
- Check the ptc operation inside the power seat motor.
Notice:
The inspection should be performed with the seat installed in the vehicle.
- Operate the lumbar support switch and move the lumbar support to either the foremost or rearmost position. Keep the seat in that position for approximately 60 seconds.
- Operate the lumbar support switch again and
continue to try to move the lumbar support in
the same direction as in the previous step.
Measure the amount of time elapsed before current is automatically cut (the sound of the motor has stopped).
Standard: 4 to 90 seconds
- After current has been cut, release the lumbar support switch and wait for approximately 60 seconds.
- Operate the lumbar support switch and move the seat in the opposite direction. Check that the motor operates.
 Seat
Seat
...
 Seat heater system
Parts location
System diagram
Problem symptoms table
Hint:
Use the table below to help determine the cause of the
problem symptom. The potential causes of the symptoms are
listed in orde ...
Other materials:
Horn relay
On-vehicle inspection
Remove engine room no. 1 Relay block cover
Inspect integration relay (unit a: horn relay)
Using a screwdriver, detach the 2 claws and
disconnect the integration relay from the engine
room junction block.
Hint:
Tape the screwdriver tip before use.
Mea ...
Open in pump motor circuit
Description
The motor relay drives the pump motor based on a signal from the skid control
ecu.
Wiring diagram
Refer to dtc c0273/13, c0274/14, c1361/91 (see page bc-79).
Inspection procedure
Perform active test by intelligent tester (motor relay)
Select the active test, gener ...
Seat belt pretensioners (front seats)
The pretensioners help the seat
belts to quickly restrain the occupants
by retracting the seat belts
when the vehicle is subjected to
certain types of severe frontal or
side collision or a vehicle rollover.
The pretensioners do not activate
in the event of a minor frontal
impact, a minor ...
