Toyota RAV4 (XA40) 2013-2018 Service Manual: Installation
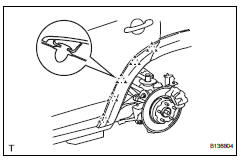
Hint:
- Use the same procedures for the rh side and lh side.
- The procedures listed below are for the lh side.
- When installing the moulding, heat the vehicle body and moulding using a heat light.
Standard heating temperature 
Notice:
Do not heat the vehicle body and moulding excessively.
- Install no. 1 Rocker panel moulding retainer lh
- Install the 2 retainers with the 4 screws.
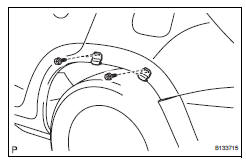
- Install quarter opening retainer lh
- Install the retainer with the 4 screws.
- Install no. 2 Rocker panel moulding retainer lh
- Install the retainer with the 2 screws.
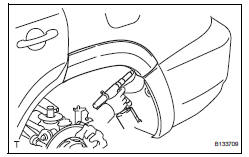
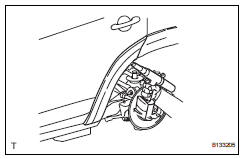
- Install rear quarter outside moulding lh
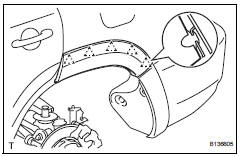
- Attach the 5 clips to install the moulding.
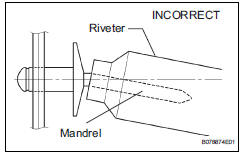
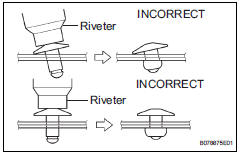
- Using an air riveter or hand riveter with a nose piece, strike 2 rivets to the vehicle to install the rear quarter outside moulding to the vehicle.
Notice:
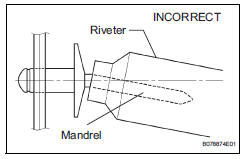
If the rivet is not positioned perpendicularly, it will bend the mandrel.
- Do not pry the rivet with the riveter, as this will cause damage to the riveter and mandrel.
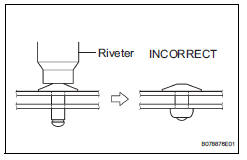
- Confirm that the rivets are seated properly against the moulding. Do not tilt the riveter when installing the rivet to the moulding. Do not leave any space between the rivet head and moulding.
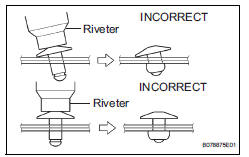
- Do not leave any space between the moulding and door panel. Firmly hold together the 2 items while installing the rivet.
- Install no. 1 Rear wheel opening extension lh
- Attach the 5 clips to install the extension.
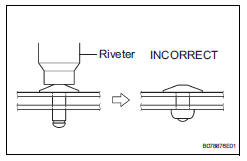
Using an air riveter or hand riveter with a nose piece, strike 2 rivets to the vehicle to install the rear wheel opening extension to the vehicle.
Notice:
If the rivet is not positioned perpendicularly, it will bend the mandrel.
- Do not pry the rivet with the riveter, as this will cause damage to the riveter and mandrel.
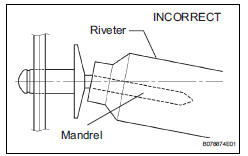
- Confirm that the rivets are seated properly against the moulding. Do not tilt the riveter when installing the rivet to the moulding. Do not leave any space between the rivet head and moulding.
- Do not leave any space between the moulding and door panel. Firmly hold together the 2 items while installing the rivet.
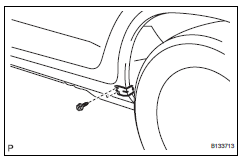
- Install no. 2 Rear wheel opening extension lh
- Attach the clip to install the extension.
Install the screw and clip.
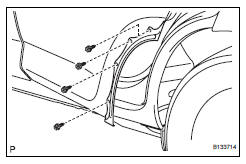
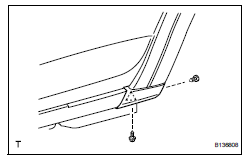
- Install front fender moulding subassembly lh
- Attach the 9 clips to install the extension
- Install the 4 screws and 2 clips.
 Removal
Hint:
Use the same procedures for the rh side and lh side.
The procedures listed below are for the lh side.
When removing the moulding, heat the vehicle body and
moulding using a heat light. ...
 Back door outside garnish
Components
Removal
Disconnect cable from negative battery
terminal
Caution:
Wait at least 90 seconds after disconnecting the
cable from the negative (-) battery terminal to
preven ...
Other materials:
Gcwr, twr and unbraked twr
Confirm that the gross trailer weight, gross combination weight, gross
vehicle weight, gross axle weight and tongue weight are all within the
limits.
Gcwr*
2Wd models: 5985 lb. (2715 Kg)
Awd models: 6100 lb. (2765 Kg)
Twr*
1500 Lb. (680 Kg)
Unbraked twr*
1000 Lb. (450 Kg)
*: ...
Seat belt pretensioners (front seats)
The pretensioners help the seat
belts to quickly restrain the occupants
by retracting the seat belts
when the vehicle is subjected to
certain types of severe frontal or
side collision or a vehicle rollover.
The pretensioners do not activate
in the event of a minor frontal
impact, a minor ...
Insufficient coolant temperature for closed loop fuel control
Description
Refer to dtc p0115 (see page es-105).
Monitor description
The resistance of the ect sensor varies in proportion to the actual ect. The
ect supplies a constant
voltage to the sensor and monitors the signal output voltage of the sensor. The
signal voltage output
varies acc ...
