Toyota RAV4 (XA40) 2013-2018 Service Manual: Oil filter
Components

Replacement
Caution:
- Prolonged and repeated contact with engine oil will cause the loss of natural oils from the skin, leading to dryness, irritation and dermatitis. In addition, used engine oil contains potentially harmful contaminants which may cause skin cancer.
- Precautions should be taken when replacing engine oil to minimize the risk of your skin making contact with used engine oil. Wear protective clothing and gloves. Wash your skin thoroughly with soap and water, or use a waterless hand cleaner to remove any used engine oil. Do not use gasoline, thinners or solvents.
- For environmental protection, used oil and used oil filters must be disposed of at designated disposal sites.
- Remove no. 1 Engine under cover
- Drain engine oil
- Remove the oil filler cap.
- Remove the oil drain plug and drain the oil into a container.
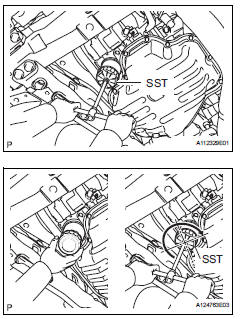
- Remove oil filter sub-assembly
- Using sst, remove the oil filter.
Sst 09228-06501
- Install oil filter sub-assembly
- Check and clean the oil filter installation surface.
- Apply clean engine oil to the gasket of a new oil filter.
- Lightly screw the oil filter into place by hand. Tighten it until the gasket contacts the seat.
- Using sst, tighten the oil filter.
Sst 09228-06501
Depending on the work space available, choose from the following.
1. If enough space is available, use a torque wrench to tighten the oil filter.
Torque: 17.2 N*m (175 kgf*cm, 13 ft.*Lbf) 2. If enough space is not available to use a torque wrench, tighten the oil filter a 3/4 turn by hand or use a common wrench.
- Add engine oil
- Clean and install the oil drain plug with a new gasket.
Torque: 40 n*m (408 kgf*cm, 30 ft.*Lbf)
- Add new oil.
Standard capacity 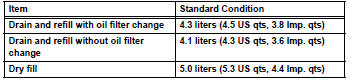
- Install the oil filler cap.
- Check for engine oil leaks
- Install no. 1 Engine under cover
 Lubrication system
On-vehicle inspection
Check engine oil level
Warm up the engine, stop the engine and wait for 5
minutes.
Check that the engine oil level is between the l and
f marks of the oil dipstic ...
 Oil pump
Components
Removal
Remove chain sub-assembly
Remove the chain (see page em-22).
Remove oil pump assembly
Remove the 3 bolts, oil pump and gasket.
...
Other materials:
Disassembly
Caution:
Wear protective gloves. Sharp areas on the seat frame
(with adjuster) may injure your hands.
Remove reclining power seat switch knob
Using a screwdriver, detach the knob.
Hint:
Tape the screwdriver tip before use.
Remove slide and vertical power seat switch knob
...
Driver side rear airbag sensor circuit malfunction
Description
The rear airbag sensor lh consists of parts including the diagnostic circuit
and the lateral deceleration
sensor.
When the center airbag sensor receives signals from the lateral deceleration
sensor, it determines
whether or not the srs should be activated.
Dtc b1630/23 i ...
Initializing the tire pressure
warning system (if
equipped)
â– The tire pressure warning
system must be initialized
in the following circumstances:
When rotating the tires.
When changing the tire.
After registering the ID codes.
When the tire pressure warning
system is initialized, the current
tire inflation pressure is set as
the benchmark pressure.
â ...
