Toyota RAV4 (XA40) 2013-2018 Service Manual: Removal
Hint:
- Use the same procedures for the rh side and lh side.
- The procedures listed below are for the lh side.
- Disconnect cable from negative battery terminal
Caution:
Wait at least 90 seconds after disconnecting the cable from the negative (-) battery terminal to prevent airbag and seat belt pretensioner activation.
- Remove front seat headrest assembly
- Remove front seat track bracket outer cover lh
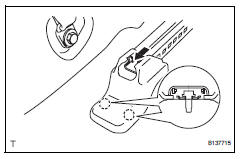
- Lift up the seat track adjusting handle and move the seat to the foremost position
- Using a screwdriver, detach the 4 claws.
Hint:
Tape the screwdriver tip before use.
- Remove the outer cover in the direction indicated by the arrow in the illustration.
- Remove front seat track bracket inner cover lh
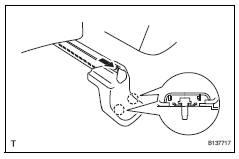
- Using a screwdriver, detach the 2 claws.
Hint:
Tape the screwdriver tip before use.
- Remove the inner cover in the direction indicated by the arrow in the illustration.
- Remove front seat assembly
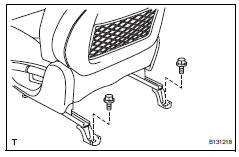
- Remove the 2 bolts on the rear side of the seat.
- Lift up the seat track adjusting handle and move the seat to the rearmost position.
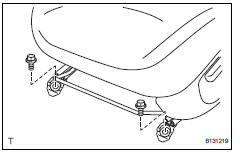
- Remove the 2 bolts on the front side of the seat.
- Lift up the seat track adjusting handle and move the seat to the center position. Also, operate the reclining adjuster release handle and move the seatback to the upright position.
- Disconnect the connector under the seat.
- Remove the seat.
Notice:
Be careful not to damage the vehicle body.
 Front seat assembly (for manual seat)
Components
...
 Disassembly
Caution:
Wear protective gloves. Sharp areas on the seat frame
(with adjuster) may injure your hands.
Hint:
Use the same procedures for the rh side and lh side.
The procedures listed below ar ...
Other materials:
Inside vehicle
General maintenance
Performing the following maintenance checks on the vehicle
is the owner's responsibility. The owner may perform the
maintenance or take the vehicle to a service center. Check
the parts of the vehicle described below on a daily basis. In
most cases, special tools are not requ ...
Throttle / pedal position sensor / switch "A"
Hint:
These dtcs relate to the throttle position (tp) sensor.
Description
The tp sensor is mounted on the throttle body, and detects the opening angle
of the throttle valve. This
sensor is a non-contact type. It uses hall-effect elements in order to yield
accurate signals even in
extrem ...
Hydraulic test
Measure line pressure
Notice:
Perform the test at the normal operating atf
temperature: 50 to 80°c (122 to 176°f).
The line pressure test should always be
performed with at least 2 people. One person
should observe the condition of the wheels or
wheel chocks while the other ...
