Toyota RAV4 (XA40) 2013-2018 Service Manual: Speed sensor
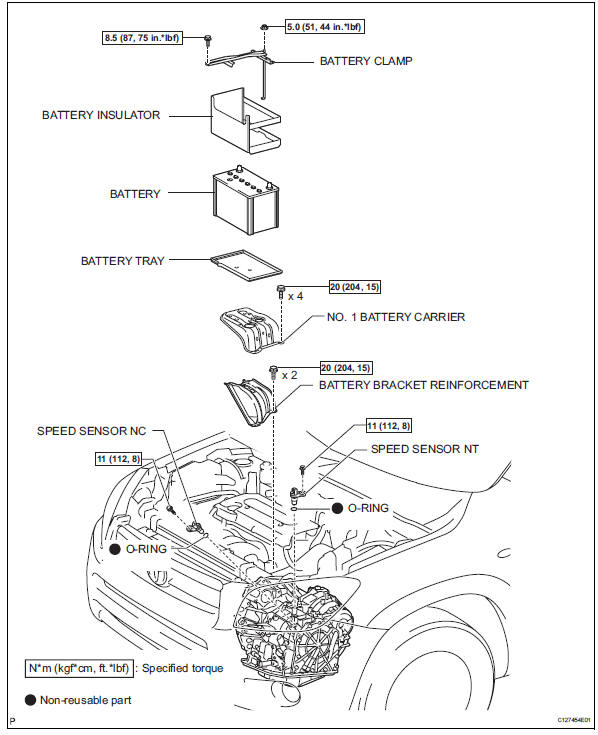
Components
Removal
- Disconnect cable from negative battery terminal
Caution:
Wait at least 90 seconds after disconnecting the cable from the negative (-) battery terminal to prevent airbag and seat belt pretensioner activation.
- Remove battery
- Loosen the nut and remove the bolt and battery clamp.
- Remove the battery.
- Remove the battery tray.
- Remove the 4 bolts and battery carrier.
- Remove the 2 bolts and battery bracket reinforcement.
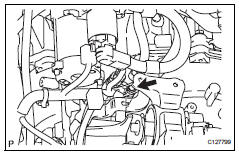
- Remove speed sensor nt
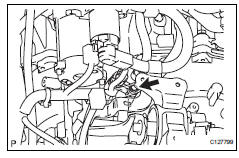
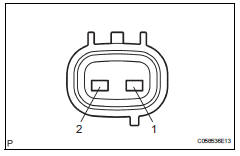
- Disconnect the sensor connector.
- Remove the bolt and sensor.
- Remove the o-ring from the sensor.
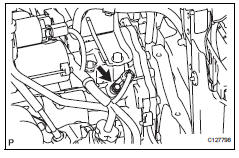
- Remove speed sensor nc
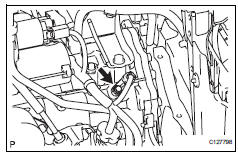
- Disconnect the sensor connector.
- Remove the bolt and sensor.
- Remove the o-ring from the sensor.
Inspection
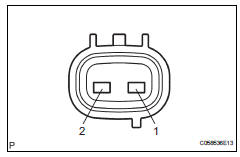
- Inspect speed sensor nt
Measure the resistance of the sensor.
Standard resistance 
- Inspect speed sensor nc
Measure the resistance of the sensor.
Standard resistance 
Installation
- Install speed sensor nc
- Coat a new o-ring with atf.
- Install the o-ring to the sensor.
- Install the sensor with the bolt.
Torque: 11 n*m (112 kgf*cm, 8 ft.*Lbf)
- Connect the sensor connector.
- Install speed sensor nt
- Coat a new o-ring with atf.
- Install the o-ring to the sensor.
- Install the sensor with the bolt.
Torque: 11 n*m (112 kgf*cm, 8 ft.*Lbf)
- Connect the sensor connector.
- Install battery
- Install the battery bracket reinforcement with the 2 bolts.
Torque: 20 n*m (204 kgf*cm, 15 ft.*Lbf)
- Install the battery carrier with the 4 bolts.
Torque: 20 n*m (204 kgf*cm, 15 ft.*Lbf)
- Install the battery tray.
- Install the battery with the battery clamp.
Torque: 8.5 N*m (87 kgf*cm, 75 in.*Lbf) for bolt
5.0 N*m (51 kgf*cm, 44 in.*Lbf) for nut
- Connect cable to negative battery terminal
 Automatic transaxle fluid
On-vehicle inspection
Check transaxle fluid level
Hint:
Drive the vehicle so that the engine and transaxle are at
normal operating temperature.
Fluid temperature:
70 to 80°c (158 to 176°f ...
 Transmission wire
Components
Removal
Disconnect cable from negative battery
terminal
Caution:
Wait at least 90 seconds after disconnecting the
cable from the negative (-) battery terminal to
preven ...
Other materials:
Passenger airbag on / off indicator circuit malfunction
Description
The passenger airbag on / off indicator circuit consists of the center airbag
sensor and the heater
control panel*1 or *2.
This circuit indicates the operation condition of the front passenger airbag,
the front passenger side airbag
and passenger side seat belt pretensioner ...
Cruise control switch circuit
Description
This circuit sends signals to the ecm depending on the cruise control switch
condition. The battery
supplies positive (+) battery voltage to the cruise control switch. Then
terminal ccs of the ecm receives
the voltage according to the switch condition.
Wiring diagram
Inspect ...
Front wiper motor and link
Components
Removal
Disconnect cable from negative battery
terminal
Caution:
Wait at least 90 seconds after disconnecting the
cable from the negative (-) battery terminal to
prevent airbag and seat belt pretensioner activation.
Remove front wiper arm head cap
Remove the 2 c ...
