Toyota RAV4 (XA40) 2013-2018 Service Manual: Data list / active test
- Read data list
Hint:
Using the intelligent tester's data list allows switch, actuator and other item values to be read without removing any parts. Reading the data list early in troubleshooting is one way to save time.
- Connect the intelligent tester (with can vim) to the dlc3.
- Turn the ignition switch on.
- Read the data list.

Key reminder buzzer does not sound
Description
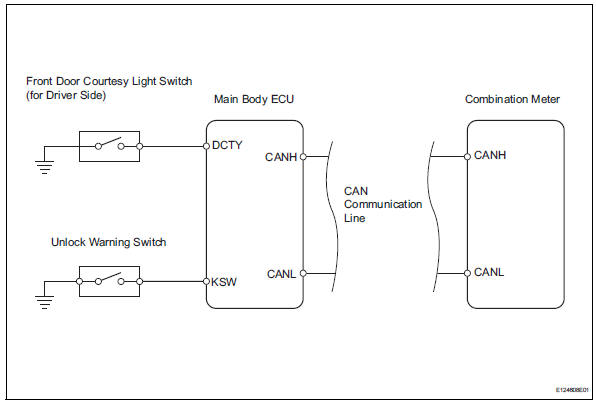
The key reminder warning buzzer sounds when the driver side door is opened while the ignition switch is in the lock or acc positions. The key reminder warning buzzer is activated when the main body ecu sends a key switch signal and driver side courtesy switch signal to the combination meter.
Hint: since the key reminder warning system has functions that use can communication, first confirm that there is no malfunction in the communication system by inspecting the can communication functions in accordance with the "how to proceed with troubleshooting" procedures. Then, conduct the following inspection procedure.
Wiring diagram
Inspection procedure
- Read value using intelligent tester (front door courtesy light switch)
- Check the data list to ensure proper operation of the front door courtesy light switch.

Ok: "on" (driver door is open) appears on the screen.


- Read value using intelligent tester (unlock warning switch)
- Check the data list to ensure proper operation of the door unlock warning switch.

Ok: "on" (key is in ignition key cylinder) appears on the screen.


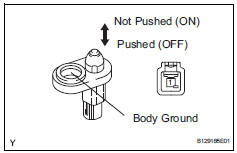
- Inspect unlock warning switch assembly
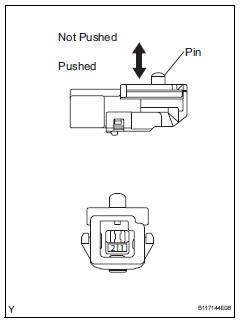
- Remove the unlock warning switch.
- Measure the resistance of the switch.
Standard resistance 


- Check wire harness (unlock warning switch - main body ecu)
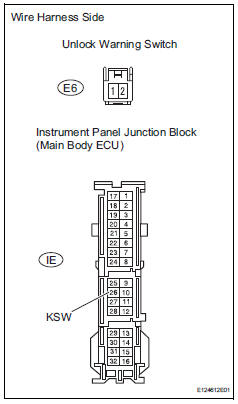
- Disconnect the e6 switch connector.
- Disconnect the ie junction block connector.
- Measure the resistance between the wire harness side connectors.
Standard resistance 


Replace instrument panel junction block (main body ecu)
- Inspect front door courtesy light switch (for driver side)
- Remove the courtesy light switch.
- Measure the resistance of the switch.
Standard resistance 


- Check wire harness and connectors (front door courtesy light switch - main body ecu)
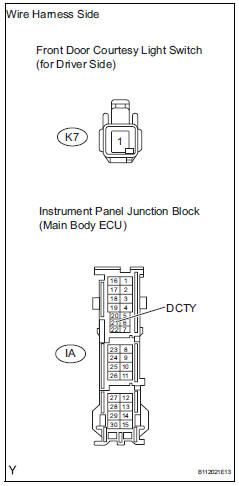
- Disconnect the k7 connector.
- Disconnect the ia junction block connector.
- Measure the resistance between the wire harness side connectors.
Standard resistance 


Replace instrument panel junction block (main body ecu)
 Diagnosis system
Description
Key reminder warning system data can be read
through the data link connector 3 (dlc3) of the
vehicle. When the system seems to be
malfunctioning, use the intelligent tes ...
 Door control transmitter module
Components
Removal
Remove transmitter housing cover
Notice:
Take extra care when handling these precision
electronic components.
Twist the screwdriver in the direction of the arrow
...
Other materials:
Installation
Hint:
Use the same procedures for the rh side and lh side.
The procedures listed below are for the lh side.
Install front door belt moulding
assembly lh
Attach the claws to install the belt moulding.
Hint:
Confirm that the moulding is firmly installed.
Install outer r ...
Blower motor
On-vehicle inspection
Inspect blower motor (for automatic air conditioning system)
Disconnect the blower motor connector.
Connect the positive (+) lead from the battery to
terminal 1 and negative (-) lead to terminal 2, and
then check that the motor operates smoothly.
If the ...
Display contents
Following information is displayed
on the multi-information
display.
Content display area (left)
Content display area (center)
Content display area (right)
Driving support system information
display area
When driving information support
system is displayed on the content
display area, the sy ...
