Toyota RAV4 (XA40) 2013-2018 Service Manual: Installation
Hint:
- Use the same procedures for the lh side and rh side.
- The procedures listed below are for the lh side.
- A bolt without a torque specification is shown in the standard bolt chart (see page ss-2).
- Install front shoulder belt anchor adjuster assembly
- Align the adjuster positioning hole with the claw, and install the adjuster with the 2 bolts as shown in the illustration.
Torque: 42 n*m (428 kgf*cm, 31 ft.*Lbf)
- Install front shoulder belt anchor plate sub-assembly lh
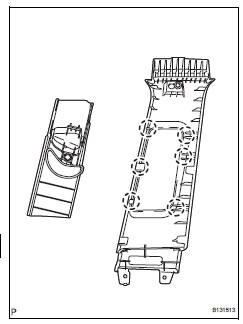
- Install the plate as shown in the illustration.
Hint:
Make sure the plate is firmly set into the garnish's claws.
- Install front seat outer belt assembly lh
Notice:
Do not disassemble the retractor.
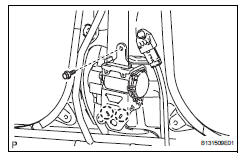
- Align the 2 claws with the seat belt positioning
holes, and install the retractor of the outer belt with
the bolt as shown in the illustration.
Torque: 8.5 N*m (87 kgf*cm, 75 in.*Lbf)
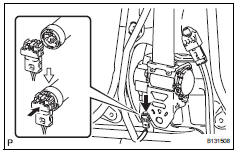
- Connect the pretensioner connector as shown in the illustration.
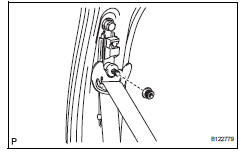
- Connect the outer belt with the shoulder anchor's
bolt.
Torque: 42 n*m (428 kgf*cm, 31 ft.*Lbf)
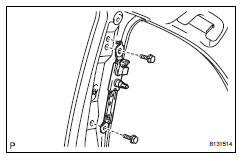
- Install center pillar garnish lh
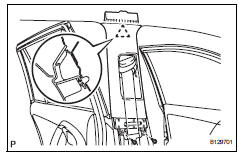
- Pass the outer belt anchor through the center pillar garnish.
- Attach the clip.
- Install the garnish with the 2 screws.
- Install center pillar garnish lower lh
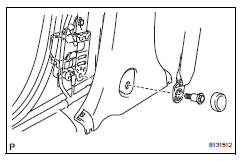
- Attach the 2 claws and 2 clips to install the garnish.
- Connect the floor anchor with the bolt.
Torque: 42 n*m (428 kgf*cm, 31 ft.*Lbf)
- Attach the lap belt outer anchor cover
- Install rear door opening trim weatherstrip lh
- Install rear door scuff plate lh (see page ir-57)
- Install front door scuff plate lh (see page ir-59)
- Install front door opening trim weatherstrip lh
- Connect cable to negative battery terminal
 Inspection
Inspect front seat outer belt assembly
Notice:
Do not disassemble the retractor.
Before installing the outer belt, check the elr.
When the inclination of the retractor is 15Đ or
...
 Disposal
Hint:
When scrapping vehicles equipped with a seat belt
pretensioner or disposing of a front seat outer belt (with seat
belt pretensioner), always first activate the seat belt
pretensioner in acco ...
Other materials:
Toyota Safety Sense 2.5
The Toyota Safety Sense
2.5 consists of the following
drive assist systems and
contributes to a safe and
comfortable driving experience:
Driving assist system
PCS (Pre-Collision System)
LTA (Lane Tracing Assist)
AHB (Automatic High
Beam)
RSA (Road Sign Assist) (if
equipped)
Dynamic radar cru ...
Short in motor circuit
Description
The power steering ecu supplies current to the power steering motor through
this circuit.
Inspection procedure
Reconfirm dtc
Check for dtc.
Ok:
dtc is not output.
Replace power steering ecu ...
Compressor circuit
Description
When the a/c switch is turned on, the magnetic clutch on signal is sent from
the air conditioning
amplifier. Then the mg clt relay turns on to operate the magnetic clutch.
Wiring diagram
Inspection procedure
Perform active test by intelligent tester (a/c mag clutch)
C ...
