
Toyota RAV4 (XA40) 2013-2018 Service Manual: Intake air temperature sensor gradient too high

Description
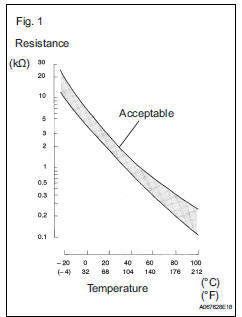
The intake air temperature (iat) sensor, mounted on the mass air flow (maf) meter, monitors the iat.
The iat sensor has a built-in thermistor with a resistance that varies according to the temperature of the intake air. When the iat is low, the resistance of the thermistor increases. When the temperature is high, the resistance drops. These variations in resistance are transmitted to the ecm as voltage changes (see fig. 1).
The iat sensor is powered by a 5 v supply from the tha terminal of the ecm, via resistor r.
Resistor r and the iat sensor are connected in series. When the resistance value of the iat sensor changes, according to changes in the iat, the voltage at terminal tha also varies. Based on this signal, the ecm increases the fuel injection volume when the engine is cold to improve driveability.

Monitor description
The ecm performs obd ii monitoring based on the values from the intake air temperature sensor. If there is no change of the sensor value within the normal range, the ecm will not be able to perform obd ii monitoring or will misdiagnose that there is a malfunction in the sensor. The ecm detects the stuck intake air temperature sensor value by performing monitoring after the ignition switch is turned off or the engine is started (short soak or long soak).
Monitor strategy
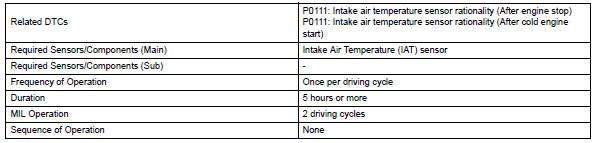
Typical enabling conditions
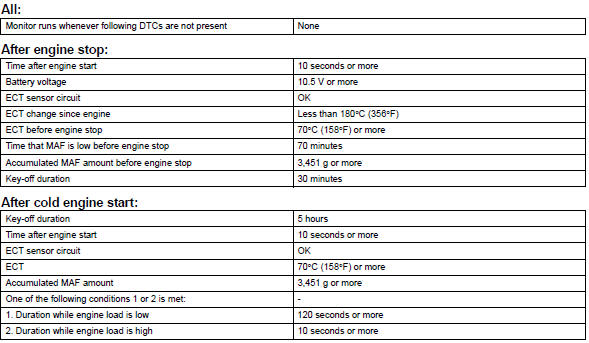
Typical malfunction thresholds

Wiring diagram
Refer to dtc p0110 (see page es-88).
Inspection procedure
- Check any other dtcs output (in addition to dtc p0111)
- Connect the intelligent tester to the dlc3.
- Turn the ignition switch on.
- Turn the tester on.
- Enter the following menus: diagnosis / enhanced obd ii / dtc info / current codes.
- Read dtcs.

Hint:
If any dtcs other than p0111 are output, troubleshoot those dtcs first.

 Intake air temperature circuit malfunction
Description
The intake air temperature (iat) sensor, mounted on the mass air flow (maf)
meter, monitors the iat.
The iat sensor has a built-in thermistor with a resistance that varies ac ...
 Engine coolant temperature circuit
Description
A thermistor, whose resistance value varies according to the ect, is built
into the engine coolant
temperature (ect) sensor.
The structure of the sensor and its connection to th ...
Other materials:
Front seat cushion heater
Inspection
Inspect front seat cushion heater
assembly lh
Measure the resistance of the seat cushion heater.
Standard resistance
If the result is not as specified, replace the seat
cushion heater assembly.
Heat the thermostat with a light.
Measure the resistance of the sea ...
Front brake
Components
Removal
Hint:
Use the same procedures for the lh side and rh side.
The procedures listed below are for the lh side.
Remove front wheel
Drain brake fluid
Notice:
Wash off brake fluid immediately if it comes in
contact with any painted surface.
Disconnec ...
All-wheel drive lock
switch (awd models)
All-wheel drive lock mode can be used when a large amount of
drive power needs to be applied to all the wheels, such as when
the vehicle gets stuck in mud and you need to free it.
Press the switch.
The torque of the engine is distributed
to the rear wheels to the maximum
extent possible in
ac ...
