
Toyota RAV4 (XA40) 2013-2018 Owners Manual: Memory recall function (vehicles with a smart key system)
Each electronic key can be registered to recall your preferred driving position.
Registering procedure
Record your driving position to button “1� or “2� before performing the following: carry only the key you want to register, and then close the driver’s door.
If 2 or more keys are in the vehicle, the driving position cannot be recorded properly.
- Check that the shift lever is in p.
- Turn the engine switch to ignition on mode.
- Recall the driving position that you want to record.
- While pressing the recalled
button, press and hold the
door lock switch (either lock
or unlock) until the buzzer
sounds.
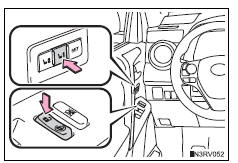
If the button could not be registered, the buzzer sounds continuously for approximately 3 seconds.
Recall procedure
Carry the electronic key that has been registered to the driving position, and then unlock and open the driver’s door using the smart key system or wireless remote control.
The driving position will move to the recorded position.
If the driving position is in a position that has already been recorded, the seat will not move.
Cancelation procedure
Carry only the key you want to cancel and then close the driver’s door.
If 2 or more keys are in the vehicle, the driving position cannot be canceled properly.
- Turn the engine switch to ignition on mode.
- While pressing the “set� button, press and hold the door lock
switch (either lock or unlock) until the buzzer sounds twice.
If the button could not be canceled, the buzzer sounds continuously for approximately 3 seconds.
Recalling the driving position using the memory recall function
- Different driving positions can be registered for each electronic key. Therefore, the driving position that is recalled may be different depending on the key being carried.
- If a door other than the driver’s door is unlocked with the smart key system, the driving position cannot be recalled. In this case, press the driving position button which has been set.
Caution
Seat adjustment caution
Take care during seat adjustment so that the seat does not strike the rear passenger or squeeze your body against the steering wheel.
 Driving position memory
Your preferred driving position (the position of the driver’s seat) can
be recorded and recalled by pressing a button.
Two different driving positions can be recorded into memory.
Recording pro ...
 Head restraints
Head restraints are provided for all seats.
Front seats
Up
Pull the head restraints up.
Down
Push the head restraint down while
pressing the lock release button.
Rear seats
Up
...
Other materials:
Room light assembly
Components
Removal
Disconnect cable from negative battery
terminal
Caution:
Wait at least 90 seconds after disconnecting the
cable from the negative (-) battery terminal to
prevent airbag and seat belt pretensioner activation.
Remove room light lens
Using a screwdriver ...
Yaw rate and deceleration sensor
Components
Removal
Disconnect cable from negative battery
terminal
Caution:
Wait at least 90 seconds after disconnecting the
cable from the negative (-) battery terminal to
prevent airbag and seat belt pretensioner activation.
Remove front seat assembly lh
For manual seat: ...
Repair
Repair valve seats
If the seating is too high on the valve face, use 30°
and 45° cutters to correct the seat.
If the seating is too low on the valve face, use 75°
and 45° cutters to correct the seat.
Standard width
Lap the valve and valve seat by hand with an
abrasiv ...
