Toyota RAV4 (XA40) 2013-2018 Service Manual: On-vehicle inspection
- Check steering pad assembly (vehicle not involved in collision and airbag not deployed)

- Perform a diagnostic system check (see page rs- 49).
- With the steering pad (with airbag) installed on the
vehicle, perform a visual check:
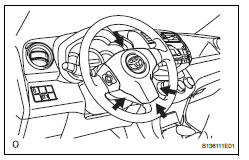
check for cuts, cracks or discoloration on the
steering pad outer surface and in the grooved
portion.
If any of the defects mentioned above are present, replace the steering pad with a new one.
Caution:
For removal and installation of the steering pad, be sure to follow the correct procedure.
- Check steering pad assembly (vehicle involved in collision and airbag not deployed)
- Perform a diagnostic system check (see page rs- 49).
- With the steering pad (with airbag) removed from the vehicle, perform a visual check:
- Check for cuts, cracks or discoloration on the steering pad outer surface and in the grooved portion.
- Check for cuts and cracks in the wire harness, and chipping on the connectors.
- Check for deformation on the steering wheel.
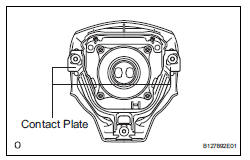
- Check for deformation of the steering pad contact plates.
If any of the defects mentioned above are present, replace the steering pad with a new one.
Caution:
For removal and installation of the steering pad, be sure to follow the correct procedure.
Hint:
- If the steering pad contact plates are deformed, never repair them. Always replace the steering pad with a new one.
- There should be no interference between the steering pad and steering wheel, and the clearance should be uniform all the way around when the new steering pad is installed on the steering wheel.
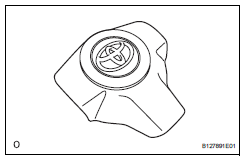
 Steering pad
Components
...
 Removal
Caution:
Be sure to read the precautionary notices concerning the
srs airbag system before servicing it (see page rs-1).
Disconnect cable from negative battery
terminal
Caution:
Wait at le ...
Other materials:
Problem symptoms table (2005/11-2006/01)
Hint:
Use the table below to help determine the cause of the
problem symptom. The potential causes of the symptoms
are listed in order of probability in the "suspected area"
column of the table. Check each symptom by checking the
suspected areas in the order they are listed. Re ...
Removal
Disconnect cable from negative battery
terminal
Caution:
Wait at least 90 seconds after disconnecting the
cable from the negative (-) battery terminal to
prevent airbag and seat belt pretensioner activation.
Remove front seat track bracket outer
cover lh (see page se-11)
Remove fr ...
Removal
Hint:
Use the same procedures for the rh side and lh side.
The procedures listed below are for the lh side.
Caution:
Be sure to read the precautionary notices concerning the
srs airbag system before servicing it (see page rs-1).
Disconnect cable from negative battery terminal
Cauti ...
