
Toyota RAV4 (XA40) 2013-2018 Service Manual: Reassembly
Hint:
- Thoroughly clean all parts to be assembled.
- Before installing the parts, apply fresh engine oil to all sliding and rotating surfaces.
- Replace oil seals with new ones.
- Install valve stem oil seal
- Using sst, push in a new oil seal.
Sst 09201-41020
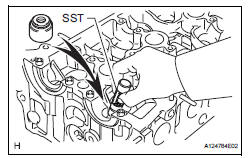
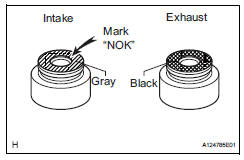
Hint:
The intake valve oil seal is gray and the exhaust valve oil seal is black.
Notice:
Pay close attention when installing the intake and exhaust oil seals. For example, installing the intake oil seal into the exhaust or installing the exhaust oil seal to the intake can cause installation problems later.
- Install intake valve
- Place the cylinder head on wooden blocks.
- Install the valve, seat, spring and retainer onto the cylinder head.
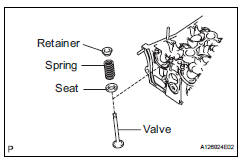
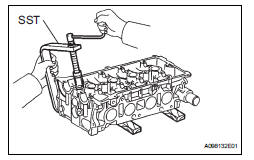
- Using sst, compress the spring, and place the 2 retainer locks around the valve stem.
Sst 09202-70020 (09202-00010)
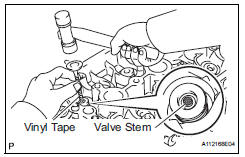
- Using a plastic-faced hammer and discarded valve (with its tip wrapped with tape), lightly tap the installed valve to fit it into place.
Notice:
Be careful not to damage the valve stem tip.
- Install exhaust valve
- Place the cylinder head on wooden blocks.
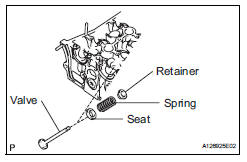
- Install the valve, seat, spring and retainer onto the cylinder head.
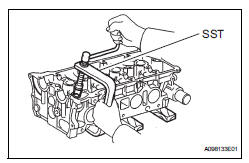
- Using sst, compress the spring, and place the 2 retainer locks around the valve stem.
Sst 09202-70020 (09202-00010)
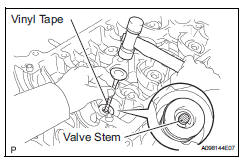
- Using a plastic-faced hammer and discarded valve (with its tip wrapped with tape), lightly tap the installed valve to fit it into place.
Notice:
Be careful not to damage the valve stem tip.
- Install valve lifter
- Assemble the valve lifter and the tip of the valve stem with a light coat of engine oil applied.
Notice:
Install the valve lifters in their original places.
- Nstall no. 1 Camshaft bearing
Clean the contact surface of the bearing and the bearing cap.
Notice:
Do not apply engine oil to the contact surfaces of the camshaft bearing and bearing cap.
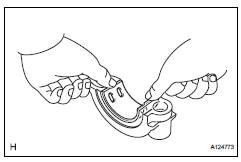
- Align the bearing claw with the claw groove of no. 1 And no. 2 Bearing cap, and push in the no. 1 Camshaft bearing.
- Install no. 2 Camshaft bearing
- Clean the contact surface of the bearing and the bearing cap.
Notice:
Do not apply engine oil to the contact surfaces of the camshaft bearing and cylinder block.
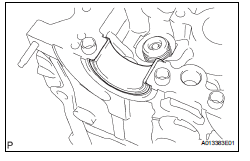
- Install the no. 2 Camshaft bearing onto the cylinder head.
- Install camshaft position sensor
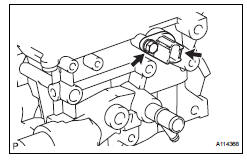
- Install the camshaft position sensor with the bolt.
Torque: 9.0 N*m (92 kgf*cm, 80 in.*Lbf)
- Install engine coolant temperature sensor
- Using sst, install a new gasket and the ect sensor.
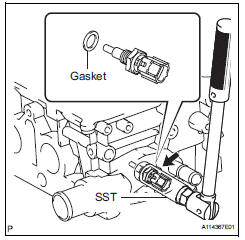
Sst 09817-33190
Torque: 20 n*m (204 kgf*cm, 15 ft.*Lbf)
- Install oil pressure switch
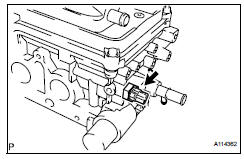
- Apply adhesive to 2 or 3 threads of the oil pressure switch.
Adhesive: toyota genuine adhesive 1344, three bond 1344 or equivalent
- Using a 24 mm deep socket wrench, install the oil pressure switch.
Torque: 13 n*m (133 kgf*cm, 10 ft.*Lbf)
- Install radio setting condenser
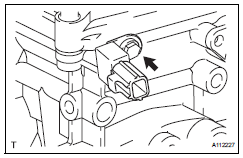
- Install the condenser with the bolt.
Torque: 10 n*m (102 kgf*cm, 7 ft.*Lbf)
 Replacement
Replace intake valve guide bush
Heat the cylinder head to 80 to 100°c (176 to
212°f).
Place the cylinder head on wooden blocks.
Using sst and a hammer, tap out the guide bush.
...
Other materials:
Washer motor
Components
Removal
Disconnect cable from negative battery
terminal
Caution:
Wait at least 90 seconds after disconnecting the
cable from the negative (-) battery terminal to
prevent airbag and seat belt pretensioner activation.
Remove washer inlet sub-assembly
Remove th ...
Short in front passenger side - side squib circuit
Description
The front passenger side - side squib circuit consists of the center airbag
sensor and the front seat side
airbag rh.
The circuit instructs the srs to deploy when the deployment conditions are met.
These dtcs are recorded when a malfunction is detected in the front passenge ...
Installation
Caution:
Be sure to read the precautionary notices concerning the
srs airbag system before servicing it (see page rs-1).
Install steering pad assembly
Support the steering pad with one hand as shown in
the illustration.
Connect the 2 airbag connectors.
Notice:
When handling t ...
