Toyota RAV4 (XA40) 2013-2018 Service Manual: Registration
Notice:
The vehicle identification number (vin) must be input into the replacement ecm.
Hint:
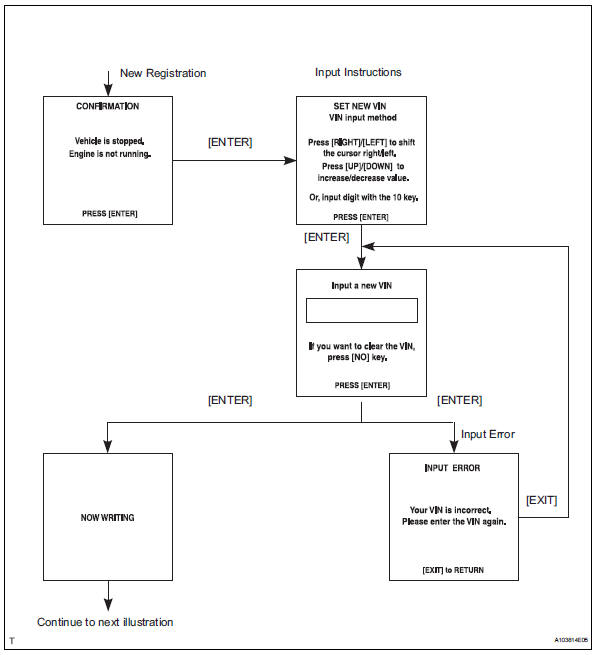
The vin is a 17-digit alphanumeric number. The intelligent tester is required to register the vin.
- Description
This registration section consists of 3 parts: input instructions, read vin and write vin.
- Input instructions: explains the general vin input instructions when using the intelligent tester.
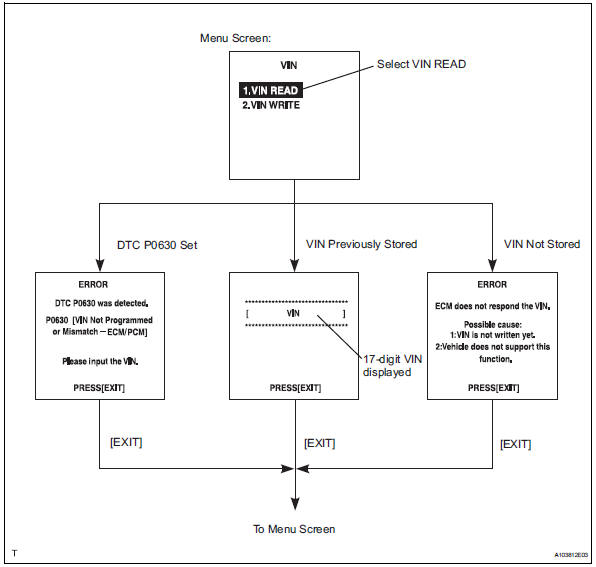
- Read vin: explains the vin reading process in a flowchart. This process allows the vin stored in the ecm to be read in order to confirm that the two vins, provided with the vehicle and stored in the vehicle's ecm, are the same.
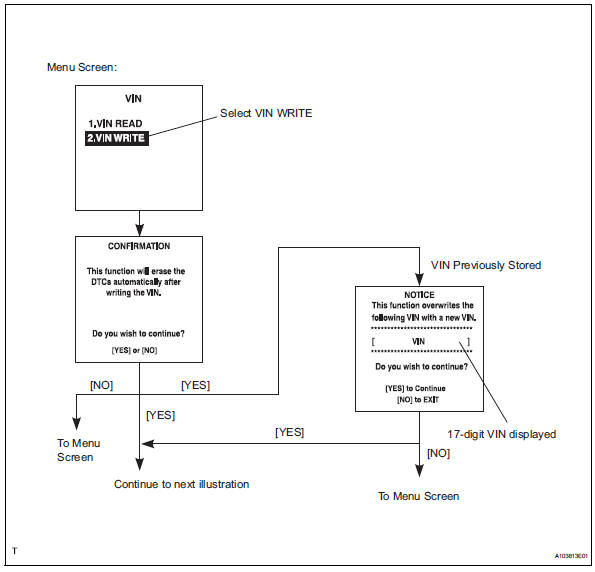
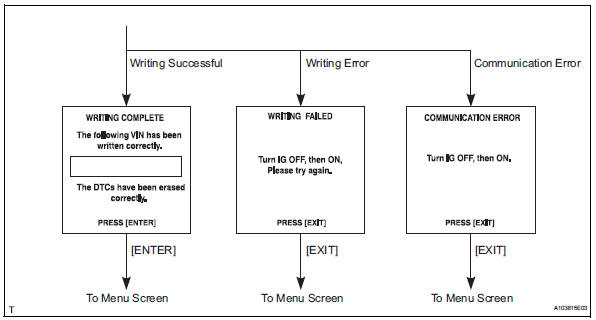
- Write vin: explains the vin writing process in a flowchart. This process allows the vin to be input into the ecm. If the ecm is changed, or the vehicle vin and ecm vin do not match, the vin can be registered or overwritten in the ecm by following this procedure.
- Input instructions
- Intelligent tester
The arrow buttons (up, down, right and left) and numerical buttons (0 to 9) are used to input the vin.
- Cursor operation
To move the cursor around the tester screen, press the right and left buttons.
- Alphabetical character input
- Press the up and down buttons to select the desired alphabetical character.
- After selection, the cursor should move.
- Numeric character input
- Press the numerical button corresponding to the number that you want to input.
- After input, the cursor should move.
Hint:
Numerical characters can also be selected by using the up and down buttons.
- Correction
- When correcting the input character(s), put the cursor onto the character using the right and left buttons.
- Select or input the correct character using the up/down buttons, or the numerical buttons.
- Finishing input operation
- Make sure that the input vin matches the vehicle vin after input.
- Press the enter button on the tester.
- Read vin
- Confirm the vehicle vin.
- Connect the intelligent tester to the dlc3.
- Turn the ignition switch on.
- Turn the tester on.
- Select the following menu items: diagnosis / enhanced obd ii/ vin.
- Write vin
- Confirm the vehicle vin.
- Connect the intelligent tester to the dlc3.
- Turn the ignition switch on.
- Turn the tester on.
Select the following menu items: diagnosis / enhanced obd ii/ vin.
 Basic inspection
When a malfunction is not confirmed by the dtc check,
troubleshooting should be carried out in all circuits
considered to be possible causes of the problem. In many
cases, by carrying out the basic ...
 Checking monitor status
Perform monitor drive pattern
Connect the intelligent tester to the dlc3.
Turn the ignition switch and the tester on.
Clear the dtcs (see page es-35).
Run the vehicle in accordance with ...
Other materials:
Using the mechanical key (vehicles with a smart key system)
To take out the mechanical key,
push the release button and take
the key out.
The mechanical key can only be
inserted in one direction, as the
key only has grooves on one side.
If the key cannot be inserted in a
lock cylinder, turn it over and reattempt
to insert it.
After using the mec ...
Exhaust pipe
Components
Removal
Disconnect cable from negative battery terminal
Caution:
Wait at least 90 seconds after disconnecting the
cable from the negative (-) battery terminal to
prevent airbag and seat belt pretensioner activation.
Remove heated oxygen sensor (for bank 1
sensor 2) (s ...
Communication
Description
The skid control ecu sends signals such as cruise control cancel demand
signals and brake operation
demand from ecm response signals to the ecm when the cruise control system is in
operation.
Inspection procedure
Hint:
This circuit uses can communication. Therefore, if t ...
