Toyota RAV4 (XA40) 2013-2018 Service Manual: Removal
Hint:
- Use the same procedures for the rh side and lh side.
- The procedures listed below are for the rh side.
- Remove front seat headrest assembly
- Remove front seat assembly
- Operate the power seat switch knob and move the seat to the foremost position.
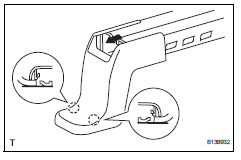
- Using a screwdriver, detach the 2 claws.
Hint:
Tape the screwdriver tip before use.
- remove the front seat track bracket outer cover in the direction indicated by the arrow in the illustration.
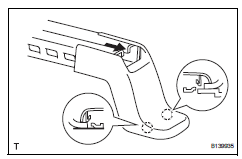
- Using a screwdriver, detach the 2 claws.
Hint:
Tape the screwdriver tip before use.
- Remove the front seat track bracket inner cover in the direction indicated by the arrow in the illustration.
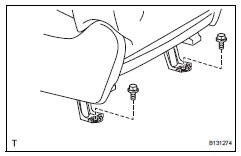
- Remove the 2 bolts on the rear side of the seat.
- Operate the power seat switch knob and move the seat to the rearmost position.
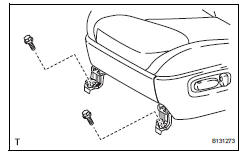
- Remove the 2 bolts on the front side of the seat.
- Operate the power seat switch knob and move the seat to the center position. Then, operate the power seat switch knob and move the seatback to the upright position.
- Disconnect the cable from the negative (-) battery terminal.
Caution:
Wait at least 90 seconds after disconnecting the cable from the negative (-) battery terminal to prevent airbag and seat belt pretensioner activation.
- Disconnect the connectors under the seat. Then remove the seat.
 Installation
Hint:
Use the same procedures for the rh side and lh side.
The procedures listed below are for the rh side.
Install front seat assembly
Place the seat in the cabin.
Notice:
Be ca ...
 Disassembly
Caution:
Wear protective gloves. Sharp areas on the seat frame
(with adjuster) may injure your hands.
Remove reclining power seat switch knob
Using a screwdriver, detach the knob.
H ...
Other materials:
When closing the back door
Lower the back door using the
back door handle.
Vehicles without a power back
door
Make sure to push the back door
down from the outside to close it.
Vehicles with a power back
door
The back door closing assist will
activate, and the back door will
fully close automatically.
...
Dtc check / clear
Check dtc
When using intelligent tester:
Connect the intelligent tester (with can vim) to
the dlc3.
Turn the ignition switch on and press the
intelligent tester main switch on.
Read the dtcs by following the prompts on the
intelligent tester.
Hint:
Refer to the intel ...
Key types
The following keys are provided
with the vehicle.
Vehicles without smart key
system
Master keys
Operating the wireless remote control
function
Key number plate
Vehicles with smart key system
Electronic keys
Operating the smart key system
Operating the wireless remote
control function ...
