Toyota RAV4 (XA40) 2013-2018 Service Manual: Removal
Hint:
- Use the same procedures for the rh side and lh side.
- The procedures listed below are for the lh side.
- Disconnect cable from negative battery terminal
Notice:
Wait at least 90 seconds after disconnecting the cable from the negative (-) battery terminal to prevent airbag and seat belt pretensioner activation.
- Remove front door lower frame bracket garnish lh (see page ed-19)
- Remove front armrest base panel upper lh (see page ed-19)
- Remove front door trim board subassembly lh (see page ed-20)
- Remove outer rear view mirror assembly lh (see page mi-8)
- Remove front door belt moulding assembly lh
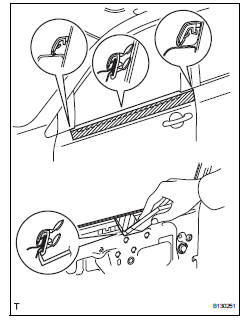
- Put protective tape under the belt moulding.
- Using a moulding remover, detach the claws to remove the belt moulding as shown in the illustration.
Hint:
Tape the remover tip before use.
Notice:
Be careful when removing the belt moulding as there are claws attached to the front and rear ends of the belt moulding.
 Front door belt moulding
Components
...
 Installation
Hint:
Use the same procedures for the rh side and lh side.
The procedures listed below are for the lh side.
Install front door belt moulding
assembly lh
Attach the claws to ins ...
Other materials:
Back door outside garnish
Components
Removal
Disconnect cable from negative battery
terminal
Caution:
Wait at least 90 seconds after disconnecting the
cable from the negative (-) battery terminal to
prevent airbag and seat belt pretensioner activation.
Remove back door center garnish (see page
ed-5 ...
Front drive shaft assembly (for 2wd)
Components (2005/11-2006/01)
Components (2006/01- )
...
Blower motor circuit
Description
When the heater control (blower switch) is set to position 1 or higher, the
contact of the htr relay is
closed, current flows to the blower motor, and the blower motor operates. The
blower motor speed can be
changed by exchanging the ground and the blower resistor circuit with the ...
