Toyota RAV4 (XA40) 2013-2018 Service Manual: Seat position airbag sensor circuit malfunction

Description
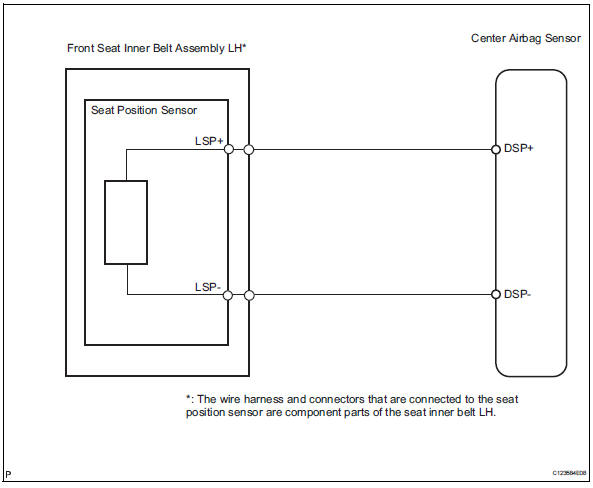
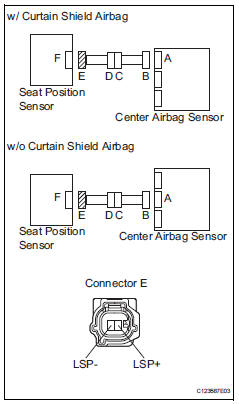
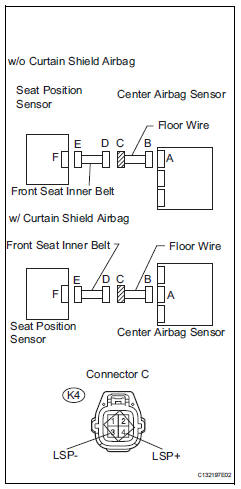
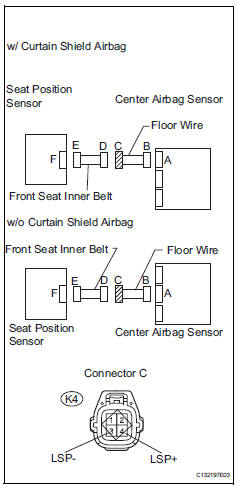
The seat position sensor circuit consists of the center airbag sensor and the seat position sensor.
Dtc b1653/35 is recorded when a malfunction is detected in the seat position sensor circuit.

Wiring diagram
Inspection procedure
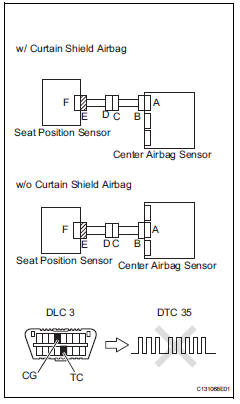
- Check for dtc
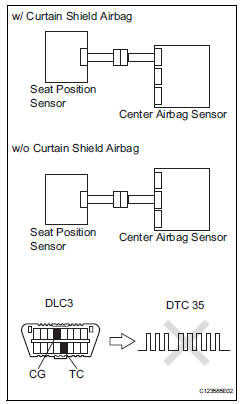
- Turn the ignition switch on, and wait for at least 60 seconds.
- Clear the dtcs (see page rs-49).
- Turn the ignition switch off.
- Turn the ignition switch on, and wait for at least 60 seconds.
- Check the dtcs (see page rs-49).
Ok: dtc b1653/35 is not output.
Hint:
Dtcs other than dtc b1653/35 may be output at this time, but they are not related to this check.


- Check connection of connector
- Turn the ignition switch off.
- Disconnect the cable from the negative (-) battery terminal, and wait for at least 90 seconds.
- Check that the connectors are properly connected to the center airbag sensor and the seat position sensor.
Ok: the connectors are properly connected.


- Check seat position sensor circuit (open)
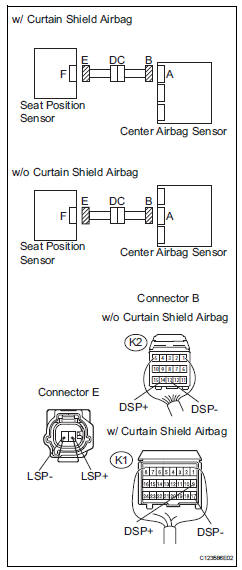
- Disconnect the connectors from the center airbag sensor and the seat position sensor.
- Using a service wire, connect 2 and 1 of connector e.
Notice:
Do not forcibly insert the service wire into the terminals of the connector when connecting.
- Measure the resistance of the wire harness side connector.
Standard resistance:
W/o curtain shield airbag 
W/ curtain shield airbag 


- Check seat position sensor circuit (short)
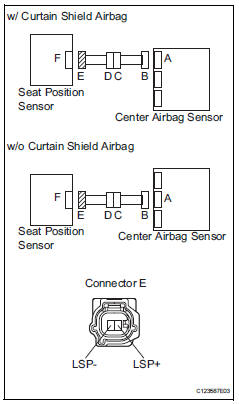
- Disconnect the service wire from connector e.
- Measure the resistance of the wire harness side connector.
Standard resistance 


- Check seat position sensor circuit (to b+)
- Connect the cable to the negative (-) battery terminal, and wait for at least 2 seconds.
- Turn the ignition switch on.
- Measure the voltage of the wire harness side connector.
Standard voltage 


- Check seat position sensor circuit (to ground)

- Turn the ignition switch off.
- Disconnect the cable from the negative (-) battery terminal, and wait for at least 90 seconds.
- Measure the voltage of the wire harness side connector.
Standard resistance 


- Check seat position sensor
- Connect the connectors to the center airbag sensor and the seat position sensor.
- Connect the cable to the negative (-) battery terminal, and wait for at least 2 seconds.
- Turn the ignition switch on, and wait for at least 60 seconds.
- Clear the dtcs (see page rs-49).
- Turn the ignition switch off.
- Turn the ignition switch on, and wait for at least 60 seconds.
- Check the dtcs (see page rs-49).
Ok: dtc b1653/35 is not output.
Hint:
Dtcs other than dtc b1653/35 may be output at this time, but they are not related to this check.


- Replace seat position sensor
- Turn the ignition switch off.
- Disconnect the cable from the negative (-) battery terminal, and wait for at least 90 seconds.
- Replace the seat position sensor (see page rs-389).
Hint:
Perform the inspection using parts from a normal vehicle if possible.

- Check center airbag sensor assembly

- Connect the cable to the negative (-) battery terminal, and wait for at least 2 seconds.
- Turn the ignition switch on, and wait for at least 60 seconds.
- Clear the dtcs (see page rs-49).
- Turn the ignition switch off
- Turn the ignition switch on, and wait for at least 60 seconds.
- Check the dtcs (see page rs-49).
Ok: dtc b1653/35 is not output.
Hint:
Dtcs other than dtc b1653/35 may be output at this time, but they are not related to this check.


End
- Check floor wire (open)
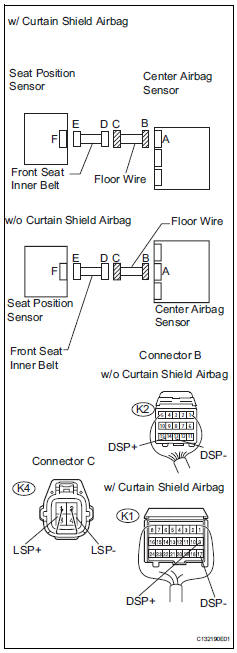
- Disconnect the front seat inner belt connector from the flow wire.
- Using a service wire, connect k4-1 (lsp+) and k4-2 (lsp-) of connector c.
Notice:
Do not forcibly insert the service wire into the terminals of the connector when connecting.
- Measure the resistance of the wire harness side connectors.
Standard resistance:
W/o curtain shield airbag 
W/ curtain shield airbag 


Replace front seat inner belt assembly lh
- Check floor wire (short)
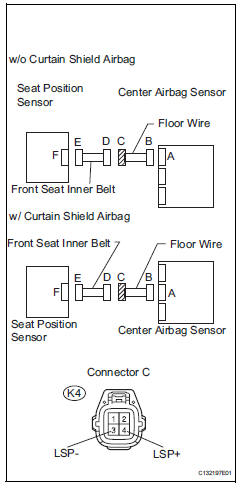
- Disconnect the front seat inner belt connector from the floor wire.
- Measure the resistance of the wire harness side connector.
Standard resistance 


Replace front seat inner belt assembly lh
- Check floor wire (to b+)
- Turn the ignition switch off.
- Disconnect the cable from the negative (-) battery terminal, and wait for at least 90 seconds.
- Disconnect the front seat inner belt connector from the floor wire.
- Connect the cable to the negative (-) battery terminal, and wait for at least 2 seconds.
- Turn the ignition switch on.
- Measure the voltage of the wire harness side connectors.
Standard voltage 


Replace front seat inner belt assembly lh
- Check floor wire (to ground)
- Disconnect the front seat inner belt connector from the floor wire.
- Measure the resistance of the wire harness side connectors.
Standard resistance


Replace front seat inner belt assembly lh
 Occupant classification system malfunction
Description
The occupant classification system circuit consists of the center airbag
sensor and the occupant
classification system.
When the center airbag sensor receives signals from the occup ...
 Driver side seat belt buckle switch circuit malfunction
Description
The driver side seat belt buckle switch circuit consists of the center airbag
sensor and the front seat inner
belt lh.
Dtc b1655/37 is recorded when a malfunction is detected in ...
Other materials:
No signal from transmitter id
Description
The tire pressure warning valve and transmitter constantly sends radio waves
to the tire pressure warning
ecu.
Under the following conditions, the tire pressure warning antenna and receiver
is unable to receive the
signals from the tire pressure warning valve and transmitte ...
How to proceed with troubleshooting
Hint:
Use these procedures to troubleshoot the lighting system.
*: Use the intelligent tester.
Vehicle brought to workshop
Inspect battery voltage
Standard voltage:
11 to 14 v
If the voltage is below 11 v, recharge or replace the battery
before proceeding.
Refer to pr ...
Differential case
Components
Disassembly
Remove front differential ring gear
Place the matchmarks on the ring gear and
differential case.
Remove the 14 bolts.
Using a plastic-faced hammer, tap on the ring gear
to remove it from the case.
Remove front differential case ...
