Toyota RAV4 (XA40) 2013-2018 Service Manual: Thermostat
Components
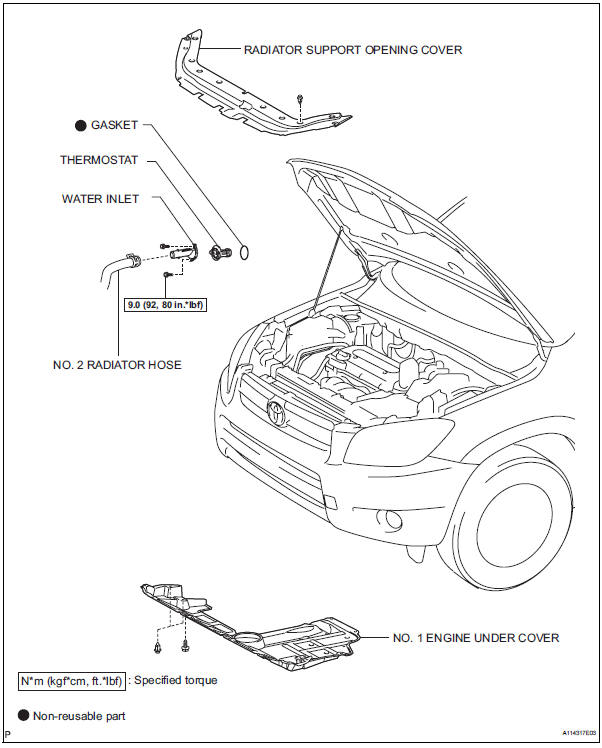
Removal
- Remove no. 1 Engine under cover
- Drain engine coolant (see page co-6)
- Remove radiator support opening cover
- Disconnect no. 2 Radiator hose
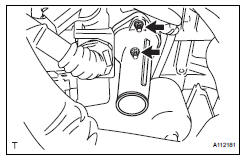
- Remove water inlet
- Remove the 2 nuts and disconnect the water inlet from the cylinder block.
- Remove thermostat
- Remove the gasket from the thermostat.
Inspection
- Inspect thermostat
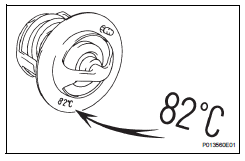
Hint:
The valve opening temperature is inscribed on the thermostat.
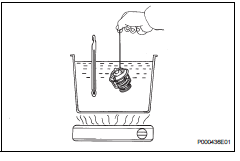
- Immerse the thermostat in water, and then gradually heat the water.
- Check the valve opening temperature of the thermostat.
Standard valve opening temperature: 80 to 84°c (176 to 183°f)
If the valve opening temperature is not as specified, replace the thermostat.
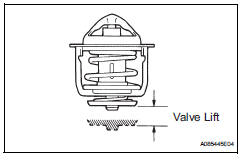
- Check the valve lift.
Standard valve lift: 10 mm (0.39 In.) Or more at 95°c (203°f)
If the valve lift is not as specified, replace the thermostat.
- Check that the valve is fully closed when the thermostat is at low temperatures (below 77°c (171°f).
If it is not fully closed, replace the thermostat.
Installation
- Install thermostat
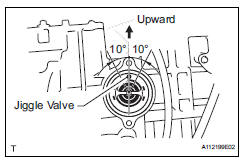
- Install a new gasket onto the thermostat.
- Install the thermostat with the jiggle valve upward.
Hint:
The jiggle valve may be set to within 10° on either side of the prescribed position.
- Install water inlet
- Install the water inlet with the 2 nuts.
Torque: 9.0 N*m (92 kgf*cm, 80 in.*Lbf)
- Connect no. 2 Radiator hose
- Add engine coolant (see page co-6)
- Check for engine coolant leaks (see page co-1)
- Install radiator support opening cover
- Install no. 1 Engine under cover
 Installation
Install water pump assembly
Remove any old seal packing material from the
contact surface.
Apply a continuous line of seal packing as shown in
the illustration.
Seal packing:
to ...
 Cooling fan motor
On-vehicle inspection
Inspect no. 1 Cooling fan motor
Disconnect the no. 1 Fan connector.
Connect the battery and ammeter to the no. 1 Fan
motor connector.
Check th ...
Other materials:
Diagnosis system
Check dlc3
The ecm uses iso 15765-4 for communication. The
terminal arrangement of the dlc3 complies with sae
j1962 and matches the iso 15765-4 format.
If the result is not as specified, the dlc3 may have a
malfunction. Repair or replace the harness and
connector.
Hint:
Conn ...
Precaution
Caution:
Replace the faulty parts of the seat belt systems (outer
belt, inner belt, bolts, nuts, adjustable shoulder anchor,
tether anchor hardware and other related parts). When
inspecting a vehicle that was in a collision, be sure to
check all of the seat belt systems regardless of whethe ...
Air mix damper control servo motor circuit (driver
side)
Description
The air mix damper servo sends pulse signals to indicate the damper position
to the air conditioning
amplifier. The air conditioning amplifier activates the motor (normal or
reverse) based on these signals to
move the air mix damper (driver seat) to the appropriate position. T ...
