Toyota RAV4 (XA40) 2013-2018 Owners Manual: Customization
Customizable features
Your vehicle includes a variety of electronic features that can be personalized to your preferences. The settings of these features can be changed by using the steering wheel switches, entune premium audio with navigation or entune audio, or at your toyota dealer.
Customizing vehicle features
When customizing vehicle features, ensure that the vehicle is parked in a safe place with the shift lever in p and the parking brake set.
Changing using entune premium audio with navigation or entune audio plus
- Press the “apps” button on entune premium audio with navigation or entune audio plus.
- Select “setup” on the “apps” screen.
- Select “vehicle” on the “setup” screen and select “vehicle customization”.
Various setting can be changed. Refer to the list of settings that can be changed for details.
Changing using entune audio
- Press the “setup” button on entune audio.
- Select “vehicle” on the “setup” screen and select “vehicle customization”.
Various setting can be changed. Refer to the list of settings that can be changed for details.
Customizable features
Some function settings are changed simultaneously with other functions being customized. Contact your toyota dealer for further details.
- Vehicles with entune premium audio with navigation or entune audio: settings that can be changed using entune premium audio with navigation or entune audio.
- Settings that can be changed by your toyota dealer
Definition of symbols: o = available, — = not available
*1: If equipped
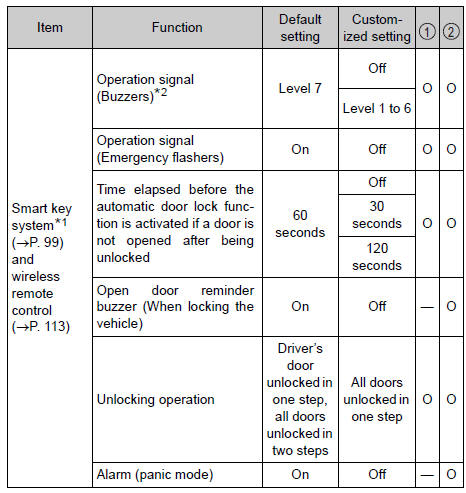
*2: For vehicles with the power back door and/or driving position memory system, the default setting is “5”.
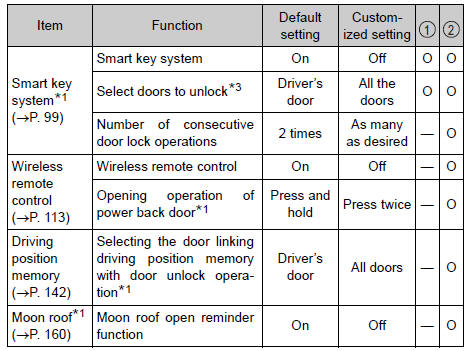
*3: Settings that can be changed by electronic key
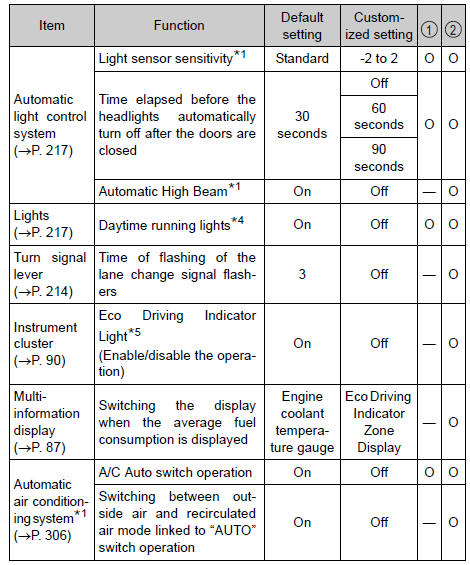
*4: U.S.A. Only
*5: Settings that can be changed by “disp” button.
*6: Settings that can be changed only for vehicles with the power back door and/or driving position memory system
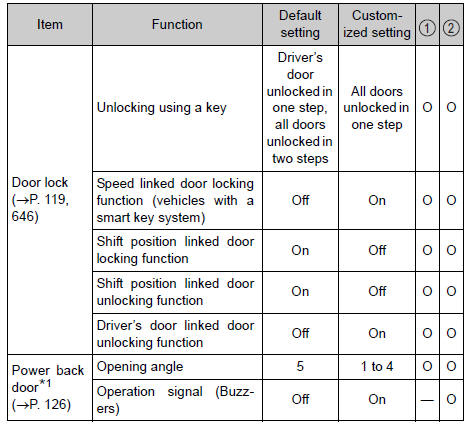
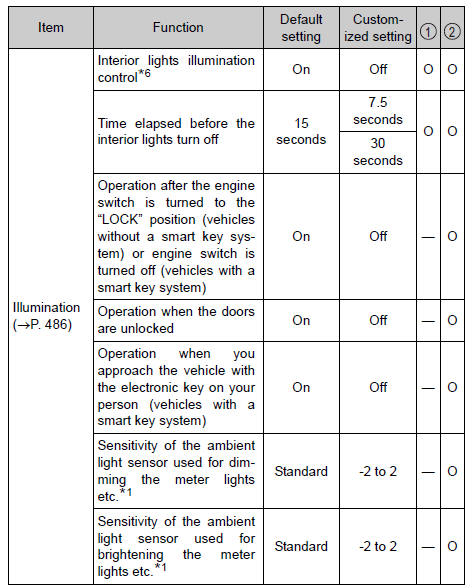
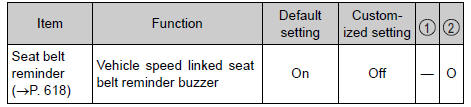
Vehicle customization
When the speed linked door locking function and shift position linked door locking function are both on, the door lock operates as follows.
- When shifting the shift lever to any position other than p, all the doors will be locked.
- If the vehicle is started with all the doors locked, the speed linked door locking function would not operate.
- If the vehicle is started with any door unlocked, the speed linked door locking function will operate.
When the smart key system (if equipped) is off, the selecting doors to unlock cannot be customized.
When the doors remain closed after unlocking the doors and the automatic door lock function activates, the signals will be generated in accordance with the operation signal (buzzers) and the operation signal (emergency flashers) settings.
Caution
During customization
As the engine needs to be running during customization, ensure that the vehicle is parked in a place with adequate ventilation. In a closed area such as a garage, exhaust gases including harmful carbon monoxide (co) may collect and enter the vehicle. This may lead to death or a serious health hazard.
Notice
During customization
To prevent battery discharge, ensure that the engine is running while customizing features.
 Tire information
Typical tire symbols
Full-size tire
Compact spare tire
Tire size
Dot and tire identification number (tin)
Location of treadwear indicators
Tire ply composition and materials
Pli ...
 Items to initialize
The following items must be initialized for normal system operation
after such cases as the battery being reconnected, or maintenance
being performed on the vehicle:
...
Other materials:
Problem symptoms table (2005/11-2006/01)
Hint:
Use the table below to help determine the cause of the
problem symptom. The potential causes of the symptoms
are listed in order of probability in the "suspected area"
column of the table. Check each symptom by checking the
suspected areas in the order they are listed. Re ...
Input signal circuit abnormal
Description
This dtc expresses the internal abnormalities of the ecm.
Inspection procedure
Check for dtc
Clear the dtc (see page cc-15).
Check for dtc (see page cc-15).
Ok:
dtc is not output.
End ...
Installation
Install ignition switch assembly
Install the ignition switch with the 2 screws.
Install the ignition key cylinder light connector.
Install the ignition switch connector.
Install steering column cover lower
Attach the 4 claws to install the steering column
l ...
