Toyota RAV4 (XA40) 2013-2018 Owners Manual: Display settings
Settings are available for adjusting the contrast and brightness of the screen.
Screen for display settings
- Press the “setup” button.
- Select “display” on the “setup” screen.
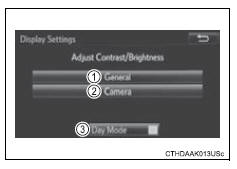
- Adjust the screen display
- Adjust the camera display*
- Changes to day mode.
*: If equipped
Day mode
When the headlights are turned on, the screen dims.
However, the screen can be switched to day mode by selecting “day mode”.
The screen will stay in day mode when the headlights are turned on until “day mode” is selected again.
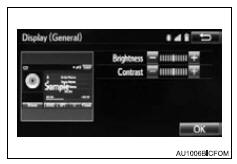
Brightness, contrast, tone and color adjustment
- Select “general” or “camera” on the “display settings” screen.
- Select the desired item.

 Audio settings
Settings are available for adjusting the radio operation, cover
art, etc.
Screen for audio settings
Press the “setup” button.
Select “audio” on the “setup” screen.
Numbe ...
 Voice settings
This screen is used for setting the voice command guidance
system.
Adjust the voice guidance volume
setting.
Set the voice recognition
prompts “high”, “low” or “off”.
Train vo ...
Other materials:
Blower motor
On-vehicle inspection
Inspect blower motor (for automatic air conditioning system)
Disconnect the blower motor connector.
Connect the positive (+) lead from the battery to
terminal 1 and negative (-) lead to terminal 2, and
then check that the motor operates smoothly.
If the ...
Digital Rear-view Mirror
The Digital Rear-view Mirror
is a system that uses the
camera on the rear of the
vehicle and displays its
image on the display of the
Digital Rear-view Mirror.
The Digital Rear-view Mirror
can be changed between
optical mirror mode and digital
mirror mode by operating
the lever.
The Digital Rear-v ...
Problem symptoms table (2006/01- )
Hint:
Use the table below to help determine the cause of the
problem symptom. The potential causes of the symptoms are
listed in order of probability in the "suspected area" column
of the table. Check each symptom by checking the suspected
areas in the order they are listed. Replace p ...
