Toyota RAV4 (XA40) 2013-2018 Owners Manual: Audio settings
Settings are available for adjusting the radio operation, cover art, etc.
Screen for audio settings
- Press the “setup” button.
- Select “audio” on the “setup” screen.
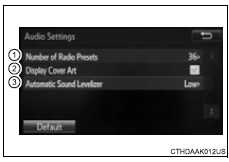
- Number of radio presets select the number of radio preset stations.
- Display cover art on/off
- Automatic sound levelizer
Automatic sound leveliser (asl)
- Select “automatic sound levelizer”.
- Select “high”, “mid”, “low” or “off”.
The sound quality level is adjusted individually
The treble, mid and bass levels can be adjusted for each audio mode separately.
About automatic sound leveliser (asl)
Asl automatically adjusts the volume and tone quality according to the vehicle speed.
 Customizing the startup and screen off images (if equipped)
An image can be copied from a usb memory and used as the startup
and screen off images.
When the engine switch is in the “acc” or “on” position (vehicles
without a smart key system) or ac ...
 Display settings
Settings are available for adjusting the contrast and brightness
of the screen.
Screen for display settings
Press the “setup” button.
Select “display” on the “setup” screen.
...
Other materials:
Installation (2006/01- )
Install no. 1 Roof silencer pad
W/o sliding roof:
Install the 5 silencer pads.
W/ sliding roof:
Install the 2 silencer pads.
Install no. 3 Roof silencer pad
Install no. 1 Roof wire
Only when replacing the roof headlining:
Align the marking, and then ...
System description
Power door lock system description
The power door lock system locks / unlocks all
doors with a one-touch operation.
The door control switch of the power window
regulator master switch or door control switch on
passenger side sends lock / unlock request
signals to the main body ...
Initializing the tire pressure
warning system (if
equipped)
‚ñÝ The tire pressure warning
system must be initialized
in the following circumstances:
When rotating the tires.
When changing the tire.
After registering the ID codes.
When the tire pressure warning
system is initialized, the current
tire inflation pressure is set as
the benchmark pressure.
‚ ...
