Toyota RAV4 (XA50) 2019-2026 Owners Manual: Components
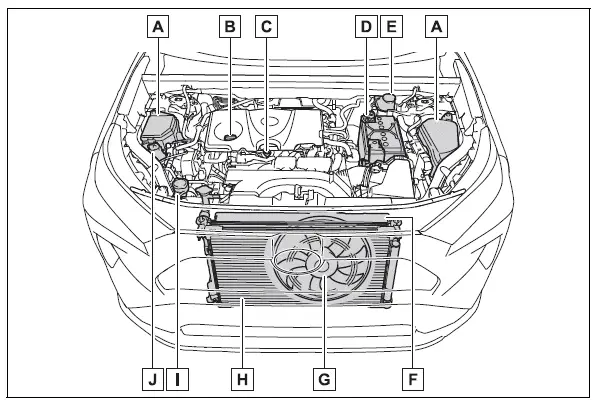
- Fuse boxes
- Engine oil filler cap
- Engine oil level dipstick
- Battery
- Brake fluid reservoir
- Radiator
- Electric cooling fan
- Condenser
- Washer fluid tank
- Engine coolant reservoir
Checking the engine oil
With the engine at operating temperature and turned off, check the oil level on the dipstick.
1. Park the vehicle on level ground. After warming up the engine and turning off the engine, wait about 5 minutes for the oil to drain back into the bottom of the engine.
2. Holding a rag under the end, pull the dipstick out.
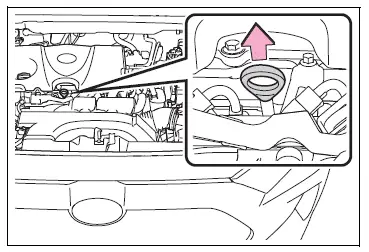
3. Wipe the dipstick clean.
4. Reinsert the dipstick fully.
5. Holding a rag under the end, pull the dipstick out and check whether the oil level is above low level mark.
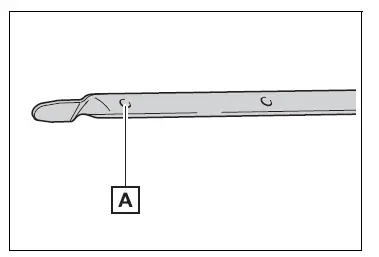
- Low level mark
The shape of the dipstick may differ depending on the type of vehicle or engine.
6. Wipe the dipstick and reinsert it fully.
NOTICE
â– To prevent serious engine damage
Check the oil level on a regular basis.
â– Engine oil consumption
A certain amount of engine oil will be consumed while driving. In the following situations, oil consumption may increase, and engine oil may need to be refilled in between oil maintenance intervals.
- When the engine is new, for example directly after purchasing the vehicle or after replacing the engine
- If low quality oil or oil of an inappropriate viscosity is used
- When driving at high engine speeds or with a heavy load, when towing, or when driving while accelerating or decelerating frequently
- When leaving the engine idling for a long time, or when driving frequently through heavy traffic
â– Engine oil level rise
If the vehicle is repeatedly driven without the engine warmed up, moisture caused by dew condensation inside the engine or fuel which did not burn mixes into the engine oil, resulting in a rise in engine oil level. However, this is not a malfunction.
For example, the engine become difficult to be warmed up in the following situations.
- When driving a short distance
- When driving at a low speed
- When the outside temperature is low
When checking the engine oil, make sure that the engine is warmed up. If the engine oil level exceeds the refill upper limit mark, contact your Toyota dealer.

 Adding engine oil
â– Checking the oil type and
preparing the items needed
Make sure to check the oil type
and prepare the items needed
before adding oil.
Engine oil selection
Oil quantity (Low level mark
Refill u ...
Other materials:
SRS airbags
The SRS airbags inflate when the vehicle is subjected to certain
types of severe impacts that may cause significant injury
to the occupants. They work together with the seat belts to
help reduce the risk of death or serious injury.
SRS airbag system
â– Location of the SRS airbags
SRS front airbags ...
Problem symptoms table
Hint:
Use the table below to help determine the cause of the
problem symptom. The potential causes of the symptoms
are listed in order of probability in the "suspected area"
column of the table. Check each symptom by checking the
suspected areas in the order they are listed. Re ...
Test mode procedure
Test mode check
Hint:
When entering the test mode, the tire pressure
warning ecu sets all the test dtcs first. After
completing the test mode for each inspection item, the
dtcs that are determined normal by the tire pressure
warning ecu will be erased.
The dtcs for other inspec ...
