Toyota RAV4 (XA40) 2013-2018 Service Manual: Data list / active test
- Read data list
Hint:
Using the intelligent tester's data list allows switch, sensor, actuator and other item values to be read without removing any parts. Reading the data list early in troubleshooting is one way to save time.
- Connect the intelligent tester (with can vim) to the dlc3.
- Turn the ignition switch on and turn the tester on.
- Select the following menu items: diagnosis / obd/mobd / immobiliser / data list.
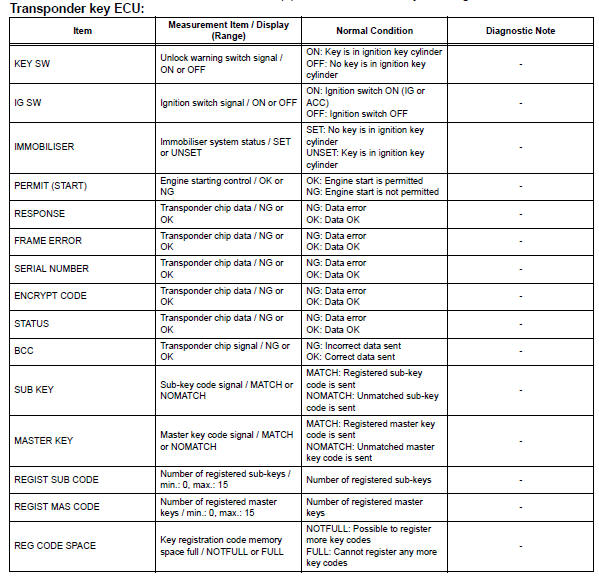
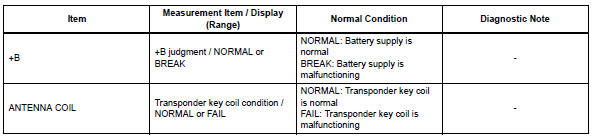
- Check the results by referring to the table below.
- Perform active test
Hint:
performing the intelligent tester's active test allows relay, vsv, actuator and other items to be operated without removing any parts. performing the active test early in troubleshooting is one way to save time.
the data list can be displayed during the active test.
- Connect the intelligent tester (with can vim) to the dlc3.
- Turn the ignition switch on and turn the tester on.
- Select the following menu items: diagnosis / obd/mobd / immobiliser / active test.
- Perform the active test by referring to the table below.

 Dtc check / clear
Check dtc
Connect the intelligent tester (with can vim) to the
dlc3.
Turn the ignition switch on and turn the intelligent
tester on.
Select the following menu items: diagnosis /
...

Other materials:
Axle system
Problem symptoms table
Hint:
Use the table below to help determine the cause of the
problem symptom. The potential causes of the symptoms are
listed in order of probability in the "suspected area" column of
the table. Check each symptom by checking the suspected
areas in the order th ...
Registering ID codes
(vehicles with tire pressure
warning system)
Every tire pressure warning
valve and transmitter has a
unique ID code. When replacing
a tire pressure warning valve
and transmitter, it is necessary
to register the ID code.
When registering the ID codes,
perform the following procedure.
â– Registering procedure (with
7-inch display)
1. Park the ...
Adding engine oil
â– Checking the oil type and
preparing the items needed
Make sure to check the oil type
and prepare the items needed
before adding oil.
Engine oil selection
Oil quantity (Low level mark
Refill upper limit mark)
1.6 qt. (1.5 L, 1.3 Imp. qt.)
Item
Clean funnel
â– Adding engine oil
If the oi ...
