
Toyota RAV4 (XA40) 2013-2018 Service Manual: Diagnosis system
- Description
- Air conditioning system data and the diagnostic trouble codes (dtcs) can be read through the data link connector 3 (dlc3) of the vehicle. When the system seems to be malfunctioning, use the intelligent tester to check for malfunctions and perform troubleshooting.
- Check dlc3
The vehicle's ecm uses the iso 15765-4 for communication protocol. The terminal arrangement of the dlc3 complies with sae j1962 and matches the iso 15765-4 format.
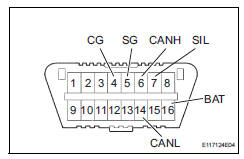
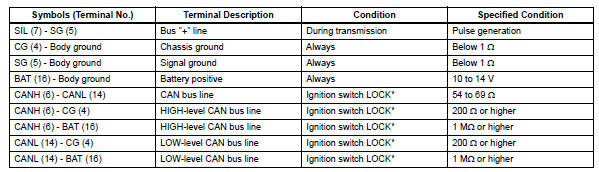
If the result is not as specified, the dlc3 may have a malfunction. Repair or replace the harness and connector.
Notice:
*: Before measuring the resistance, leave the vehicle as is for at least 1 minute and do not operate the ignition switch, other switches or doors.
Hint:
Connect the cable of the intelligent tester (with can vim) to the dlc3, turn the ignition switch on and attempt to use the tester. If the display indicates that a communication error has occurred, there is a problem either with the vehicle or with the tester.
If communication is normal when the tester is connected to another vehicle, inspect the dlc3 of the original vehicle.
If communication is still not possible when the tester is connected to another vehicle, the problem may be in the tester itself. Consult the service department listed in the tester's instruction manual.
 Terminals of ecu (2006/01- )
Check air conditioning amplifier
Measure the voltage and resistance of the
connectors.
Hint:
Check from the rear of the connector while it is
connected to the air conditioning ampl ...
 Dtc check / clear
Check dtc
Connect the intelligent tester (with can vim) to the
dlc3.
Turn the ignition switch on and turn the intelligent
tester on.
Read the dtc by following the prompts on the
...
Other materials:
Reporting safety defects
for u.S. Owners
If you believe that your vehicle has a defect which could cause a
crash or could cause injury or death, you should immediately
inform the national highway traffic safety administration
(nhtsa) in addition to notifying toyota motor sales, u.S.A., Inc.
(Toll-free: 1-800-331-4331).
If nhtsa re ...
Pressure control solenoid "A" electrical (shift solenoid valve sl1)
Description
Shifting from 1st to o/d is performed in combination with the on and off
operation of the shift solenoid
valves sl1 and sl2, which are controlled by the ecm. If an open or short circuit
occurs in any of the shift
solenoid valves, the ecm controls the remaining normal shift soleno ...
Check for intermittent problems
Check for intermittent problems
Hint:
A momentary interruption (open circuit) in the connectors
and/or wire harness between the sensors and ecus can
be detected by using the ecu data list function of an
intelligent tester.
Turn the ignition switch off and connect the
intelligent test ...
