Toyota RAV4 (XA40) 2013-2018 Service Manual: Inspection
- Inspect rear stabilizer link assembly lh
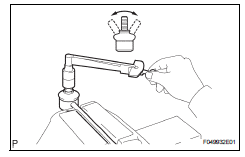
- As shown in the illustration, move the ball joint stud back and forth 5 times before installing the nut.
- Using a torque wrench, turn the nut continuously at a rate of 3 to 5 seconds per turn and take the torque reading on the fifth turn.
Turning torque: 0.05 To 1.96 N*m, (0.5 To 20 kgf*cm, 0.4 To 17 in.*Lbf) or less
- Check for any cracks and grease leaks on the ball joint dust cover.
 Removal
Hint:
Use the same procedures for the rh side and lh side.
The procedures listed below are for the lh side.
Remove rear wheel
Remove rear stabilizer link assembly lh
Remove the ...
 Installation
Hint:
Use the same procedures for the rh side and lh side.
The procedures listed below are for the lh side.
Install rear stabilizer bush
Install the 2 bushes.
Hint:
Instal ...
Other materials:
Cooling fan motor
On-vehicle inspection
Inspect no. 1 Cooling fan motor
Disconnect the no. 1 Fan connector.
Connect the battery and ammeter to the no. 1 Fan
motor connector.
Check that the no. 1 Fan rotates smoothly, and then
check the reading on the ammeter.
Standard amperage ...
Freeze frame data
Description
Freeze frame data records the engine conditions (fuel
system, calculated load, engine coolant temperature,
fuel trim, engine speed, vehicle speed, etc.) When a
malfunction is detected. When troubleshooting, it can
help determine if the vehicle was running or stopped, the
engin ...
Room temperature sensor (for automatic ai conditioning system)
Components
Removal
Remove lower instrument panel
Remove the lower instrument panel (see page ip-
16).
Remove room temperature sensor
Disconnect the duct.
Disconnect the connector.
Detach the claws and remove the sensor.
Inspection
Inspect room temperature ...
