Toyota RAV4 (XA40) 2013-2018 Service Manual: Removal
Hint:
- Use the same procedures for the rh side and lh side.
- The procedures listed below are for the lh side.
- Remove rear wheel
- Remove rear stabilizer link assembly lh
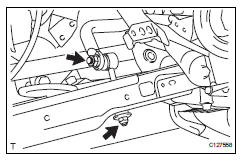
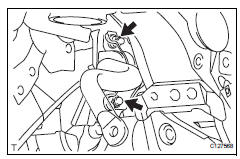
- Remove the nut and disconnect the link from the suspension no. 2 Arm.
- Remove the nut and link from the stabilizer bar.
- Remove rear stabilizer link assembly rh
Hint:
Use the same procedures described for the lh side
- Remove rear no. 2 Suspension arm assembly lh (see page sp-45)
- Remove rear no. 2 Suspension arm assembly rh
Hint:
Use the same procedures described for the lh side
- Remove rear coil spring insulator upper lh (see page sp-33)
- Remove rear coil spring lh (see page sp-33)
- Remove rear coil spring insulator lower lh (see page sp-33)
- Remove rear coil spring insulator upper rh
Hint:
Use the same procedures described for the lh side
- Remove rear coil spring rh
Hint:
Use the same procedures described for the lh side
- Remove rear coil spring insulator lower rh
Hint:
Use the same procedures described for the lh side
- Remove rear no. 1 Stabilizer bar bracket
- Remove the 2 nuts and bracket.
Hint:
Use the same procedures for the other side.
- Remove rear stabilizer bar
- Remove the stabilizer bar from the vehicle.
Notice:
When removing the stabilizer bar from the vehicle, make sure not to damage the sensor wire, brake hose, etc.
- Remove rear stabilizer bush
- Remove the 2 stabilizer bushes from the stabilizer bar.
 Suspension & axle rear stabilizer bar
Components
...
 Inspection
Inspect rear stabilizer link assembly lh
As shown in the illustration, move the ball joint stud
back and forth 5 times before installing the nut.
Using a torque wrench, turn the nut c ...
Other materials:
Cooling fan relay
On-vehicle inspection
Disconnect cable from negative battery
terminal
Caution:
Wait at least 90 seconds after disconnecting the
cable from the negative (-) battery terminal to
prevent airbag and seat belt pretensioner activation.
Remove engine room no. 2 Relay block
cover
Inspect ...
Installation
Install water pump assembly
Remove any old seal packing material from the
contact surface.
Apply a continuous line of seal packing as shown in
the illustration.
Seal packing:
toyota genuine seal parking black, three
bond 1207b or equivalent
Standard seal diameter:
2.2 To 2. ...
Fuel pump control circuit
Description
When the engine is cranked, the starter relay drive signal output from the
star terminal of the ecm is
input into the sta terminal of the ecm, and ne signal generated by the
crankshaft position sensor is also
input into the ne+ terminal. Thus, the ecm interprets that the engine is ...
