Toyota RAV4 (XA40) 2013-2018 Service Manual: Engine
On-vehicle inspection
- Inspect engine coolant
- Inspect engine oil
- Inspect battery
- Inspect air cleaner filter element subassembly
- Remove the air cleaner cap.
- Remove the air filter element.
- Visually check that the air filter is not excessively
damaged or oily.
If necessary, replace the air filter.
- Inspect spark plug
- Inspect fan and generator v belt
Hint:
You do not need to check the belt deflection because the auto tensioner has been adopted.
- Inspect ignition timing
Notice:
- Turn all the electrical systems and the a/c off.
- Inspect the ignition timing with the cooling fan off.
- When checking the ignition timing, shift the transmission to the neutral position.
- Warm up and stop the engine.
- When using intelligent tester:
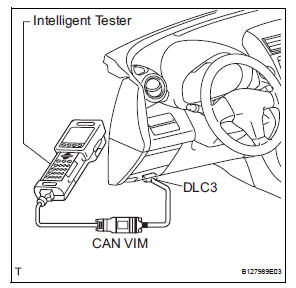
- Connect the intelligent tester to the dlc3.
- Allow the engine to idle.
- Select the following menu items: diagnosis / enhanced obd ii / data list / primary / ign advance.
- Read ign advance to check the ignition timing.
Standard ignition timing: 5 to 15° btdc @ idle
- check that the ignition timing advances immediately when the engine speed is increased.
- Turn the ignition switch off.
- Disconnect the intelligent tester from the dlc3.
- When not using intelligent tester:
- Remove the no. 1 Engine cover (see page em- 22).
- Open the ignition cover located to the right of the no. 4 Ignition coil.
- Pull out the wire harness from the ig cover.
- Connect a timing light to the wire harness.
Notice:
Use a timing light that detects the first signal.
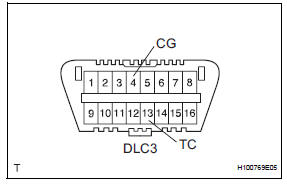
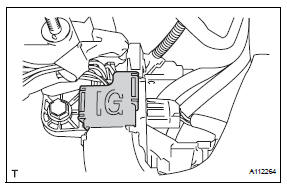
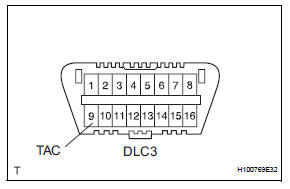
- Using sst, connect terminals 13 (tc) and 4 (cg) of the dlc3.
Sst 09843-18040
- Allow the engine to idle and check the ignition timing.
Standard ignition timing: 8 to 12° btdc @ idle
Hint:
Run the engine at 1,000 to 1,300 rpm for 5 seconds, then check that the engine speed returns to the idling speed.
- Remove sst from the dlc3.
- Allow the engine to idle and check the ignition timing.
Standard ignition timing: 5 to 15° btdc
- Check that the ignition timing advances immediately when the engine speed is increased.
- Turn the ignition switch off.
- Remove the timing light.
- Close the ig cover.
- Install the no. 1 Engine cover (see page em- 43).
- Inspect engine idle speed
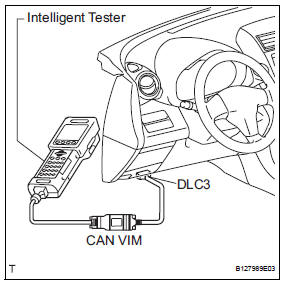
- When using intelligent tester:
- Turn off all the accessories and air conditioning.
- Move the shift lever to p or neutral.
- Connect the intelligent tester to the dlc3.
- Warm up the engine.
- Select the tester menus: diagnosis / enhanced obd ii / data list / primary / engine spd.
- Read engine speed to check the idle speed while the radiator-cooling fan is not rotating.
Standard idle speed: 600 to 700 rpm
- Turn the ignition switch off.
- Disconnect the tester from the dlc3.
- When not using intelligent tester:
- Turn off all the accessories and air conditioning.
- Move the shift lever to p or neutral.
- Connect sst to 9 (tac) of the dlc3 terminal, and then connect a tachometer to sst.
Sst 09843-18030
- Warm up the engine.
- Check the idle speed while the radiator-cooling fan is not rotating.
Standard idle speed: 600 to 700 rpm
- Turn the ignition switch off.
- Remove the tachometer and disconnect sst from the dlc3.
- Inspect compression
- Warm up and stop the engine.
- Remove the no. 1 Engine under cover.
- Remove the 4 ignition coils (see page ig-9).
- Remove the 4 spark plugs.
- Disconnect the 4 fuel injector connectors.
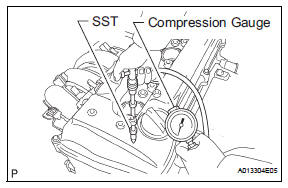
- Set sst and a compression gauge. Sst 09992-00500
- Insert the compression gauge into the spark plug hole.
- While cranking the engine, measure the compression pressure.
Standard compression pressure: 1,300 kpa (13.8 Kgf/cm2, 196 psi)
Minimum pressure: 1,000 kpa (10 kgf/cm2, 142 psi)
Standard difference between each cylinder: 100 kpa (1.0 Kgf/cm2, 14 psi)
Notice:
- Always use a fully charged battery to obtain an engine speed of 250 rpm or more.
- Check the other cylinders' compression pressures in the same way.
- This measurement must be done as quickly as possible.
If the cylinder compression is low, pour a small amount of engine oil into the cylinder through the spark plug hole and inspect again.
Hint:
- If adding oil increases the compression, the piston rings and/or cylinder bore may be worn or damaged.
- If pressure stays low, a valve may be stuck or seated improperly, or there may be leakage in the gasket.
- Connect the 4 fuel injector connectors.
- Install the 4 spark plugs.
Torque: 25 n*m (255 kgf*cm, 18 ft.*Lbf)
- Install the 4 ignition coils (see page ig-9).
- Install the no. 1 Engine under cover.
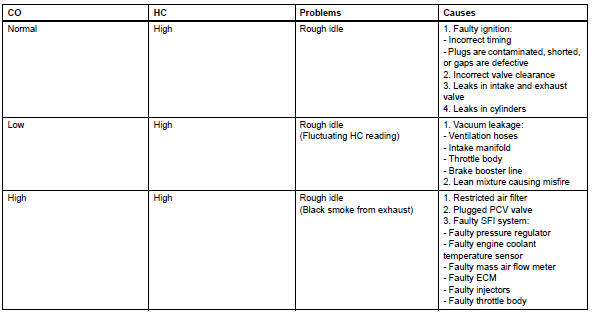
- Inspect co/hc
Hint:
The ecm properly controls the co/hc concentration in the emission gas.
- Start and warm up the engine.
- Start and warm up the engine.
- Insert the co/hc meter testing probe at least 40 cm (1.3 Ft.) Into the tailpipe while idling.
- Inspect the co/hc concentration while idling and/or at 2,500 rpm.
If the co/hc concentration is not as specified, perform troubleshooting.
Hint:
See the table below for possible causes, and then inspect and repair the applicable causes if necessary.

 Drive belt
Components
...
Other materials:
Cruise control system cruise control main switch
Components
Removal
Caution:
Be sure to read the precautionary notices concerning the
srs airbag system before servicing it (see page rs-1).
Disconnect cable from negative battery
terminal
Caution:
Wait at least 90 seconds after disconnecting the
cable from the negative (-) batt ...
Warning lights
Warning lights inform the driver
of malfunctions in the indicated
vehicle's systems.
Brake system warning
light*1
Brake system warning
light*1
Brake system warning
light*1
Charging system warning
light (vehicles without
12.3-inch multi-information
display)*1
Charging system warning
light (vehic ...
Communication
Description
The skid control ecu sends signals such as cruise control cancel demand
signals and brake operation
demand from ecm response signals to the ecm when the cruise control system is in
operation.
Inspection procedure
Hint:
This circuit uses can communication. Therefore, if t ...
