
Toyota RAV4 (XA40) 2013-2018 Owners Manual: Gauges and meters
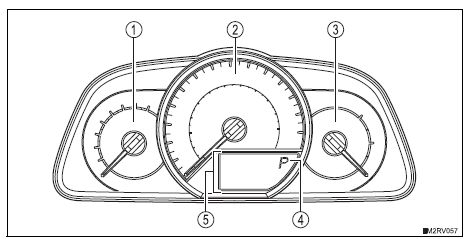
The units used on the speedometer may differ depending on the target region.
- Tachometer
Displays the engine speed in revolutions per minute
- Speedometer
Displays the vehicle speed
- Fuel gauge
Displays the quantity of fuel remaining in the tank
- Shift position and shift range
Displays the selected shift position or selected shift range
- Multi-information display
Presents the driver with a variety of driving-related data
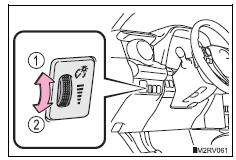
Instrument panel light control
The brightness of the instrument panel lights can be adjusted by turning the dial.
- Brighter
- Darker
Notice
To prevent damage to the engine and its components
Do not let the indicator needle of the tachometer enter the red zone, which indicates the maximum engine speed.
 Warning lights and indicators
The warning lights and indicators on the instrument cluster and
center panel inform the driver of the status of the vehicle’s various
systems.
For the purpose of explanation, the following illu ...
 Multi-information display
Display contents
The multi-information display presents the driver with a variety of driving-
related data including the current outside air temperature.
Outside temperature display
Indicates th ...
Other materials:
Bluetooth®
When using the bluetooth® audio system
In the following conditions, the system may not function.
If the portable audio player is turned off
If the portable audio player is not connected
If the portable audio player’s battery is low
There may be a delay if a cellular phone connection i ...
Diagnosis system
Bus check
Select "bus check" from the "obd / mobd
menu" screen.
Hint:
The ecus and sensors that are properly connected
to the can communication system can be displayed
using the intelligent tester via can vim.
Press "enter" on the intelligen ...
Trailer towing
Your vehicle is designed primarily as a passenger-and-load-carrying
vehicle. Towing a trailer can have an adverse impact on
handling, performance, braking, durability, and fuel consumption.
For your safety and the safety of others, you must not overload
your vehicle or trailer. You must also e ...
