Toyota RAV4 (XA50) 2019-2026 Owners Manual: Gauges and meters (with 7- inch multi-information display)
The meters display various drive information.
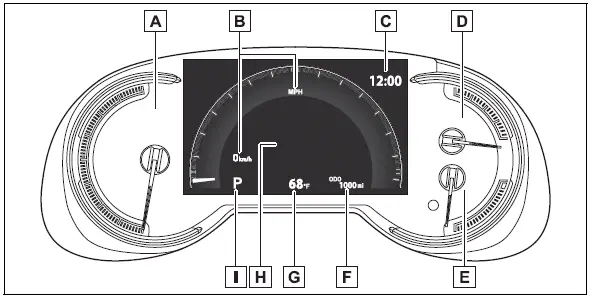
Meter display
The display of the speedometer can be selected from two types, analog or digital.
Analog speedometer
The units used on the meter and display may differ depending on the target region.
- Tachometer
Displays the engine speed in revolutions per minute - Speedometer
Displays the vehicle speed - Clock
Automatically adjusts the time by using the GPS time information (GPS clock).For details, refer to "MULTIMEDIA OWNER'S MANUAL".
- Fuel gauge
Displays the quantity of fuel remaining in the tank.In the following situations, the actual quantity of fuel remaining in the tank may not be displayed correctly.
- A small amount of fuel is added.
- Fuel is added with the fuel gauge near or at "F".
- The vehicle is stopped on an uneven surface, such as a slope.
- The vehicle is driven on a slope or around a curve.
- Engine coolant temperature gauge Displays the engine coolant temperature
- Odometer and trip meter
Odometer:
Displays the total distance that the vehicle has been driven Trip meter:
Displays the distance the vehicle has been driven since the meter was last reset. Trip meters "A" and "B" can be used to record and display different distances independently. - Outside temperature
- Multi-information display Presents the driver with a variety of driving-related data Displays warning messages if a malfunction occurs
- Shift position and shift range indicator Displays the selected shift position or selected shift range
Digital speedometer
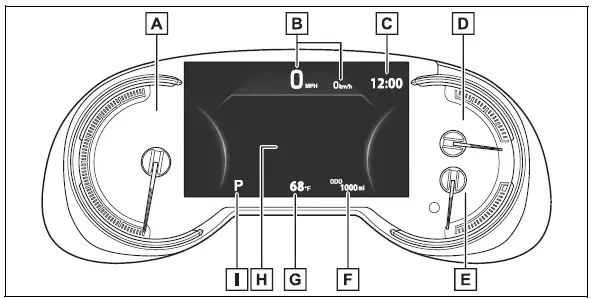
The units used on the meter and display may differ depending on the target region.
- Tachometer
Displays the engine speed in revolutions per minute - Speedometer
Displays the vehicle speed - Clock
Automatically adjusts the time by using the GPS time information (GPS clock).For details, refer to "MULTIMEDIA OWNER'S MANUAL".
- Fuel gauge
Displays the quantity of fuel remaining in the tank.In the following situations, the actual quantity of fuel remaining in the tank may not be displayed correctly.
- A small amount of fuel is added.
- Fuel is added with the fuel gauge near or at "F".
- The vehicle is stopped on an uneven surface, such as a slope.
- The vehicle is driven on a slope or around a curve.
- Engine coolant temperature gauge Displays the engine coolant temperature
- Odometer and trip meter
Odometer:
Displays the total distance that the vehicle has been driven Trip meter:
Displays the distance the vehicle has been driven since the meter was last reset. Trip meters "A" and "B" can be used to record and display different distances independently. - Outside temperature
- Multi-information display Presents the driver with a variety of driving-related data Displays warning messages if a malfunction occurs
- Shift position and shift range indicator Displays the selected shift position or selected shift range
â– The meters and display illuminate when
The engine switch is in ON.
â– When changing driving mode
- Speedometer color is changed following the selected driving mode.
- AWD models: Speedometer color is changed following the selected driving mode or Multi-terrain Select mode.
â– Manually updating the fuel gauge and possible driving range
The fuel gauge and the possible driving range are linked. If the displays of the fuel gauge and possible driving range do not update after adding a small amount of fuel, the displays can be updated by performing the following procedure.
1. Stop the vehicle on a level surface.
2. Press the "ODO TRIP" switch to change the odometer and trip meter display to odometer.
3. Turn the engine switch off.
4. While pressing and holding the "ODO TRIP" switch, turn the engine switch to ON.
5. Continue to hold the "ODO TRIP" switch for approximately 5 seconds, and then release it once the odometer begins flashing.
Updating is complete once the odometer flashes for approximately 5 seconds and then the display returns to normal.
â– Outside temperature display
- In the following situations, the correct
outside temperature may not
be displayed, or the display may
take longer than normal to
change.
- When stopped, or driving at low speeds (less than 12 mph [20 km/h] )
- When the outside temperature has changed suddenly (at the entrance/exit of a garage, tunnel, etc.)
- When "--" or "E" is displayed, the
system may be malfunctioning.
Take your vehicle to your Toyota dealer.
- Displays the outside temperature within the range of -40ÂşF (-40ÂşC) to 122ÂşF (50ÂşC).
- When the outside temperature is
approximately 37ÂşF (3ÂşC) or
lower, the indicator
 will flash
for approximately 10 seconds, then stay on.
â– Customization
Settings (e. g. meter display) can be changed on the
 screen of the
multi-information display.
WARNING
â– The information display at low temperatures
Allow the interior of the vehicle to warm up before using the liquid crystal information display. At extremely low temperatures, the display monitor may respond slowly, and display changes may be delayed.
For example, there is a lag between the driver's shifting and the new gear number appearing on the display. This lag could cause the driver to downshift again, causing rapid and excessive engine braking and possibly an accident resulting in death or injury.
NOTICE
â– To prevent damage to the engine and its components
- Do not let the indicator needle of the tachometer enter the red zone, which indicates the maximum engine speed.
- The engine may be overheating if the engine coolant temperature gauge is in the red zone ("H"). In this case, immediately stop the vehicle in a safe place, and check the engine after it has cooled completely.
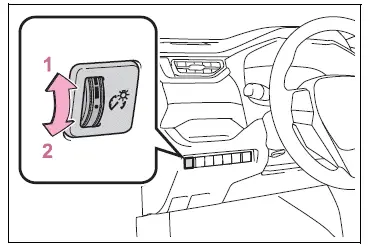
Using the "ODO TRIP" switch
Switches the items of the odometer, trip meter A and trip meter B by pressing the "ODO TRIP" switch.
When the trip meter is displayed, pressing and holding the switch will reset the trip meter.
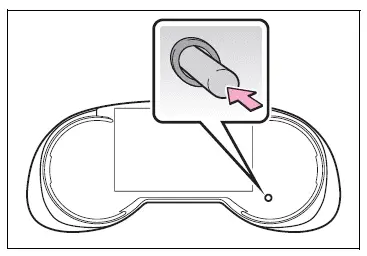
Instrument panel light control
The brightness of the instrument panel lights can be adjusted by turning the dial.
- Brighter
- Darker
â– Instrument panel brightness adjustment
The instrument panel brightness levels when the tail lights are on and off can be adjusted individually.
However, when the surroundings are bright (daytime, etc.), turning on the tail lights will not change the instrument panel brightness.
 Indicators
The indicators inform the driver
of the operating state of the
vehicle's various systems.
Turn signal indicator
Headlight indicator
Tail light indicator
Headlight high beam indicator
Automatic Hi ...
 Gauges and meters (with 12.3-inch multi-information display)
The meters display various drive information.
Meter display
â– Locations of gauges and meters
The meter type can be changed on
of the multi-information display.
Type 1/Type 2
The units of measure ...
Other materials:
Front stabilizer bar
Components
Removal
Remove front wheel
Remove front stabilizer link assembly lh
Remove the 2 nuts and stabilizer link.
Remove front stabilizer link assembly rh
Hint:
Use the same procedures described for the lh side.
Remove front suspension member brace front lh
...
Inspection
Inspect engine coolant temperature sensor
Measure the resistance of the sensor.
Standard resistance
Notice:
If checking the sensor in water, be careful not to
allow water to contact the terminals. After
checking, wipe the water off the sensor.
If the result is not as specified, ...
Parts location
System diagram
...
