Toyota RAV4 (XA40) 2013-2018 Owners Manual: Light bulbs
You may replace the following bulbs by yourself. The difficulty level of replacement varies depending on the bulb. If necessary bulb replacement seems difficult to perform, contact your toyota dealer.
For more information about replacing other light bulbs, contact your toyota dealer.
Preparing for light bulb replacement
Check the wattage of the light bulb to be replaced.
Bulb locations
Front
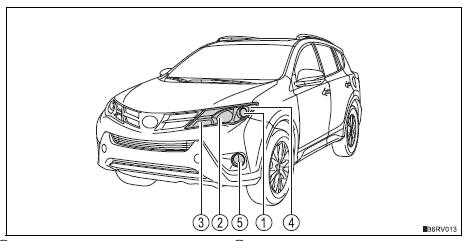
- Headlight low beam
- Daytime running light/headlight high beam
- Front turn signal light/parking light
- Front side marker light
- Fog light (if equipped)
Rear
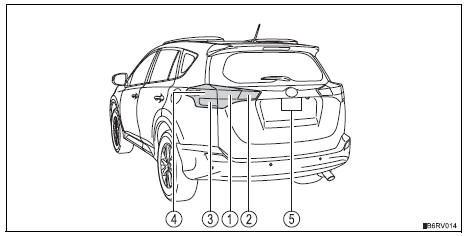
- Tail light
- Back-up light
- Rear turn signal light
- Stop/tail light and rear side marker light
- License plate lights
Replacing light bulbs
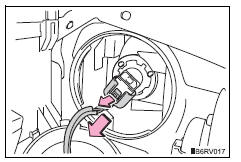
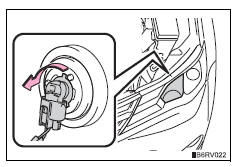
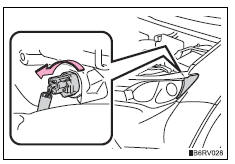
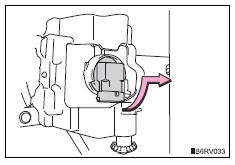
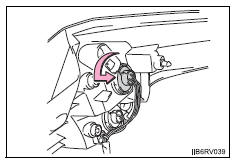
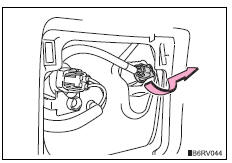
Headlight low beams
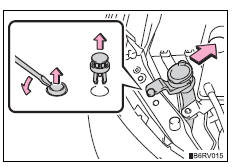
- For the right side only:
remove the securing clip.
Then move the washer tank inlet.
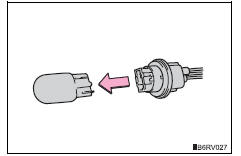
- Disconnect the connector and turn the cover counterclockwise.
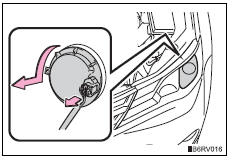
- Unplug the connector while pulling the lock release.
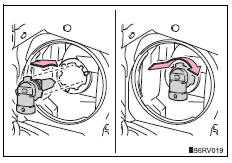
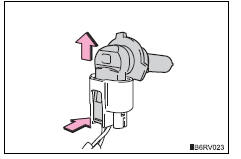
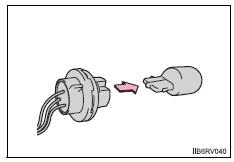
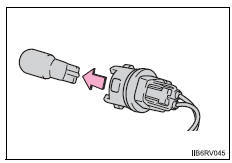
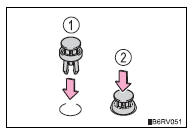
- Turn the bulb base counterclockwise.

- Set the new light bulb.
Align the 3 tabs on the light bulb with the mounting, and insert.
Turn it clockwise to set.
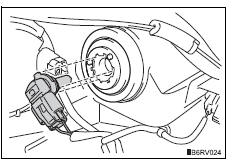
- Set the connector.
After installing the connector, shake the bulb base gently to check that it is not loose.
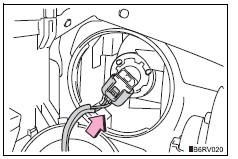
- Set the connector and install the cover.
Before installing the cover, turn the headlight low beams on once and visually confirm that no light is leaking through the mounting.
- For the right side only: move the washer tank inlet and install the securing clip.
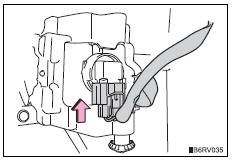
Daytime running lights/headlight high beams
- For the right side only: remove the securing clip. Then move the washer tank inlet.
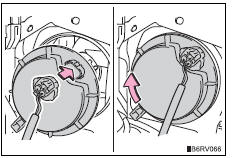
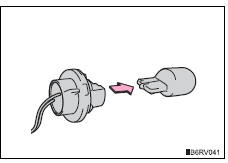
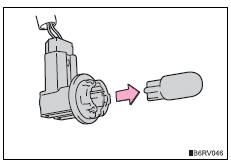
- Turn the bulb base counterclockwise.
- Unplug the connector while pressing the lock release.
- Replace the light bulb, and install the bulb base.
Align the 3 tabs on the light bulb with the mounting, and insert.
- Turn and secure the bulb base.
Shake the bulb base gently to check that it is not loose, turn the headlights on once and visually confirm that no light is leaking through the mounting.

- For the right side only: move the washer tank inlet and install the securing clip.
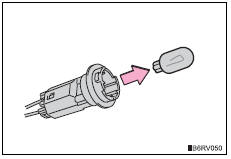
Front turn signal lights/parking lights
- Turn the bulb base counterclockwise.
- Remove the light bulb.
- When installing, reverse the steps listed.
Front side maker lights
- Turn the bulb base counterclockwise.
- Remove the light bulb.

- When installing, reverse the steps listed.
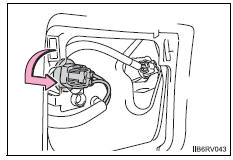
Fog lights (if equipped)
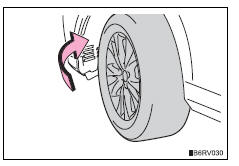
- To allow enough working space, turn the steering wheel to the opposite side of the bulb to be replaced.
Turn the steering wheel to the left when replacing the right side light bulb, and turn the steering wheel to the right when replacing the left side light bulb.
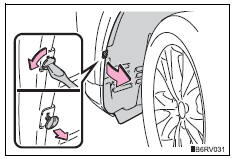
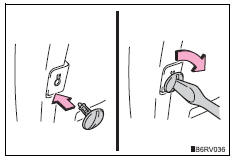
- Remove the fender liner clip and open the fender liner.
- Unplug the connector while pressing the lock release.

- Turn the bulb base counterclockwise.
- Set the new light bulb.
Align the 3 tabs on the light bulb with the mounting, and insert.
Turn it clockwise to set.

- Set the connector.
After installing the connector, shake the bulb base gently to check that it is not loose, turn the fog lights on once and visually confirm that no light is leaking through the mounting.
- Reinstall the fender liner and
install the clip.
Insert the clip and turn to lock.
Stop/tail lights and rear side marker lights, and rear turn signal lights
- Open the back door and remove the bolts, and remove the lamp assembly by pulling it directly backward from the rear of the vehicle.
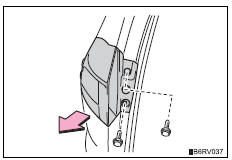
- Turn the bulb base counterclockwise.
Stop/tail lights and rear side marker lights
Rear turn signal lights

- Remove the light bulb.
Stop/tail lights and rear side marker lights
Rear turn signal lights
- When installing, reverse the steps listed.
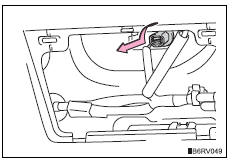
Tail lights and back-up lights
- Open the back door and remove the cover.

To prevent damage, cover the tip of the screwdriver with rag.
- Turn the bulb base counterclockwise.
Tail lights
Back-up lights
- Remove the light bulb.
Tail lights
Back-up lights
- When installing, reverse the steps listed.
License plate lights
- Open the back door and remove the cover.
To prevent damage, cover the tip of the screwdriver with rag.
- Turn the bulb base counterclockwise.
Left side
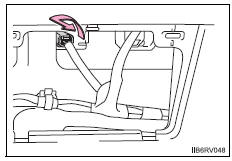
Right side
- Remove the light bulb.
- When installing, reverse the steps listed.
If any of the lights listed below has burnt out, have it replaced by your toyota dealer.
- Side turn signal lights (if equipped)
- High mounted stoplight
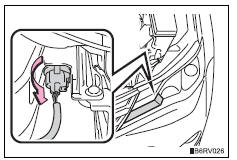
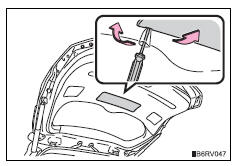
After moving the washer tank inlet
After replacing the bulbs, return the washer tank inlet to its original position with the clip.
- Insert
- Press
Led lights
The side turn signal lights (if equipped) and high mounted stoplight consist of a number of leds. If any of the leds burn out, take your vehicle to your toyota dealer to have the light replaced.
Condensation build-up on the inside of the lens
Temporary condensation build-up on the inside of the headlight lens does not indicate a malfunction.
Contact your toyota dealer for more information in the following situations:
- Large drops of water have built up on the inside of the lens.
- Water has built up inside the headlight.
Caution
Replacing light bulbs
- Turn off the lights. Do not attempt to replace the bulb immediately
after
turning off the lights.
The bulbs become very hot and may cause burns.
- Do not touch the glass portion of the light bulb with bare hands. When
it is
unavoidable to hold the glass portion, use and hold with a clean dry cloth
to avoid getting moisture and oils on the bulb.
Also, if the bulb is scratched or dropped, it may blow out or crack.
- Fully install light bulbs and any parts used to secure them. Failure to do so may result in heat damage, fire, or water entering the headlight unit. This may damage the headlights or cause condensation to build up on the lens.
- Do not attempt to repair or disassemble light bulbs, connectors,
electric
circuits or component parts.
Doing so may result in death or serious injury due to electric shock.
To prevent damage or fire
- Make sure bulbs are fully seated and locked.
- Check the wattage of the bulb before installing to prevent heat damage.
 Checking and replacing
fuses
Checking and replacing
fuses
If any of the electrical components do not operate, a fuse may
have blown. If this happens, check and replace the fuses as necessary.
Vehicles without a smart key system:
turn the engine switch ...

Other materials:
Front airbag sensor lh circuit malfunction
Description
The front airbag sensor lh consists of the diagnostic circuit, the frontal
deceleration sensor, etc.
If the center airbag sensor receives signals from the frontal deceleration
sensor, it determines whether or
not the srs should be activated.
Dtc b1615/14 is recorded when a ma ...
Brake switch "A" / "B" correlation
Description
The stop light switch is a duplex system that transmits two signals: stp and
st1-. These two signals are
used by the ecm to monitor whether or not the brake system is working properly.
If the signals, which
indicate the brake pedal is being depressed and released, are detected ...
Stuck in deceleration sensor
Description
The skid control ecu receives signals from the yaw rate and deceleration
sensor via the can
communication system.
The yaw rate sensor has a built-in deceleration sensor and detects the vehicle's
condition using 2 circuits
(gl1: g sensor 1, gl2: g sensor 2).
If there is t ...
