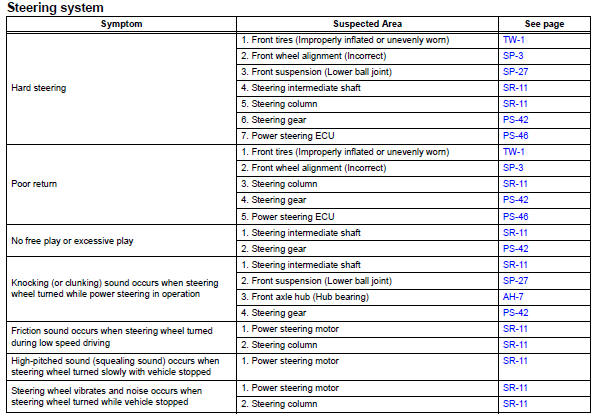
Toyota RAV4 (XA40) 2013-2018 Service Manual: Problem symptoms table (2006/01- )
Hint:
Use the table below to help determine the cause of the problem symptom. The potential causes of the symptoms are listed in order of probability in the "suspected area" column of the table. Check each symptom by checking the suspected areas in the order they are listed. Replace parts as necessary.
On-vehicle inspection
- Check steering wheel free play
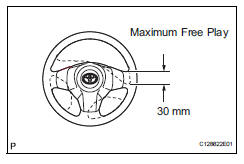
- Stop the vehicle and align the tires facing straight ahead.
- Turn the steering wheel gently right and left, and check the steering wheel free play.
Maximum free play: 30 mm (1.18 In.)
If the free play exceeds the maximum, replace the steering intermediate shaft sub-assembly or steering gear.
Repair
- Correct steering off center
- Check whether the steering wheel is off-center.
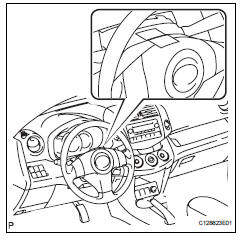
- Apply masking tape to the top center of the steering wheel and the upper steering column cover.
- Drive the vehicle in a straight line for 100 meters at a constant speed of 56 km/h (35 mph), holding the steering wheel to maintain the course.
- Draw a line on the masking tape, as shown in the illustration.
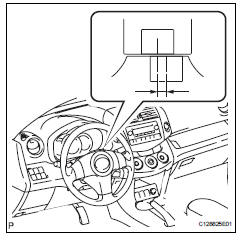
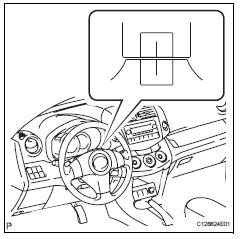
- Turn the steering wheel to the center position.
Hint:
Look at the upper surface of the steering wheel, the steering spokes and the srs airbag line to determine the center position.
- Draw another line on the masking tape on the steering wheel, as shown in the illustration.
- Measure the distance between the 2 lines on the masking tape on the steering wheel.
- Convert the measured distance to the steering angle.
Hint:
- Measured distance of 1 mm (0.04 In.) =Approximately 1 degree steering angle.
- Make a note of the steering angle.
- Adjust the steering angle.
- For the following 2steps, carry out the rh and lh procedures separately.
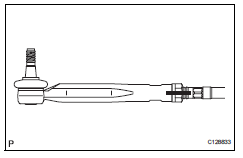
- Draw a line on the tie rod and rack end where it can easily be seen.
- Using a paper gauge, measure the distance between the tie rod end and the rack end screw.
- Remove the rh and lh boot clips from the rack boots.
- Loosen the rh and lh lock nuts.
- Turn the rh and lh rack ends by the same amount (but in opposite directions) in accordance with the steering angle.
Hint:
Electronic power steering: 1 turn (360Đ© of rack end (1.5 Mm (0.059 In.) Horizontal movement) - 10.8Đ Of steering angle.
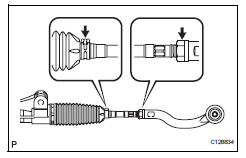
- Tighten the rh and lh lock nuts.
Torque: 88 n*m (897 kgf*cm, 65 ft.*Lbf)
Notice:
Make sure that the difference in length between the rh and lh tie rod ends and rack end screws is less than 1.5 Mm (0.059 In.).
- Install the rh and lh boot clips.
 Problem symptoms table (2005/11-2006/01)
Hint:
Use the table below to help determine the cause of the
problem symptom. The potential causes of the symptoms are
listed in order of probability in the "suspected area" column
of th ...
 Steering column assembly
Components
Removal
Caution:
Some of these service operations affect the srs airbag
system. Read the precautionary notices concerning the
srs airbag system before servicing ...
Other materials:
All-wheel drive lock
switch (awd models)
All-wheel drive lock mode can be used when a large amount of
drive power needs to be applied to all the wheels, such as when
the vehicle gets stuck in mud and you need to free it.
Press the switch.
The torque of the engine is distributed
to the rear wheels to the maximum
extent possible in
ac ...
How to proceed with troubleshooting
Hint:
Use these procedures to troubleshoot the cruise control
system.
*: Use the intelligent tester.
Vehicle brought to workshop
Inspect battery voltage
Standard voltage:
11 to 14 v
If the voltage is below 11 v, recharge or replace the battery
before proceeding.
Che ...
Removal (2005/11-2006/01)
Disconnect cable from negative battery
terminal
Caution:
Wait at least 90 seconds after disconnecting the
cable from the negative (-) battery terminal to
prevent airbag and seat belt pretensioner activation.
Remove roof headlining assembly
Remove the roof headlining (see page ir ...
