Toyota RAV4 (XA40) 2013-2018 Service Manual: Rear wiper motor
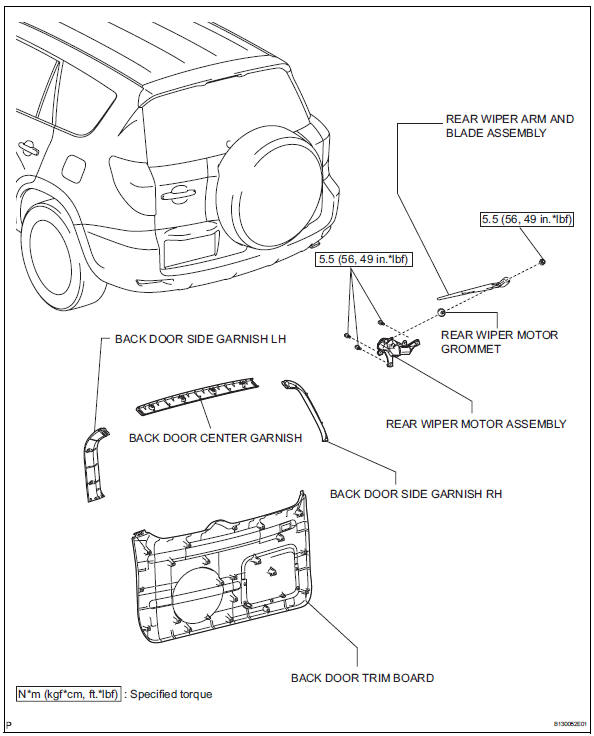
Components
Removal
- Disconnect cable from negative battery terminal
Caution:
Wait at least 90 seconds after disconnecting the cable from the negative (-) battery terminal to prevent airbag and seat belt pretensioner activation.
- Remove back door center garnish (see page ed-59)
- Remove back door side garnish lh (see page ed-59)
- Remove back door side garnish rh (see page ed-59)
- Remove back door trim board (see page ed- 59)
- Remove rear wiper arm and blade assembly
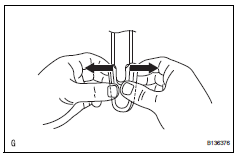
- Widen each end of the cap 5 mm (0.19In).
- Lift the both widened ends of the cap.
- Rotate the cap. Fix the cap in place.
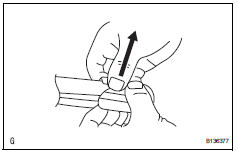
- Remove the nut and arm and blade.
- Remove rear wiper motor grommet
- Remove rear wiper motor assembly
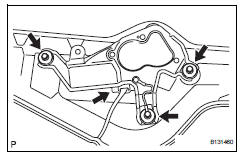
- Disconnect the connector.
- Remove the 3 bolts and wiper motor.
Inspection
- Inspect rear wiper motor
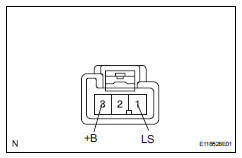
- Connect the battery's positive (+) lead to terminal 3 (+b) and the negative (-) lead to terminal 1 (ls).
- Check that the rear wiper motor operates.
Ok: rear wiper motor operates.
Notice:
Check that the body ground is connected.
If the result is not as specified, replace the motor.
Installation
- Install rear wiper motor assembly
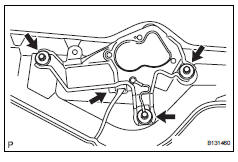
- Install the wiper motor with the 3 bolts.
Torque: 5.5 N*m (56 kgf*cm, 49 in.*Lbf)
- Connect the connector.
- Install rear wiper motor grommet
- Install rear wiper arm and blade assembly
- Stop the wiper motor at the automatic stop position.
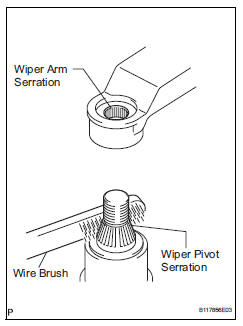
- Clean the wiper arm serration with a round file or equivalent.
- Clean the wiper pivot serration with a wire brush.
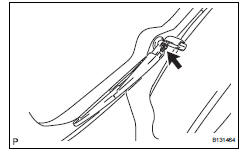
- Install the arm and blade with the nut. Make sure that the arm and blade comes to the position shown in the illustration.
Torque: 5.5 N*m (56 kgf*cm, 49 in.*Lbf)
Hint:
- Hold down the arm hinge by hand while tightening the nut.
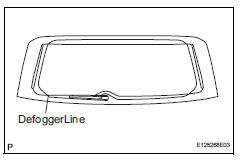
- Install the arm and blade so that the rear wiper blade is aligned with the ceramic line.
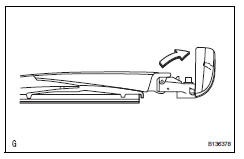
- Install the cap.
- Install back door trim board assembly (see page ed-66)

- Install back door side garnish rh (see page ed-67)
- Install back door side garnish lh (see page ed-67)
- Install back door center garnish (see page ed-67)
- Connect cable to negative battery terminal
 Front wiper rubber
Components
Removal
Remove front wiper blade
Detach the claw as shown in the illustration.
Remove the wiper blade as shown in the illustration.
Notice:
Do not fold ...
 Rear wiper rubber
Components
Removal
Remove rear wiper blade assembly
Rotate and remove the cap as described in the
"remove" procedures.
Raise the arm and blade.
Raise the wip ...
Other materials:
Removal
Hint:
Use the same procedures for the rh side and lh side.
The procedures listed below are for the lh side.
Disconnect cable from negative battery
terminal
Caution:
Wait at least 90 seconds after disconnecting the
cable from the negative (-) battery terminal to
prevent airbag and ...
Installing child restraints using a seat belt (child restraint lock
function belt)
Rear-facing „o infant seat/convertible seat
Adjust the seatback to the
8th lock position from the
fully reclined position.
Fully reclined position
8Th lock position
If your child restraint system interferes with a head restraint and
cannot be installed properly, install the ...
Removal (2005/11-2006/01)
Disconnect cable from negative battery
terminal
Caution:
Wait at least 90 seconds after disconnecting the
cable from the negative (-) battery terminal to
prevent airbag and seat belt pretensioner activation.
Remove front door scuff plate lh
Using a screwdriver, detach the 10 cla ...
