Toyota RAV4 (XA40) 2013-2018 Service Manual: Removal (2005/11-2006/01)
- Disconnect cable from negative battery terminal
Caution:
Wait at least 90 seconds after disconnecting the cable from the negative (-) battery terminal to prevent airbag and seat belt pretensioner activation.
- Remove roof headlining assembly
- Remove the roof headlining (see page ir-26).
- Remove sliding roof side garnish lh

- Using a screwdriver, detach the claws and remove the garnish.
Hint:
Tape the screwdriver tip before use.
- Remove sliding roof side garnish rh
Hint:
Use the same procedures described for the lh side.
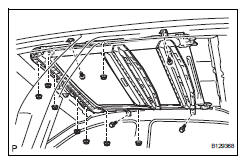
- Remove sliding roof glass sub-assembly
- Using a t25 "torx" driver, remove the 4 screws and glass.
- Pull the glass upward to remove it.
- Remove sliding roof weatherstrip
- Disconnect sliding roof drain hose
- Disconnect the 4 drain hoses.
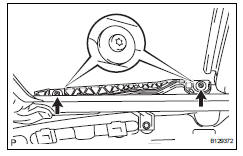
- Remove sliding roof housing assembly
- Remove the 4 bolts, 8 nuts and housing.
Notice:
Be careful not to damage the curtain shield airbag when removing the housing.

 Removal (2006/01- )
Disconnect cable from negative battery
terminal
Caution:
Wait at least 90 seconds after disconnecting the
cable from the negative (-) battery terminal to
prevent airbag and seat belt preten ...
Other materials:
Mechanical system tests
Stall speed test
Hint:
This test is to check the overall performance of the
engine and transaxle.
Notice:
Do not perform the stall speed test longer than 5
seconds.
To ensure safety, perform this test in an open and
level area that provides good traction.
The stall speed test sh ...
Knock sensor 1 circuit
Description
Flat type knock sensors (non-resonant type) have structures that can detect
vibrations over a wide band
of frequencies: between approximately 6 khz and 15 khz.
A knock sensor is fitted onto the engine block to detect engine knocking.
The knock sensor contains a piezoelectri ...
Light bulbs
You may replace the following
bulbs by yourself. The
difficulty level of replacement
varies depending on
the bulb. If necessary bulb
replacement seems difficult
to perform, contact your
Toyota dealer.
For more information about
replacing other light bulbs,
contact your Toyota dealer.
Preparing for ...
