Toyota RAV4 (XA40) 2013-2018 Service Manual: Removal (2005/11-2006/01)
- Remove front wheel
- Drain automatic transaxle fluid
- Drain the automatic transaxle fluid for u140f (see page ax-147).
- Drain the automatic transaxle fluid for u241e (see page ax-146).
- Remove front axle hub nut (see page ah-6)
- Disconnect front speed sensor lh
- Disconnect the speed sensor (see page bc-191).
- Disconnect front speed sensor rh
Hint:
Use the same procedures described for the lh side.
- Disconnect front disc brake cylinder assembly lh (see page br-40)
- Disconnect front disc brake caliper assembly rh
Hint:
Use the same procedures described for the lh side.
- Remove front stabilizer link assembly lh (see page sp-30)
- Remove front stabilizer link assembly rh
Hint:
Use the same procedures described for the lh side.
- Disconnect front suspension lower no. 1 Arm sub-assembly lh (see page ah-7)
- Disconnect front suspension lower no. 1 Arm sub-assembly rh
Hint:
Use the same procedures described for the lh side.
- Disconnect steering knuckle with axle hub lh

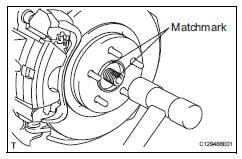
- Put matchmarks on the drive shaft and axle hub.
Notice:
Do not punch the marks.
- Using a plastic-faced hammer, disconnect the steering knuckle with axle hub.
Notice:
Be careful not to damage the boot and speed sensor rotor.
Do not excessively push out the drive shaft from the axle assembly.
- Disconnect steering knuckle with axle hub rh
Hint:
Use the same procedures described for the lh side.
- Disconnect tie rod end sub-assembly lh (see page ps-42)
- Disconnect tie rod end sub-assembly rh
Hint:
Use the same procedures described for the lh side.
- Remove front drive shaft assembly
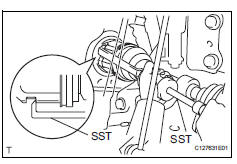
lh

- Using sst, remove the front drive shaft.
Sst 09520-01010, 09520-24010 (09520-32040)
Notice:
- Be careful not to damage the transaxle case oil seal, inboard joint boot and drive shaft dust cover.
- Be careful not to drop the drive shaft.
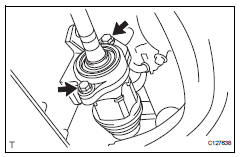
- Remove front drive shaft assembly rh

- Remove the 2 bolts and pull out the drive shaft together with the drive shaft bearing case.
- Remove the drive shaft from the transaxle.
Notice:
- Be careful not to damage the inboard joint boot and drive shaft dust cover.
- Be careful not to drop the drive shaft.
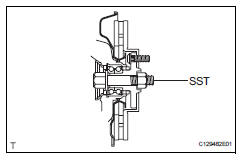
- Fix front axle assembly

Notice:
The hub bearing could be damaged if it is subjected to the vehicle weight, such as when moving the vehicle with the drive shaft removed. Therefore, if it is absolutely necessary to place the vehicle weight on the hub bearing, first support it with sst.
Sst 09608-16042 (09608-02021, 09608-02041)
 Front drive shaft assembly (for 2wd)
Components (2005/11-2006/01)
Components (2006/01- )
...
 Removal
(2006/01- )
Remove front wheel
Drain automatic transaxle fluid
Drain the automatic transaxle fluid for u140f (see
page ax-147).
Drain the automatic transaxle fluid for u241e (see
page ax-146).
...
Other materials:
Ig2 relay
On-vehicle inspection
Disconnect cable from negative battery
terminal
Caution:
Wait at least 90 seconds after disconnecting the
cable from the negative (-) battery terminal to
prevent airbag and seat belt pretensioner activation.
Remove ig2 relay
Remove the no. 1 Engine room re ...
Disassembly
Caution:
Wear protective gloves. Sharp areas on the seat frame
(with adjuster) may injure your hands.
Remove reclining power seat switch knob
Using a screwdriver, detach the knob.
Hint:
Tape the screwdriver tip before use.
Remove slide and vertical power seat switch knob
...
Removal
Discharge fuel system pressure (see page
fu-9)
Disconnect cable from negative battery
terminal
Caution:
Wait at least 90 seconds after disconnecting the
cable from the negative (-) battery terminal to
prevent airbag and seat belt pretensioner activation.
Remove hood sub-assembly ( ...
